Shiro+Redis实现登录次数冻结的示例
概述
假设我们需要有这样一个场景:如果用户连续输错5次密码,那可能说明有人在搞事情,所以需要暂时冻结该账户的登录功能
关于Shiro整合JWT,可以看这里:Springboot实现Shiro+JWT认证
假设我们的项目中用到了shiro,因为Shiro是建立在完善的接口驱动设计和面向对象原则之上的,支持各种自定义行为,所以我们可以结合Shiro框架的认证模块和redis来实现这个功能。
思路
我们大体的思路如下:
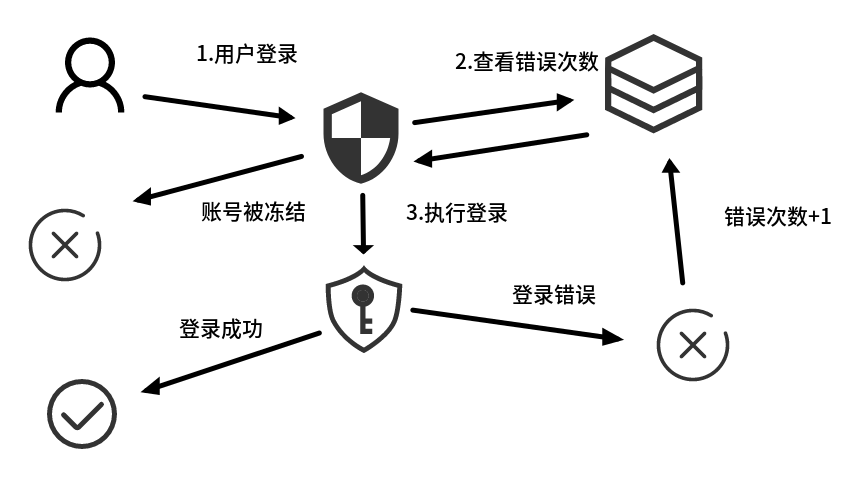
- 用户登录
- Shiro去Redis检查账户的登录错误次数是否超过规定范围(超过了就是所谓的冻结)
- Shiro进行密码比对
- 如果登录失败,则去Redis里记录:登录错误次数+1
- 如果密码正确,则登录成功,删除Redis里的登录错误记录
前期准备
除了需要用到Shiro以外,我们也需要用到Redis,这里需要先配置好RedisTemplate,(由于这个不是重点,我就把代码和配置方法贴在文章的最后了),另外,在Controller层,登录接口的异常处理除了之前的登录错误,还需要新增一个账户冻结类的异常,代码如下:
 @PostMapping(value = "/login")
 public AccountVO login(String userName, String password){

  //尝试登录
  Subject subject = SecurityUtils.getSubject();
  try {
   //通过shiro提供的安全接口来进行认证
   subject.login(new UsernamePasswordToken(userName, password));
  } catch (ExcessiveAttemptsException e1) {
   //新增一个账户锁定类错误
   throw new AccountLockedException();
  } catch (Exception e) {
   //其他的错误判定
   throw new LoginFailed();
  }
  //聚合登录信息
  AccountVO account = accountService.getAccountByUserName(userName);
  //返回正确登录的结果
  return account;
 }
自定义Shiro认证管理器
HashedCredentialsMatcher
当你在上面的Controller层调用subject.login方法后,会进入到自定义的Realm里去,然后慢慢进入到Shiro当前的Security Manager里定义的HashedCredentialsMatcher认证管理器的doCredentialsMatch方法,进行密码匹配,原版代码如下:
 /**
  * This implementation first hashes the {@code token}'s credentials, potentially using a
  * {@code salt} if the {@code info} argument is a
  * {@link org.apache.shiro.authc.SaltedAuthenticationInfo SaltedAuthenticationInfo}. It then compares the hash
  * against the {@code AuthenticationInfo}'s
  * {@link #getCredentials(org.apache.shiro.authc.AuthenticationInfo) already-hashed credentials}. This method
  * returns {@code true} if those two values are {@link #equals(Object, Object) equal}, {@code false} otherwise.
  *
  * @param token the {@code AuthenticationToken} submitted during the authentication attempt.
  * @param info the {@code AuthenticationInfo} stored in the system matching the token principal
  * @return {@code true} if the provided token credentials hash match to the stored account credentials hash,
  *   {@code false} otherwise
  * @since 1.1
  */
 @Override
 public boolean doCredentialsMatch(AuthenticationToken token, AuthenticationInfo info) {
  Object tokenHashedCredentials = hashProvidedCredentials(token, info);
  Object accountCredentials = getCredentials(info);
  return equals(tokenHashedCredentials, accountCredentials);
 }
可以发现,原版的逻辑很简单,就做了两件事,获取密码,比对密码。
由于我们需要联动Redis,在每次登录前都做一次冻结检查,每次遇到登录失败之后还需要实现对redis的写操作,所以现在需要重写一个认证管理器去配置到Security Manager里。
CustomMatcher
我们自定义一个CustomMatcher,这个类继承了HashedCredentialsMatcher,唯独重写了doCredentialsMatch方法,在这里面加入了我们自己的逻辑,代码如下:
import com.imlehr.internship.redis.RedisStringService;
import org.apache.shiro.authc.AuthenticationInfo;
import org.apache.shiro.authc.AuthenticationToken;
import org.apache.shiro.authc.ExcessiveAttemptsException;
import org.apache.shiro.authc.UsernamePasswordToken;
import org.apache.shiro.authc.credential.HashedCredentialsMatcher;
import org.springframework.beans.factory.annotation.Autowired;

/**
 * @author Lehr
 * @create: 2020-02-25
 */
public class CustomMatcher extends HashedCredentialsMatcher {

	//这个是redis里的key的统一前缀
 private static final String PREFIX = "USER_LOGIN_FAIL:";

 @Autowired
 RedisStringService redisUtils;

 @Override
 public boolean doCredentialsMatch(AuthenticationToken token, AuthenticationInfo info) {

  //检查本账号是否被冻结

  //先获取用户的登录名字
  UsernamePasswordToken myToken = (UsernamePasswordToken) token;

  String userName = myToken.getUsername();

  //初始化错误登录次数
  Integer errorNum = 0;

  //从数据库里获取错误次数
  String errorTimes = (String)redisUtils.get(PREFIX+userName);

  if(errorTimes!=null && errorTimes.trim().length()>0)
  {
   //如果得到的字符串不为空不为空
   errorNum = Integer.parseInt(errorTimes);
  }

  //如果用户错误登录次数超过十次
  if (errorNum >= 10) {
   //抛出账号锁定异常类
   throw new ExcessiveAttemptsException();
  }

  //先按照父类的规则来比对密码
  boolean matched = super.doCredentialsMatch(token, info);

  if(matched)
  {
   //清空错误次数
   redisUtils.remove(PREFIX+userName);
  }
  else{
   //添加一次错误次数 秒为单位
   redisUtils.set(PREFIX+userName,String.valueOf(++errorNum),60*30L);
  }

  return matched;
 }
}
首先,我们从AuthenticationToken里面拿到之前存入的用户的登录信息,这个对象其实就是你在Controller层
subject.login(new UsernamePasswordToken(userName, password));
这一步里面你实例化的对象
然后,通过用户的登录名加上固定前缀(为了防止防止userName和其他主键冲突)去Redis里获取到错误次数。判断账户是否被冻结的逻辑其实就是看当前用户的错误登录次数是否超过某个规定值,这里我们定为5次。
接下来,说明用户没有被冻结,可以执行登录操作,所以我们就直接调用父类的验证方法来进行密码比对(就是之前提到的那三行代码),得到密码的比对结果
如果比对一致,那么就成功登录,返回true即可,也可以选择一旦登录成功,就消除所有错误次数记录,上面的代码就是这样做的。
如果对比结果不一样,那就再添加一次错误记录,然后返回false
测试
第一次登录:页面结果:
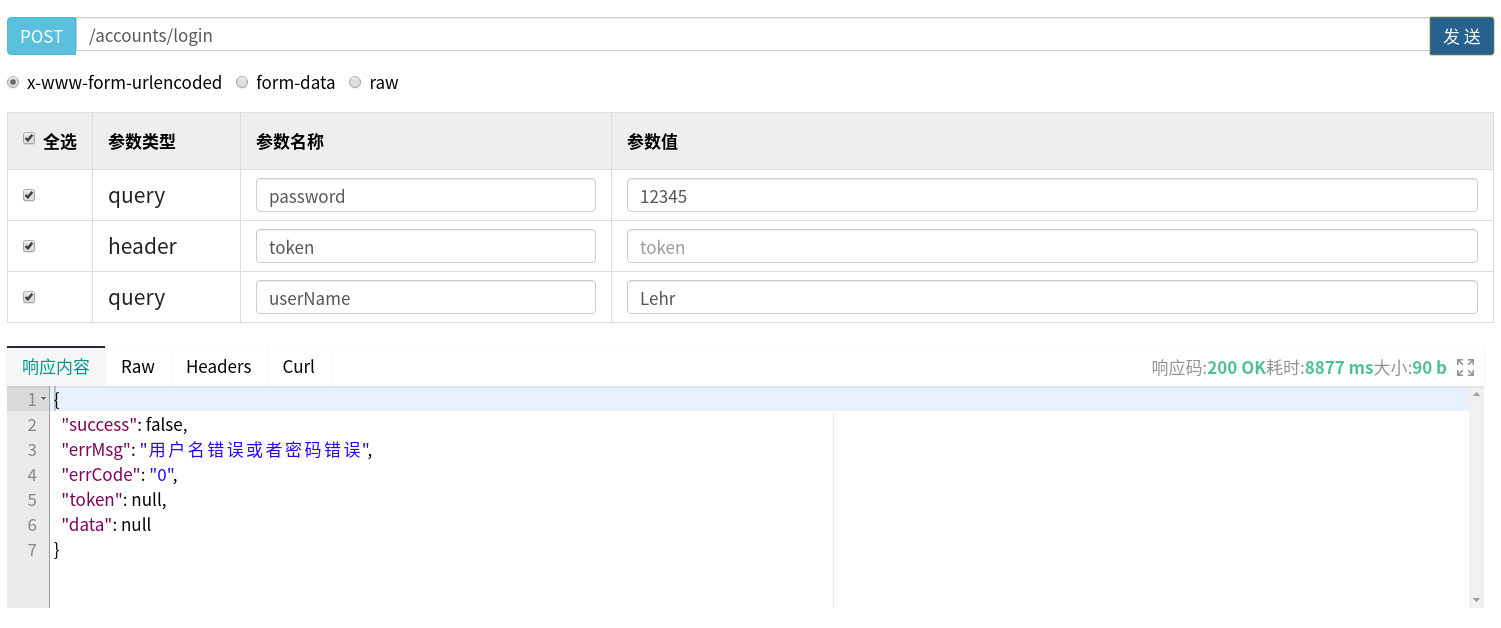
Redis中:

然后连续错误10次:
页面结果:
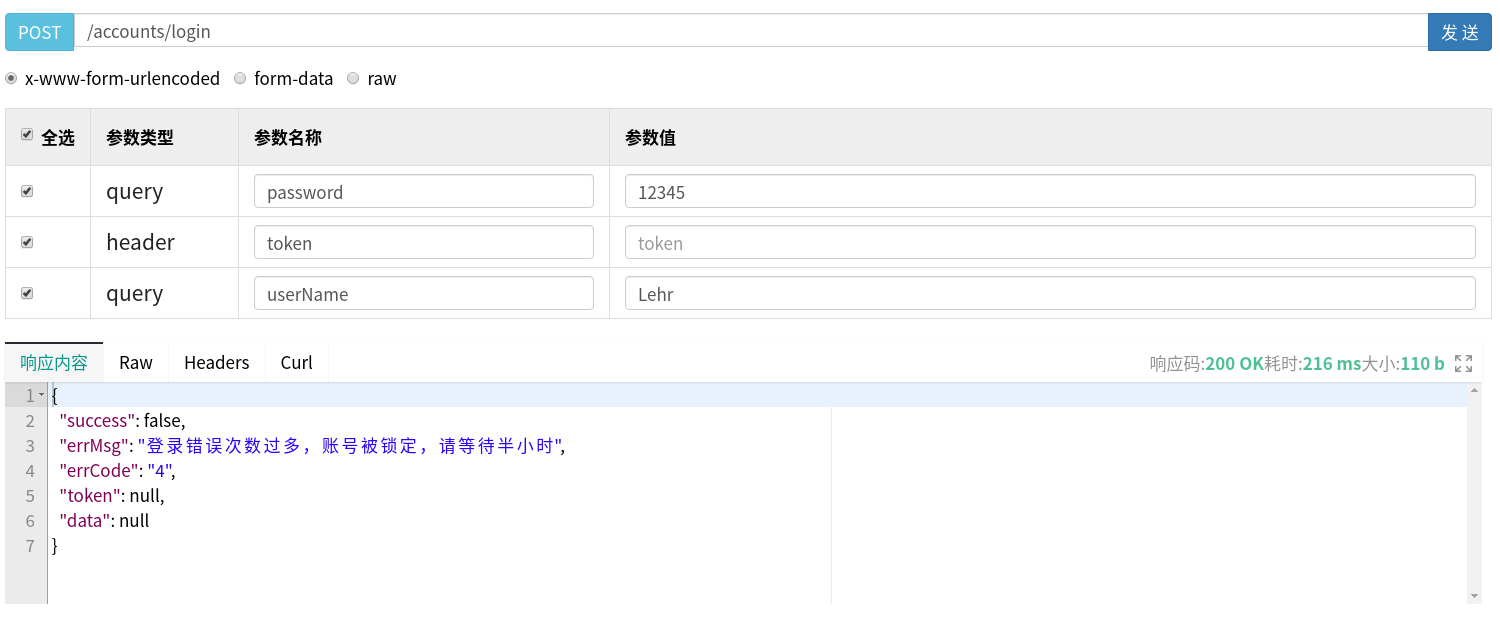
Redis中:

然后等待了半小时之后(其实我调成了5分钟)
再次尝试错误密码登录:
再次报错,此时Redis里由于之前的记录到期了,自动销毁了,所以再次触发错误又会添加一次错误记录

现在尝试一次正确登录:
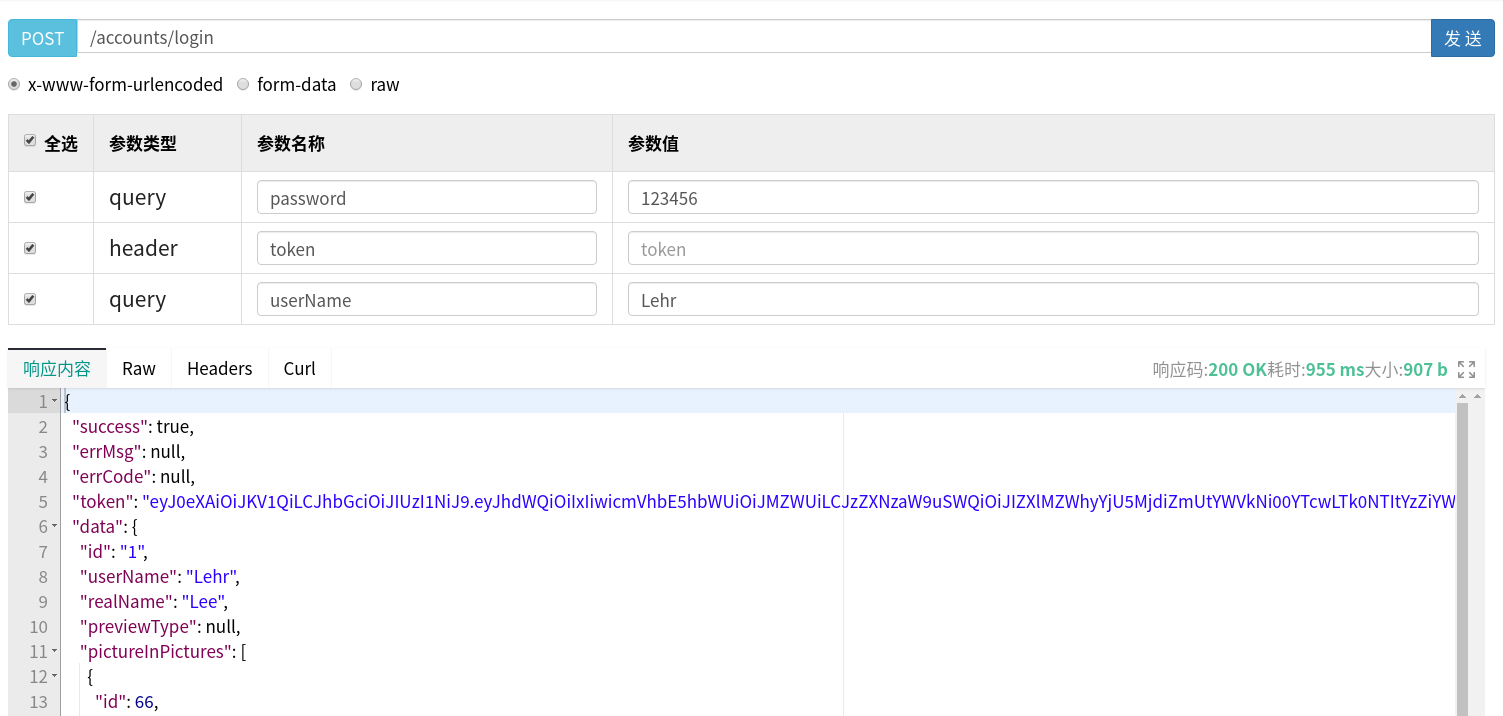
成功登录
查看Redis:

🎉Done!
附RedisTemplate代码
配置类
import org.springframework.boot.autoconfigure.condition.ConditionalOnMissingBean;
import org.springframework.context.annotation.Bean;
import org.springframework.context.annotation.Configuration;
import org.springframework.data.redis.connection.RedisConnectionFactory;
import org.springframework.data.redis.core.RedisTemplate;
import org.springframework.data.redis.serializer.JdkSerializationRedisSerializer;
import org.springframework.data.redis.serializer.StringRedisSerializer;

@Configuration
public class RedisConfig {

 @Bean
 public RedisTemplate<String, Object> redisTemplate(RedisConnectionFactory redisConnectionFactory)
 {
	//我就用的默认的序列化处理器
  StringRedisSerializer stringRedisSerializer = new StringRedisSerializer();
  JdkSerializationRedisSerializer ser = new JdkSerializationRedisSerializer();

  RedisTemplate<String, Object> template = new RedisTemplate<String, Object>();
  template.setConnectionFactory(redisConnectionFactory);

  template.setKeySerializer(stringRedisSerializer);
  template.setValueSerializer(ser);
  return template;
 }

 @Bean
 public RedisStringService myStringRedisTemplate()
 {
  return new RedisStringService();
 }
}
工具类RedisStringService
一个只能用来处理Value是String的工具类,就是我在CustomMatcher里Autowired的这个类
import org.springframework.beans.factory.annotation.Autowired;
import org.springframework.data.redis.core.StringRedisTemplate;
import org.springframework.data.redis.core.ValueOperations;
import org.springframework.stereotype.Service;

import java.util.concurrent.TimeUnit;

public class RedisStringService {

 @Autowired
 protected StringRedisTemplate redisTemplate;

 /**
  * 写入redis缓存(不设置expire存活时间)
  * @param key
  * @param value
  * @return
  */
 public boolean set(final String key, String value){
  boolean result = false;
  try {
   ValueOperations operations = redisTemplate.opsForValue();
   operations.set(key, value);
   result = true;
  } catch (Exception e) {
   e.getMessage();
  }
  return result;
 }

 /**
  * 写入redis缓存(设置expire存活时间)
  * @param key
  * @param value
  * @param expire
  * @return
  */
 public boolean set(final String key, String value, Long expire){
  boolean result = false;
  try {
   ValueOperations operations = redisTemplate.opsForValue();
   operations.set(key, value);
   redisTemplate.expire(key, expire, TimeUnit.SECONDS);
   result = true;
  } catch (Exception e) {
   e.getMessage();
  }
  return result;
 }

 /**
  * 读取redis缓存
  * @param key
  * @return
  */
 public Object get(final String key){
  Object result = null;
  try {
   ValueOperations operations = redisTemplate.opsForValue();
   result = operations.get(key);
  } catch (Exception e) {
   e.getMessage();
  }
  return result;
 }

 /**
  * 判断redis缓存中是否有对应的key
  * @param key
  * @return
  */
 public boolean exists(final String key){
  boolean result = false;
  try {
   result = redisTemplate.hasKey(key);
  } catch (Exception e) {
   e.getMessage();
  }
  return result;
 }

 /**
  * redis根据key删除对应的value
  * @param key
  * @return
  */
 public boolean remove(final String key){
  boolean result = false;
  try {
   if(exists(key)){
    redisTemplate.delete(key);
   }
   result = true;
  } catch (Exception e) {
   e.getMessage();
  }
  return result;
 }

 /**
  * redis根据keys批量删除对应的value
  * @param keys
  * @return
  */
 public void remove(final String... keys){
  for(String key : keys){
   remove(key);
  }
 }
}
到此这篇关于Shiro+Redis实现登录次数冻结的文章就介绍到这了,更多相关Shiro+Redis登录冻结内容请搜索我们以前的文章或继续浏览下面的相关文章希望大家以后多多支持我们!
相关推荐
-
SpringBoot中Shiro缓存使用Redis、Ehcache的方法
SpringBoot 中配置redis作为session 缓存器. 让shiro引用 本文是建立在你是使用这shiro基础之上的补充内容 第一种:Redis缓存,将数据存储到redis 并且开启session存入redis中. 引入pom <dependency> <groupId>org.springframework.boot</groupId> <artifactId>spring-boot-starter-data-redis</artifac
-
spring boot整合redis实现shiro的分布式session共享的方法
我们知道,shiro是通过SessionManager来管理Session的,而对于Session的操作则是通过SessionDao来实现的,默认的情况下,shiro实现了两种SessionDao,分别为CachingSessionDAO和MemorySessionDAO,当我们使用EhCache缓存时,则是使用的CachingSessionDAO,不适用缓存的情况下,就会选择基于内存的SessionDao.所以,如果我们想实现基于Redis的分布式Session共享,重点在于重写Session
-

Shiro+Redis实现登录次数冻结的示例
概述 假设我们需要有这样一个场景:如果用户连续输错5次密码,那可能说明有人在搞事情,所以需要暂时冻结该账户的登录功能 关于Shiro整合JWT,可以看这里:Springboot实现Shiro+JWT认证 假设我们的项目中用到了shiro,因为Shiro是建立在完善的接口驱动设计和面向对象原则之上的,支持各种自定义行为,所以我们可以结合Shiro框架的认证模块和redis来实现这个功能. 思路 我们大体的思路如下: 用户登录 Shiro去Redis检查账户的登录错误次数是否超过规定范围(超过了就是
-
spring boot整合Shiro实现单点登录的示例代码
Shiro是什么 Shiro是一个Java平台的开源权限框架,用于认证和访问授权.具体来说,满足对如下元素的支持: 用户,角色,权限(仅仅是操作权限,数据权限必须与业务需求紧密结合),资源(url). 用户分配角色,角色定义权限. 访问授权时支持角色或者权限,并且支持多级的权限定义. Q:对组的支持? A:shiro默认不支持对组设置权限. Q:是否可以满足对组进行角色分配的需求? A:扩展Realm,可以支持对组进行分配角色,其实就是给该组下的所有用户分配权限. Q:对数据权限的支持? 在业务
-
Redis实现登录注册的示例代码
目录 1. 引言 2. 流程图及代码实现 2.1 生成验证码保存到Redis 2.2 登录验证 2.3 请求拦截器 3. 总结 1. 引言 在传统的项目中,用户登录成功,将用户信息保存在session中,这种方式在微服务架构中会产生一系列问题.例如在购物车服务具有多台服务器,当一个请求落在购物车1号服务器后,其session保存了用户信息,另一个请求落在了购物车2号服务器,发现没有用户信息,则重新需要进行登录.服务器之间有session不共享的问题.为了解决这一问题,tomcat提出了内存拷贝,
-
shiro多验证登录代码实例及问题解决
这篇文章主要介绍了shiro多验证登录代码实例及问题解决,文中通过示例代码介绍的非常详细,对大家的学习或者工作具有一定的参考学习价值,需要的朋友可以参考下 1. 首先新建一个shiroConfig shiro的配置类,代码如下: @Configuration是标识这个类是一个配置文件,在启动时会加载这个类里面的内容,这个配置文件的位置的一定一定一定不能防止启动类外面的文件夹中,否则还会在启动类上加注解 @Bean是将这个类交给spring管理 @Configuration public clas
-
Springboot+SpringSecurity+JWT实现用户登录和权限认证示例
如今,互联网项目对于安全的要求越来越严格,这就是对后端开发提出了更多的要求,目前比较成熟的几种大家比较熟悉的模式,像RBAC 基于角色权限的验证,shiro框架专门用于处理权限方面的,另一个比较流行的后端框架是Spring-Security,该框架提供了一整套比较成熟,也很完整的机制用于处理各类场景下的可以基于权限,资源路径,以及授权方面的解决方案,部分模块支持定制化,而且在和oauth2.0进行了很好的无缝连接,在移动互联网的授权认证方面有很强的优势,具体的使用大家可以结合自己的业务场景进行选
-
SpringBoot+Shiro+Redis+Mybatis-plus 实战项目及问题小结
前言 最近也是一直在保持学习课外拓展技术,所以想自己做一个简单小项目,于是就有了这个快速上手 Shiro 和 Redis 的小项目,说白了就是拿来练手调调 API,然后做完后拿来总结的小项目,完整的源代码已经上传到 CodeChina平台上,文末有仓库链接
-
Shiro 控制并发登录人数限制及登录踢出的实现代码
我们经常会有用到,当A 用户在北京登录 ,然后A用户在天津再登录 ,要踢出北京登录的状态.如果用户在北京重新登录,那么又要踢出天津的用户,这样反复. 这样保证了一个帐号只能同时一个人使用.那么下面来讲解一下 Shiro 怎么实现这个功能,现在是用到了缓存 Redis .我们也可以用其他缓存.如果是单个点,直接用一个静态的Map<String,Object> 或者 Ehcache 即可. XML配置. <!-- session 校验单个用户是否多次登录 --> <bean
-
实例详解Spring Boot实战之Redis缓存登录验证码
本章简单介绍redis的配置及使用方法,本文示例代码在前面代码的基础上进行修改添加,实现了使用redis进行缓存验证码,以及校验验证码的过程. 1.添加依赖库(添加redis库,以及第三方的验证码库) <dependency> <groupId>org.springframework.boot</groupId> <artifactId>spring-boot-starter-redis</artifactId> </dependency&
-
Spring Security OAuth2 实现登录互踢的示例代码
本文主要介绍了Spring Security OAuth2 实现登录互踢的示例代码,分享给大家,具体如下: 背景说明 一个账号只能一处登录,类似的业务需求在现有后管类系统是非常常见的. 但在原有的 spring security oauth2 令牌方法流程(所谓的登录)无法满足类似的需求. 我们先来看 TokenEndpoint 的方法流程 客户端 带参访问 /oauth/token 接口,最后去调用 TokenGranter TokenGranter 根据不同的授权类型,获取用户认证信息 并去
-
Java利用Redis实现高并发计数器的示例代码
业务需求中经常有需要用到计数器的场景:譬如一个手机号一天限制发送5条短信.一个接口一分钟限制多少请求.一个接口一天限制调用多少次等等.使用Redis的Incr自增命令可以轻松实现以上需求.以一个接口一天限制调用次数为例: /** * 是否拒绝服务 * @return */ private boolean denialOfService(String userId){ long count=JedisUtil.setIncr(DateUtil.getDate()+"&"+user