解决Android 沉浸式状态栏和华为虚拟按键冲突问题
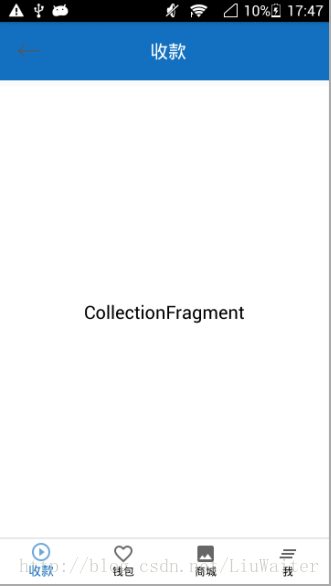
对于现在的 App 来说,布局页面基本都会用到沉浸式状态栏,单纯的沉浸式状态栏很容易解决,但是在华为手机上存在一个底部虚拟按键的问题,会导致页面底部和顶部出现很大的问题,比如页面底部导航栏被按键覆盖,导致底部无法操作,顶部状态栏布局被撑的很高,丑的不忍直视,这里就将两者的冲突问题一并解决!先看下实现的效果图:

这是我自己的手机,OnePlus 3T 7.1.1版本(免费广告,没给我钱的啊),不是华为的手机,但是有个虚拟按键可以设置,可以看到底部导航栏没有问题,顶部状态栏也成功实现,效果图看完,下面直接飙车了:
主页面布局:
<?xml version="1.0" encoding="utf-8"?>
<RelativeLayout xmlns:android="http://schemas.android.com/apk/res/android"
 xmlns:app="http://schemas.android.com/apk/res-auto"
 xmlns:tools="http://schemas.android.com/tools"
 android:layout_width="match_parent"
 android:layout_height="match_parent"
 tools:context="com.example.statusbarvirtualkey.statusbarvirtualkey.MainActivity">
 <RelativeLayout
 android:layout_width="match_parent"
 android:layout_height="match_parent">
 <include
 android:id="@+id/home_title"
 layout="@layout/layout_home_title" />
 <FrameLayout
 android:id="@+id/home_container"
 android:layout_width="match_parent"
 android:layout_height="0dp"
 android:layout_alignParentTop="true"
 android:layout_marginTop="70dp"
 android:layout_above="@+id/line_bottom"
 android:layout_weight="1"
 >
 </FrameLayout>
 <View
 android:id="@+id/line_bottom"
 android:layout_width="match_parent"
 android:layout_height="0.5dp"
 android:alpha="0.6"
 android:layout_above="@+id/bottom_navigation_view"
 android:background="@android:color/darker_gray"
 />
 <android.support.design.widget.BottomNavigationView
 android:id="@+id/bottom_navigation_view"
 android:layout_width="match_parent"
 android:layout_height="50dp"
 android:layout_alignParentBottom="true"
 app:itemBackground="@android:color/white"
 app:elevation="2dp"
 app:itemTextColor="@color/selector_item_color"
 app:itemIconTint="@color/selector_item_color"
 app:menu="@menu/navigation_menu"
 >
 </android.support.design.widget.BottomNavigationView>
 </RelativeLayout>
</RelativeLayout>
底部导航栏用到的是 BottomNavigationView,AndroidStudio 直接引入,由于这个不是本篇文章的重点部分,此处不作详细介绍,想看具体实现可以看我的源代码,顶部是一个自定义的 ToolBar,代码如下:
<?xml version="1.0" encoding="utf-8"?>
<android.support.v7.widget.Toolbar xmlns:android="http://schemas.android.com/apk/res/android"
 xmlns:app="http://schemas.android.com/apk/res-auto"
 android:id="@+id/myToolBar"
 android:layout_width="match_parent"
 android:layout_height="wrap_content"
 android:background="@drawable/layer_list_bottom_line"
 android:padding="@dimen/titleBarPadding"
 android:elevation="@dimen/primary_shadow_height"
 android:clipToPadding="true"
 android:fitsSystemWindows="true"
 app:popupTheme="@style/ThemeOverlay.AppCompat.Light">
 <RelativeLayout
 android:layout_width="match_parent"
 android:layout_height="match_parent">
 <TextView
 android:id="@+id/home_left"
 android:layout_width="wrap_content"
 android:layout_height="wrap_content"
 android:layout_centerVertical="true"
 android:drawableLeft="@mipmap/ind_icon_fan"
 android:drawablePadding="5dp"
 android:padding="@dimen/dp_4" />
 <TextView
 android:id="@+id/home_right"
 android:layout_width="wrap_content"
 android:layout_height="wrap_content"
 android:layout_alignParentEnd="true"
 android:layout_alignParentRight="true"
 android:layout_centerVertical="true"
 android:ellipsize="end"
 android:singleLine="true"
 android:maxEms="5"
 android:textColor="@android:color/black"
 android:textSize="7.0sp"
 android:typeface="monospace" />
 <TextView
 android:id="@+id/toolbar_title"
 android:layout_width="wrap_content"
 android:layout_height="wrap_content"
 android:layout_centerInParent="true"
 android:singleLine="true"
 android:text="@string/app_name"
 android:textColor="@android:color/white"
 android:textSize="20sp" />
 </RelativeLayout>
</android.support.v7.widget.Toolbar>
需要注意的是Android:fitsSystemWindows这个属性,主要是通过调整当前设置这个属性的view的padding去为我们的status_bar留下空间,如果不写,布局会出很严重的问题,可以自己去试验不写的后果…
介绍完基本布局,接下来是如何设置沉浸式状态栏呢,在 AndroidManifest 布局中,设置主题:
<application
 android:allowBackup="true"
 android:icon="@mipmap/ic_launcher"
 android:label="@string/app_name"
 android:roundIcon="@mipmap/ic_launcher_round"
 android:supportsRtl="true"
 android:theme="@style/AppTheme">
 <activity android:name=".MainActivity">
 <intent-filter>
 <action android:name="android.intent.action.MAIN" />
 <category android:name="android.intent.category.LAUNCHER" />
 </intent-filter>
 </activity>
 </application>
这里需要注意的是,需要设置 3 个文件夹,分别对应的 android 版本不一致,values,values-v19,values-v21,values目录下设置:
<style name="AppTheme" parent="@style/BaseAppTheme">
 </style>
 <style name="BaseAppTheme" parent="Theme.AppCompat.Light.NoActionBar">
 <item name="colorPrimary">@color/colorPrimary</item>
 <item name="colorPrimaryDark">@color/colorPrimaryDark</item>
 <item name="colorAccent">@color/colorAccent</item>
 </style>
values-v19:
<style name="AppTheme" parent="@style/BaseAppTheme">
 <item name="android:windowTranslucentStatus">true</item>
 <item name="android:windowTranslucentNavigation">false</item>
 </style>
values-v21:
<style name="AppTheme" parent="BaseAppTheme">
 <item name="android:statusBarColor">@color/colorPrimary</item>
 <item name="android:windowDrawsSystemBarBackgrounds">true</item>
 </style>
注意了,接下来就是Activity里面的重点操作了,这里介绍只贴重点代码,onCreate方法:
@Override
 protected void onCreate(Bundle savedInstanceState) {
 super.onCreate(savedInstanceState);
 setContentView(R.layout.activity_main);
 toolbar_title = (TextView) findViewById(R.id.toolbar_title);
 //下面的代码可以写在BaseActivity里面
 highApiEffects();
 mToolBar = (Toolbar) getWindow().findViewById(R.id.home_title);
 setSupportActionBar(mToolBar);
 }
@TargetApi(Build.VERSION_CODES.KITKAT)
 private void highApiEffects() {
 getWindow().getDecorView().setFitsSystemWindows(true);
 //透明状态栏 @顶部
 getWindow().addFlags(WindowManager.LayoutParams.FLAG_TRANSLUCENT_STATUS);
 //透明导航栏 @底部 这一句不要加,目的是防止沉浸式状态栏和部分底部自带虚拟按键的手机(比如华为)发生冲突,注释掉就好了
// getWindow().addFlags(WindowManager.LayoutParams.FLAG_TRANSLUCENT_NAVIGATION);
 }
高能预警!!!这里一定要注意,getWindow().addFlags(WindowManager.LayoutParams.FLAG_TRANSLUCENT_NAVIGATION);这句代码千!万!不!要!加!!!加了就会起冲突!到这里,沉浸式状态栏和底部虚拟按键的冲突问题就得到解决了
最后,贴上我手机三个手机的沉浸式状态栏截图,4.4的手机没有,(其实是懒得开模拟器…)抱歉不能贴上,这里分别是:
Android 4.2.2,无沉浸式状态:

Android 5.1:

Android 7.1.1,底部带虚拟按键,也就是我们本篇文章的主题:

源码下载
以上所述是小编给大家介绍的解决Android 沉浸式状态栏和华为虚拟按键冲突问题,希望对大家有所帮助,如果大家有任何疑问请给我留言,小编会及时回复大家的。在此也非常感谢大家对我们网站的支持!

