Android实现流光和光影移动效果代码

目录
  • 概述:
  • 实现思路:
  • 代码如下:
  • 注意点:

概述:

开发过程中,看到有些界面用到一道光线在屏幕中掠过的效果,觉得挺炫的。所以查找相关资料自己实现了一遍。

先上个预览图:

实现思路:

简单来说就是在一个view中绘制好一道光影,并不断改变光影在view中的位置。

1.首先我们先了解一下光影怎么绘制

在了解如何绘制之前,我们先看一下LinearGradient的构造方法

 /**
     * Create a shader that draws a linear gradient along a line.
     *
     * @param x0           The x-coordinate for the start of the gradient line
     * @param y0           The y-coordinate for the start of the gradient line
     * @param x1           The x-coordinate for the end of the gradient line
     * @param y1           The y-coordinate for the end of the gradient line
     * @param colors       The sRGB colors to be distributed along the gradient line
     * @param positions    May be null. The relative positions [0..1] of
     *                     each corresponding color in the colors array. If this is null,
     *                     the the colors are distributed evenly along the gradient line.
     * @param tile         The Shader tiling mode
     *
     *
     * 翻译过来:
     * x0,y0为渐变起点,x1,y1为渐变的终点
     *
     * colors数组为两点间的渐变颜色值,positions数组取值范围是0~1
     * 传入的colors[]长度和positions[]长度必须相等,一一对应关系,否则报错
     * position传入null则代表colors均衡分布
     *
     * tile有三种模式
     * Shader.TileMode.CLAMP:    边缘拉伸模式,它会拉伸边缘的一个像素来填充其他区域
     * Shader.TileMode.MIRROR:    镜像模式,通过镜像变化来填充其他区域
     * Shader.TileMode.REPEAT:重复模式,通过复制来填充其他区域
     */
LinearGradient(float x0, float y0, float x1, float y1, @NonNull @ColorInt int[] colors,
            @Nullable float[] positions, @NonNull TileMode tile)

colors[]和positions[]的说明结合下图,这样理解起来应该就比较明朗了

回到正题,如何绘制光影。我们看到的那道光可以参照下图:
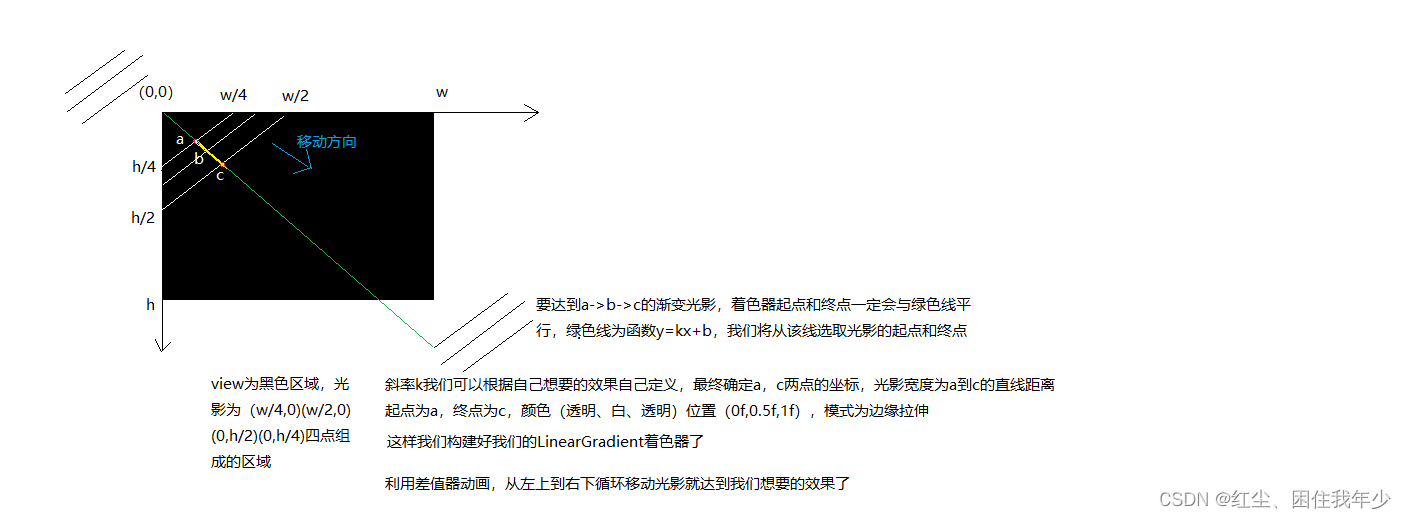
根据分析得到我们的着色器是线性着色器(其他着色器请查询相关api):

LinearGradient(a的x坐标, a的y坐标, c的x坐标, c的y坐标, new int[]{Color.parseColor("#00FFFFFF"), Color.parseColor("#FFFFFFFF"), Color.parseColor("#00FFFFFF")}, new float[]{0f, 0.5f, 1f}, Shader.TileMode.CLAMP)

2.给画笔上色。设置着色器mPaint.setShader(mLinearGradient)

3.给定一个数值范围利用数值生成器ValueAnimator产生数值,监听数值变化。每次回调都将该数值传入光影的起点和终点并进行绘制

代码如下:

/**
 * author: caoyb
 * created on: 2021/12/20 15:13
 * description:
 */
public class ConfigLoadingView extends View {

    private Paint mPaint;
    private Path mPath;
    private LinearGradient mLinearGradient;
    private ValueAnimator mValueAnimator;

    public ConfigLoadingView(Context context) {
        this(context, null);
    }

    public ConfigLoadingView(Context context, @Nullable AttributeSet attrs) {
        this(context, attrs, 0);
    }

    public ConfigLoadingView(Context context, @Nullable AttributeSet attrs, int defStyleAttr) {
        super(context, attrs, defStyleAttr);
        init();
    }

    private void init() {
        mPaint = new Paint();
        mPath = new Path();
    }

    private void initPointAndAnimator(int w, int h) {
        Point point1 = new Point(0, 0);
        Point point2 = new Point(w, 0);
        Point point3 = new Point(w, h);
        Point point4 = new Point(0, h);

        mPath.moveTo(point1.x, point1.y);
        mPath.lineTo(point2.x, point2.y);
        mPath.lineTo(point3.x, point3.y);
        mPath.lineTo(point4.x, point4.y);
        mPath.close();

		// 斜率k
        float k = 1f * h / w;
        // 偏移
        float offset = 1f * w / 2;
		// 0f - offset * 2 为数值左边界(屏幕外左侧), w + offset * 2为数值右边界(屏幕外右侧)
		// 目的是使光影走完一遍,加一些时间缓冲,不至于每次光影移动的间隔都那么急促
        mValueAnimator = ValueAnimator.ofFloat(0f - offset * 2, w + offset * 2);
        mValueAnimator.setRepeatCount(-1);
        mValueAnimator.setInterpolator(new LinearInterpolator());
        mValueAnimator.setDuration(1500);
        mValueAnimator.addUpdateListener(new ValueAnimator.AnimatorUpdateListener() {
            @Override
            public void onAnimationUpdate(ValueAnimator animation) {
                float value = (float) animation.getAnimatedValue();
                mLinearGradient = new LinearGradient(value, k * value, value + offset, k * (value + offset),
                        new int[]{Color.parseColor("#00FFFFFF"), Color.parseColor("#1AFFFFFF"), Color.parseColor("#00FFFFFF")}, null, Shader.TileMode.CLAMP);
                mPaint.setShader(mLinearGradient);
                invalidate();
            }
        });
        mValueAnimator.start();
    }

    @Override
    protected void onMeasure(int widthMeasureSpec, int heightMeasureSpec) {
        super.onMeasure(widthMeasureSpec, heightMeasureSpec);
        int widthSize = MeasureSpec.getSize(widthMeasureSpec);
        int heightSize = MeasureSpec.getSize(heightMeasureSpec);
        initPointAndAnimator(widthSize, heightSize);
    }

    @Override
    protected void onDraw(Canvas canvas) {
        super.onDraw(canvas);
        canvas.drawPath(mPath, mPaint);
    }

    @Override
    protected void onDetachedFromWindow() {
        super.onDetachedFromWindow();
        mValueAnimator.cancel();
    }
}

注意点:

LinearGradient里参数之一:
color[]参数只能是16进制的RGB数值,不能传R.color.xxx。R.color.xxx虽然是int型,但拿到的是资源ID,并不是16进制RGB

到此这篇关于Android实现流光和光影移动效果代码的文章就介绍到这了,更多相关Android 流光和光影移动效果内容请搜索我们以前的文章或继续浏览下面的相关文章希望大家以后多多支持我们!

(0)

相关推荐

  • Android实现渐变色水波纹效果

    本文实例为大家分享了Android实现渐变色水波纹效果的具体代码,供大家参考,具体内容如下 项目中使用到的效果,效果图如下: 代码实现: public class WaveView extends View { private Paint mPaint, mCriclePaint, mTextPaint; // 倾斜或旋转.快速变化,当在屏幕上画一条直线时, 横竖不会出现锯齿, // 但是当斜着画时, 就会出现锯齿的效果,所以需要设置抗锯齿 private DrawFilter mDrawFil

  • Android TextView渐变颜色和方向及动画效果的设置详解

    GradientTextView Github点我 一个非常好用的库,使用kotlin实现,用于设置TexView的字体 渐变颜色.渐变方向 和 动画效果 添加依赖 之前仓库发布在 jcenter,但是因为它即将不可用,近期已完成迁移.建议大家使用 mavenCentral 的配置. 使用 jcenter implementation 'com.williamyang:gradienttext:1.0.1' 使用 mavenCentral buildscript { repositories {

  • Android实现设置APP灰白模式效果

    目录 方案一: 方案二: 方案三 细心点的童鞋会发现,到特殊节日比如清明节这天很多App都设置了符合主题的灰白模式,比如京东,如图所示: 我们再来看看最终实现的效果图: 那我们今天就介绍三种方案全局设置灰白模式: 方案一: 这也是我回复这位童鞋的方案:给Activity的顶层View设置置灰,实现全局置灰效果,下面我们来看看具体的实现过程. 可以在BaseActivity的onCreate方法中,使用ColorMatrix设置灰度 @Override protected void onCreat

  • Android实现流光和光影移动效果代码

    目录 概述: 实现思路: 代码如下: 注意点: 概述: 开发过程中,看到有些界面用到一道光线在屏幕中掠过的效果,觉得挺炫的.所以查找相关资料自己实现了一遍. 先上个预览图: 实现思路: 简单来说就是在一个view中绘制好一道光影,并不断改变光影在view中的位置. 1.首先我们先了解一下光影怎么绘制 在了解如何绘制之前,我们先看一下LinearGradient的构造方法 /** * Create a shader that draws a linear gradient along a line

  • Android仿微信页面底部导航效果代码实现

    大家在参考本地代码的时候要根据需要适当的修改,里面有冗余代码小编没有删除.好了,废话不多说了,一切让代码说话吧! 关键代码如下所示: .java里面的主要代码 public class MainActivity extends BaseActivity implements TabChangeListener { private Fragment[] fragments; private FragZaiXianYuYue fragZaiXianYuYue; private FragDaoLuJi

  • Android用TextView实现跑马灯效果代码

    目录 [前言] 一.新手设置跑马灯效果 [关键点讲解] [总结] 二.高端玩家设置跑马灯效果 三.延伸阅读 总结 [前言] 在Textview设置的宽度有限,而需要显示的文字又比较多的情况下,往往需要给Textview设置跑马灯效果才能让用户完整地看到所有设置的文字,所以给TextView设置跑马灯效果的需求是很常见的 一.新手设置跑马灯效果 1.先在xml中给Textview设置好对应的属性 <TextView android:id="@+id/tv" android:layo

  • Android实现两个ScrollView互相联动的同步滚动效果代码

    本文实例讲述了Android实现两个ScrollView互相联动的同步滚动效果代码.分享给大家供大家参考,具体如下: 最近在做一个项目,用到了两个ScrollView互相联动的效果,简单来说联动效果意思就是滑动其中的一个ScrollView另一个ScrollView也一同跟着滑动,要做到一起同步滑动.感觉在以后的项目开发中大家可能也会用到,绝对做个Demo分享出来,供大家一起学习,以便大家以后好用,觉的不错,有用的可以先收藏起来哦! 其实对于ScrollView,Android官方并没有提供相关

  • Android实现仿通讯录侧边栏滑动SiderBar效果代码

    本文实例讲述了Android实现仿通讯录侧边栏滑动SiderBar效果代码.分享给大家供大家参考,具体如下: 之前看到某些应用的侧边栏做得不错,想想自己也弄一个出来,现在分享出来,当然里面还有不足的地方,请大家多多包涵. 先上图: 具体实现的代码如下: package com.freesonfish.listview_index; import android.content.Context; import android.graphics.Canvas; import android.grap

  • Android 仿余额宝数字跳动动画效果完整代码

    一:想都不用想的,有图有真相,看着爽了,在看下面源码 二:实例源码分析 ①:首先定义接口 package com.demo.tools.view; /** * 数字动画自定义 * * @author zengtao 2015年7月17日 上午11:48:27 * */ public interface RiseNumberBase { public void start(); public RiseNumberTextView withNumber(float number); public R

  • Android仿打开微信红包动画效果实现代码

    首先看下效果: 实现原理: 准备3张不同角度的图片,通过AnimationDrawable帧动画进行播放即可 代码实现: 1.编写动画xml文件: <?xml version="1.0" encoding="utf-8"?> <animation-list xmlns:android="http://schemas.android.com/apk/res/android" android:oneshot="false&

  • Android仿微信文章悬浮窗效果的实现代码

    序言 前些日子跟朋友聊天,朋友Z果粉,前些天更新了微信,说微信出了个好方便的功能啊,我问是啥功能啊,看看我大Android有没有,他说现在阅读公众号文章如果有人给你发微信你可以把这篇文章当作悬浮窗悬浮起来,方便你聊完天不用找继续阅读,听完是不是觉得这叫啥啊,我大Android微信版不是早就有这个功能了吗,我看文章的时候看到过有这个悬浮按钮,但是我一直没有使用过,试了一下还是挺方便的,就想着自己实现一下这个功能,下面看图,大家都习惯了无图言X 原理 看完动图我们来分析一下,如何在每个页面上都存在一

  • Android中View跟随手指滑动效果的实例代码

    本文讲述了Android中View跟随手指滑动效果的实例代码.分享给大家供大家参考,具体如下: 1.android View 主要6种滑动方法,分别是 layout() offsetLeftAndRight()和offsetTopAndBottom() LayoutParams scrollBy()和 scrollTo() Scroller 动画 2.实现效果图 3.自定义中使用layout()方法实习view的滑动 public class MoveView extends View { pr

  • Android开发TextvView实现镂空字体效果示例代码

    记录一下... 自定义TextView public class HollowTextView extends AppCompatTextView { private Paint mTextPaint, mBackgroundPaint; private Bitmap mBackgroundBitmap,mTextBitmap; private Canvas mBackgroundCanvas,mTextCanvas; private RectF mBackgroundRect; private

随机推荐