Android实现底部弹出PopupWindow背景逐渐变暗效果
在Android开发中,经常需要通过点击某个按钮弹出对话框或者选择框,通过Dialog或者PopupMenu、PopupWindow都能实现。
这里主要介绍后两者:PopupMenu、PopupWindow的实现。 先看两个效果图上边PopupMenu,下边PopupWindow:
PopupMenu PopupWindow

一、PopupMenu实现:
PopupMenu实现起来比较简单,主要用来实现根据按钮附近弹出的对话框。
首先定义一个menu文件\res\menu\headmenu.xml:
<menu xmlns:android="http://schemas.android.com/apk/res/android"
 xmlns:app="http://schemas.android.com/apk/res-auto"
 xmlns:tools="http://schemas.android.com/tools" tools:context="com.arbo.hero.LoginActivity">
 <item
 android:id="@+id/camera"
 android:title="拍照"
 android:orderInCategory="100"
 app:showAsAction="never" />
 <item
 android:id="@+id/gallery"
 android:title="从相册中选取"
 android:orderInCategory="100"
 app:showAsAction="never" />
 <item
 android:id="@+id/cancel"
 android:title="取消"
 android:orderInCategory="100"
 app:showAsAction="never" />

</menu>
创建一个PopupMenu并添加点击事件:
private void showPopmenu(View view){
 popupMenu = new PopupMenu(this,view);
 popupMenu.getMenuInflater().inflate(R.menu.headmenu,popupMenu.getMenu());
 popupMenu.setOnMenuItemClickListener(new PopupMenu.OnMenuItemClickListener() {
  @Override
  public boolean onMenuItemClick(MenuItem item) {
  switch(item.getItemId()){
   case R.id.camera:
   Toast.makeText(HeadPortrait.this,"Click camera",Toast.LENGTH_SHORT).show();
   break;
   case R.id.gallery:
   Toast.makeText(HeadPortrait.this,"Click gallery",Toast.LENGTH_SHORT).show();
   break;
   case R.id.cancel:
   Toast.makeText(HeadPortrait.this,"Click cancel",Toast.LENGTH_SHORT).show();
   break;
  }
  return false;
  }
 });
 popupMenu.show();
 }
MainActivity很简单,点击按钮调用showPopmenu()方法即可:
public class MainActivity extends Activity{
 @Override
 protected void onCreate(Bundle savedInstanceState) {
 super.onCreate(savedInstanceState);
 //main.xml页面主布局只有一个按钮,这里就不贴代码了
 setContentView(R.layout.main);
 Button button = (Button) findViewById(R.id.button);
 button.setOnClickListener(new View.OnClickListener() {
  @Override
  public void onClick(View view) {
  //点击按钮就创建并显示一个popupMenu
  showPopmenu(btnmenu);
  }
 }
 }
}
以上,就实现了利用PopupMenu在按钮附近弹出一个选择框。
PopupMenu的优点:简单;根据菜单大小自适应位置,在按钮附近弹出;适合某些情景。
缺点:形式比较单一,效果一般。
二、PopupWindow实现:
相比之下,PopupWindow的实现复杂一些,但是自定义性更强,它可以将任意界面设置为PopupWindow。
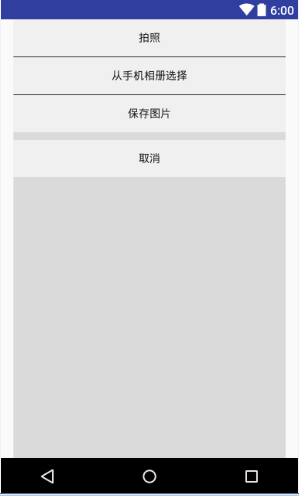
先看弹出window布局window_popup.xml:
<?xml version="1.0" encoding="utf-8"?>
<LinearLayout
 xmlns:android="http://schemas.android.com/apk/res/android"
 android:layout_width="match_parent"
 android:layout_height="match_parent"
 android:layout_marginLeft="@dimen/activity_horizontal_margin"
 android:layout_marginRight="@dimen/activity_horizontal_margin"
 android:background="#dadada"
 android:orientation="vertical">
 <LinearLayout
 android:layout_width="match_parent"
 android:layout_height="wrap_content"
 android:orientation="vertical">
 <Button
  android:id="@+id/camera"
  android:layout_width="match_parent"
  android:layout_height="wrap_content"
  android:text="拍照"
  android:background="#f0f0f0"
  />
 <TextView
  android:layout_width="match_parent"
  android:layout_height="1dp"
  android:background="#2d2c2c"
  />
 <Button
  android:background="#f0f0f0"
  android:id="@+id/gallery"
  android:layout_width="match_parent"
  android:layout_height="wrap_content"
  android:text="从手机相册选择"/>
 <TextView
  android:layout_width="match_parent"
  android:layout_height="1dp"
  android:background="#2d2c2c"
  />
 <Button
  android:background="#f0f0f0"
  android:id="@+id/savepicture"
  android:layout_width="match_parent"
  android:layout_height="wrap_content"
  android:text="保存图片"/>

 </LinearLayout>

 <LinearLayout
 android:layout_width="match_parent"
 android:layout_height="wrap_content"
 android:layout_marginTop="10dp"
 android:orientation="vertical">

 <Button
  android:background="#f0f0f0"
  android:id="@+id/cancel"
  android:layout_width="match_parent"
  android:layout_height="wrap_content"
  android:text="取消"
  />
 </LinearLayout>
</LinearLayout>
布局的效果图:
创建popupWindow并为其添加点击事件:
void bottomwindow(View view) {
 if (popupWindow != null && popupWindow.isShowing()) {
  return;
 }
 LinearLayout layout = (LinearLayout) getLayoutInflater().inflate(R.layout.window_popup, null);
 popupWindow = new PopupWindow(layout,
  ViewGroup.LayoutParams.MATCH_PARENT,
  ViewGroup.LayoutParams.WRAP_CONTENT);
 //点击空白处时,隐藏掉pop窗口
 popupWindow.setFocusable(true);
 popupWindow.setBackgroundDrawable(new BitmapDrawable());
 //添加弹出、弹入的动画
 popupWindow.setAnimationStyle(R.style.Popupwindow);
 int[] location = new int[2];
 view.getLocationOnScreen(location);
 popupWindow.showAtLocation(view, Gravity.LEFT | Gravity.BOTTOM, 0, -location[1]);
 //添加按键事件监听
 setButtonListeners(layout);
 //添加pop窗口关闭事件,主要是实现关闭时改变背景的透明度
 popupWindow.setOnDismissListener(new poponDismissListener());
 backgroundAlpha(1f);
 }
事件监听的函数setButtonListeners() :
private void setButtonListeners(LinearLayout layout) {
 Button camera = (Button) layout.findViewById(R.id.camera);
 Button gallery = (Button) layout.findViewById(R.id.gallery);
 Button savepicture = (Button) layout.findViewById(R.id.savepicture);
 Button cancel = (Button) layout.findViewById(R.id.cancel);

 camera.setOnClickListener(new View.OnClickListener() {
  @Override
  public void onClick(View view) {
  if (popupWindow != null && popupWindow.isShowing()) {
   //在此处添加你的按键处理 xxx
   popupWindow.dismiss();
  }
  }
 });
 gallery.setOnClickListener(new View.OnClickListener() {
  @Override
  public void onClick(View view) {
  if (popupWindow != null && popupWindow.isShowing()) {
   //在此处添加你的按键处理 xxx
   popupWindow.dismiss();
  }
  }
 });
 savepicture.setOnClickListener(new View.OnClickListener() {
  @Override
  public void onClick(View view) {
  if (popupWindow != null && popupWindow.isShowing()) {
   //在此处添加你的按键处理 xxx
   popupWindow.dismiss();
  }
  }
 });
 cancel.setOnClickListener(new View.OnClickListener() {
  @Override
  public void onClick(View view) {
  if (popupWindow != null && popupWindow.isShowing()) {
   popupWindow.dismiss();
  }
  }
 });
 }
弹出、收回的动画:
若res文件夹下没有anim目录,则自己添加一个:new–>Android resource directory 名字填anim。然后新建两个tranlate文件:
弹出 window_out.xml :
<?xml version="1.0" encoding="utf-8"?>
<translate xmlns:android="http://schemas.android.com/apk/res/android"
 android:interpolator="@android:anim/decelerate_interpolator"
 android:fromYDelta="100%" android:toYDelta="0"
 android:duration="300"/>
收回 window_back.xml:
<?xml version="1.0" encoding="utf-8"?>
<translate xmlns:android="http://schemas.android.com/apk/res/android"
 android:interpolator="@android:anim/accelerate_interpolator"
 android:fromYDelta="0" android:toYDelta="100%"
 android:duration="200"/>
然后在style.xml中添加我们的这两个动画:
<style name="Popupwindow">
 <item name="android:windowEnterAnimation">@anim/window_out</item>
 <item name="android:windowExitAnimation">@anim/window_back</item>
 </style>
还是上面的同一个MainActivity,把按钮点击事件的处理函数换成popupwindow的即可:
btnmenu.setOnClickListener(new View.OnClickListener() {
  @Override
  public void onClick(View view) {
  bottomwindow(btnmenu);
  }
 }
以上,就可以实现这样的点击按钮从屏幕底部弹出window窗口的效果,如下:

底部弹出
但是,这样的效果并不好,我们希望弹出windows的时候,其他背景可以变成半透明,这样可以突出重点。网上的方法是通过这段代码来改变背景的透明度的:
/**
 * 设置添加屏幕的背景透明度
 * @param bgAlpha
 */
 public void backgroundAlpha(float bgAlpha)
 {
 WindowManager.LayoutParams lp = getWindow().getAttributes();
 lp.alpha = bgAlpha; //0.0-1.0
 getWindow().setAttributes(lp);  getWindow().addFlags(WindowManager.LayoutParams.FLAG_DIM_BEHIND);
 }
然后在弹出的时候将背景设为半透明:
bottomwindow(btnmenu);
backgroundAlpha(0.5f);
在返回的时候设置回来:
backgroundAlpha(1f);
这的确是可以实现效果,但是点击的时候突然变暗和变亮,效果不太好!如下:

我希望是弹出的过程中,慢慢变暗。是有一个过程的,而不是一下子就暗下来了。这里利用延时和Handler来动态地改变背景的透明度。
//在调用弹出的方法后,开启一个子线程
  @Override
  public void onClick(View view) {
  bottomwindow(btnmenu);
  new Thread(new Runnable(){
   @Override
   public void run() {
   while(alpha>0.5f){
    try {
    //4是根据弹出动画时间和减少的透明度计算
    Thread.sleep(4);
    } catch (InterruptedException e) {
    e.printStackTrace();
    }
    Message msg =mHandler.obtainMessage();
    msg.what = 1;
    //每次减少0.01,精度越高,变暗的效果越流畅
    alpha-=0.01f;
    msg.obj =alpha ;
    mHandler.sendMessage(msg);
   }
   }

  }).start();
  }
同理,返回的时候把透明度跳回来:
/**
 * 返回或者点击空白位置的时候将背景透明度改回来
 */
 class poponDismissListener implements PopupWindow.OnDismissListener{

 @Override
 public void onDismiss() {
  // TODO Auto-generated method stub
  new Thread(new Runnable(){
  @Override
  public void run() {
   //此处while的条件alpha不能<= 否则会出现黑屏
   while(alpha<1f){
   try {
    Thread.sleep(4);
   } catch (InterruptedException e) {
    e.printStackTrace();
   }
   Log.d("HeadPortrait","alpha:"+alpha);
   Message msg =mHandler.obtainMessage();
   msg.what = 1;
   alpha+=0.01f;
   msg.obj =alpha ;
   mHandler.sendMessage(msg);
   }
  }

  }).start();
 }

 }
在Handler里面我们调用改变背景透明的方法即可:
Handler mHandler = new Handler(){
 @Override
 public void handleMessage(Message msg) {
  switch (msg.what){
  case 1:
   backgroundAlpha((float)msg.obj);
   break;
  }
 }
 };
这样修改以后,效果是这样的:

以上,基本达到了逐渐变暗、变量的目的。
以上就是本文的全部内容,希望对大家的学习有所帮助,也希望大家多多支持我们。
相关推荐
-

Android 从底部弹出Dialog(横向满屏)的实例代码
项目中经常需要底部弹出框,这里我整理一下其中我用的比较顺手的一个方式(底部弹出一个横向满屏的dialog). 效果图如下所示(只显示关键部分): 步骤如下所示: 1.定义一个dialog的布局(lay_share.xml) <?xml version="1.0" encoding="utf-8"?> <LinearLayout xmlns:android="http://schemas.android.com/apk/res/androi
-
Android PopupWindow实现右侧、左侧和底部弹出菜单
本教程为大家分享了Android PopupWindow弹出菜单的具体代码,供大家参考,具体内容如下 项目代码:http://xiazai.jb51.net/201611/yuanma/PopupLeftMenu(jb51.net).rar 项目SDK是5.1,建议将代码拷到自己的工程中去 代码如下: MainActivity类: package com.example.popupleftmenu; import android.app.Activity; import android.cont
-
Android 仿苹果底部弹出Dialog
style文件 <style name="ActionSheetDialogStyle" parent="@android:style/Theme.Dialog"> <!-- 背景透明 --> <item name="android:windowBackground">@android:color/transparent</item> <item name="android:wind
-
Android实现底部对话框BottomDialog弹出实例代码
最近项目上需要实现一个底部对话框,要实现这样的功能其实很简单,先看代码: private void show1() { Dialog bottomDialog = new Dialog(this, R.style.BottomDialog); View contentView = LayoutInflater.from(this).inflate(R.layout.dialog_content_normal, null); bottomDialog.setContentView(contentV
-
Android实现从底部弹出的Dialog示例(一)
一.概述 先给大家看一下效果图: 点击中间的显示弹框按钮,从底部弹出来一个对话框,用户可以点击拍照或者从相册选择进行相应的操作,下面看看怎么实现. 二.代码实现 主页面布局文件,很简单,一个按钮,响应点击事件: <?xml version="1.0" encoding="utf-8"?> <RelativeLayout xmlns:android="http://schemas.android.com/apk/res/android&qu
-
android底部弹出iOS7风格对话选项框(QQ对话框)--第三方开源之IOS_Dialog_Library
先给大家展示下效果图,喜欢的朋友可以下载源码哦. 完成这个效果的是使用了 IOS_Dialog_Library 下载地址:http://xiazai.jb51.net/201509/yuanma/IOS_Dialog_Library(jb51.net) 下载后导入到Eclipse中,然后作为Library引入到自己的工程中,直接作为第三方控件使用. 测试代码: <LinearLayout xmlns:android="http://schemas.android.com/apk/res/a
-
Android控件BottomSheet实现底边弹出选择列表
底边弹出一个选择列表这是一个比较常用的选择条件或跳转的很好的方法,可以很好的隐藏各个选项.在需要使用时在底边弹出.而BottomSheet就是这样的一个控件. 使用 1.导入build compile 'com.cocosw:bottomsheet:1.3.0' 2.在res/values/colors.xml文件中添加以下代码: <!--首页item文字颜色--> <color name="colorSubtitle">#999</color> &
-
Android仿IOS底部弹出对话框
在Android开发过程中,常常会因为感觉Android自带的Dialog的样式很丑,项目开发过程中会影响整体效果,会使得开发过程很是忧伤....(话唠时间结束!) 本文我将介绍一款开源的Dialog仿IOS底部弹窗效果IOS_Dialog_Library的使用.我将通过几个简单的示例介绍IOS_Dialog_Library.zip的使用方法. 1.IOS_Dialog_Library是开源的Dialog框架,所以首先你得下载IOS_Dialog_Library.zip包,并作为Library引
-
Android使用Activity实现从底部弹出菜单或窗口的方法
本文实例讲述了Android使用Activity实现从底部弹出菜单或窗口的方法.分享给大家供大家参考,具体如下: 这里使用activity实现弹出滑动窗口或菜单,主要是使用了一些设置activity的样式来实现弹出窗口和滑动效果,实现如下: 第一步:设计要弹出窗口的xml布局: <?xml version="1.0" encoding="utf-8"?> <RelativeLayout xmlns:android="http://sche
-
Android Animation实战之屏幕底部弹出PopupWindow
Android动画的一个实战内容,从屏幕底部滑动弹出PopupWindow. 相信这种效果大家在很多APP上都遇到过,比如需要拍照或者从SD卡选择图片,再比如需要分享某些东西时,大多会采用这么一种效果: 那这种效果如何实现呢? 我们仿写一个这种效果的实例吧: 1)我们首先定义一下,弹出窗口的页面布局组件:take_photo_pop.xml <?xml version="1.0" encoding="utf-8"?> <RelativeLayout