
spring boot自动装配之@ComponentScan注解用法详解
目录
- 1.@ComponentScan注解作用
- 2. @ComponentScan注解属性
- 3. @ComponentScan过滤规则说明
- 4. 自定义扫描过滤规则
- 5. @ComponentScans
- 6. spring boot处理@ComponentScan源码分析
- 总结
1.@ComponentScan注解作用
@ComponentScan用于类或接口上主要是指定扫描路径,spring会把指定路径下带有指定注解的类自动装配到bean容器里。会被自动装配的注解包括@Controller、@Service、@Component、@Repository等等。与ComponentScan注解相对应的XML配置就是<context:component-scan/>, 根据指定的配置自动扫描package,将符合条件的组件加入到IOC容器中;
XML的配置方式如下:
	<context:component-scan
		base-package="com.example.test" use-default-filters="false">
		<context:exclude-filter type="custom"
		expression="com.example.test.filter.MtyTypeFilter" />
	</context:component-scan>
2. @ComponentScan注解属性
@ComponentScan有如下常用属性:
- basePackages和value:指定要扫描的路径(package),如果为空则以@ComponentScan注解的类所在的包为基本的扫描路径。
- basePackageClasses:指定具体扫描的类。
- includeFilters:指定满足Filter条件的类。
- excludeFilters:指定排除Filter条件的类。
- useDefaultFilters=true/false:指定是否需要使用Spring默认的扫描规则:被@Component, @Repository, @Service, @Controller或者已经声明过@Component自定义注解标记的组件;
在过滤规则Filter中:
FilterType:指定过滤规则,支持的过滤规则有:
- ANNOTATION:按照注解规则,过滤被指定注解标记的类(默认);
- ASSIGNABLE_TYPE:按照给定的类型;
- ASPECTJ:按照ASPECTJ表达式;
- REGEX:按照正则表达式;
- CUSTOM:自定义规则,自定义的Filter需要实现TypeFilter接口;
value和classes:指定在该规则下过滤的表达式;
@ComponentScan的常见的配置如下:
@ComponentScan(
    excludeFilters = {@Filter(
    type = FilterType.CUSTOM,
    classes = {TypeExcludeFilter.class}
), @Filter(
    type = FilterType.CUSTOM,
    classes = {AutoConfigurationExcludeFilter.class}
)}
)
3. @ComponentScan过滤规则说明
规则表达式说明
 1. 扫描指定类文件
   @ComponentScan(basePackageClasses = Person.class)
 2. 扫描指定包,使用默认扫描规则,即被@Component, @Repository, @Service, @Controller或者已经声明过@Component自定义注解标记的组件;
   @ComponentScan(value = "com.example")
 3. 扫描指定包,加载被@Component注解标记的组件和默认规则的扫描(因为useDefaultFilters默认为true)
   @ComponentScan(value = "com.example", includeFilters = { @Filter(type = FilterType.ANNOTATION, value = Component.class) })
 4. 扫描指定包,只加载Person类型的组件
   @ComponentScan(value = "com.example", includeFilters = { @Filter(type = FilterType.ASSIGNABLE_TYPE, value = Person.class) }, useDefaultFilters = false)
 5. 扫描指定包,过滤掉被@Component标记的组件
   @ComponentScan(value = "com.example", excludeFilters = { @Filter(type = FilterType.ANNOTATION, value = Component.class) })
 6. 扫描指定包,自定义过滤规则
   @ComponentScan(value = "com.example", includeFilters = { @Filter(type = FilterType.CUSTOM, value = MtyTypeFilter.class) }, useDefaultFilters = true)
4. 自定义扫描过滤规则
用户自定义扫描过滤规则,需要实现org.springframework.core.type.filter.TypeFilter接口。
//1.自定义类实现TypeFilter接口并重写match()方法
public class MtyTypeFilter implements TypeFilter {
    /**
     *
     * @param metadataReader:读取到当前正在扫描的类的信息
     * @param metadataReaderFactory:可以获取到其他任何类的信息
     * @return
     * @throws IOException
     */
    @Override
    public boolean match(MetadataReader metadataReader, MetadataReaderFactory metadataReaderFactory) throws IOException {
        System.out.println("========MtyTypeFilter===========");
        //获取当前类的注解的信息
        AnnotationMetadata annotationMetadata = metadataReader.getAnnotationMetadata();
        System.out.println("annotationMetadata: "+annotationMetadata);
        //输出结果:annotationMetadata: com.example.test.bean.Color

        //获取当前正在扫描的类的类信息
        ClassMetadata classMetadata = metadataReader.getClassMetadata();
        System.out.println("classMetadata: "+classMetadata);
        //输出结果: classMetadata: com.example.test.bean.Color

        //获取当前类资源(类的路径)
        Resource resource = metadataReader.getResource();
        System.out.println("resource: "+resource);
        //输出结果:resource: file [D:\idea\demo-02\target\classes\com\example\test\bean\Color.class]

        //获取类名
        String className = classMetadata.getClassName();
        System.out.println("className: "+className);
        //输出结果:className: com.example.test.bean.Color
        Class<?> forName = null;
        try {
            forName = Class.forName(className);
            if (Color.class.isAssignableFrom(forName)) {
                // 如果是Color的子类,就加载到IOC容器
                return true;
            }
        } catch (ClassNotFoundException e) {
            e.printStackTrace();
        }

        System.out.println("========MtyTypeFilter===========");
        return false;
    }
}
5. @ComponentScans
可以一次声明多个@ComponentScan
@Retention(RetentionPolicy.RUNTIME)
@Target(ElementType.TYPE)
@Documented
@Repeatable(ComponentScans.class)  //指定ComponentScan可以被ComponentScans作为数组使用
public @interface ComponentScan {
}

@Retention(RetentionPolicy.RUNTIME)
@Target(ElementType.TYPE)
@Documented
public @interface ComponentScans {

	ComponentScan[] value();

}
@ComponentScans(value = { @ComponentScan(value = "com.example.test"),
		@ComponentScan(value = "com.example.test", includeFilters = {
				@Filter(type = FilterType.CUSTOM, value = MtyTypeFilter.class) }) })
public class MainConfig {

	@Bean(name = "pers", initMethod = "init", destroyMethod = "destory")
	public Person person() {
		return new Person();
	}

}
6. spring boot处理@ComponentScan源码分析
spring创建bean对象的基本流程是先创建对应的BeanDefinition对象,然后在基于BeanDefinition对象来创建Bean对象,SpringBoot也是如此,只不过通过注解创建BeanDefinition对象的时机和解析方式不同而已。SpringBoot是通过ConfigurationClassPostProcessor这个BeanFactoryPostProcessor类来处理。
本演示的demo涉及到4个演示类,分别是:
- 带有@SpringBootApplication注解的启动类Demo02Application。
- 带有@RestController注解的类HelloController。
- 带有@Configuration注解且有通过@Bean注解来创建addInterceptors的方法的MyMvcConfig类。
- Account实体类无任何注解。
本文的最后会贴出所有代码。 先从启动类为入口,SpringBoot启动类如下:
@SpringBootApplication
public class Demo02Application {

    public static void main(String[] args) {
        //1、返回我们IOC容器
        ConfigurableApplicationContext run = SpringApplication.run(Demo02Application.class, args);
	}
}
从SpringApplication.run(Demo02Application.class, args);一路断点到核心方法SpringApplication.ConfigurableApplicationContext run(String... args)方法
run方法干了两件事:
- 创建SpringApplication对象
- 利用创建好的SpringApplication对象调用run方法
 public ConfigurableApplicationContext run(String... args) {
        long startTime = System.nanoTime();
        DefaultBootstrapContext bootstrapContext = this.createBootstrapContext();
        ConfigurableApplicationContext context = null;
        this.configureHeadlessProperty();
        //初始化监听器
        SpringApplicationRunListeners listeners = this.getRunListeners(args);
        //发布ApplicationStartingEven
        listeners.starting(bootstrapContext, this.mainApplicationClass);

        try {
        	 //装配参数和环境
            ApplicationArguments applicationArguments = new DefaultApplicationArguments(args);
            //发布ApplicationEnvironmentPreparedEvent
            ConfigurableEnvironment environment = this.prepareEnvironment(listeners, bootstrapContext, applicationArguments);
            this.configureIgnoreBeanInfo(environment);
            Banner printedBanner = this.printBanner(environment);
            //创建ApplicationContext,并装配
            context = this.createApplicationContext();
            context.setApplicationStartup(this.applicationStartup);
            //发布ApplicationPreparedEvent
            this.prepareContext(bootstrapContext, context, environment, listeners, applicationArguments, printedBanner);
            this.refreshContext(context);
            this.afterRefresh(context, applicationArguments);
            Duration timeTakenToStartup = Duration.ofNanos(System.nanoTime() - startTime);
            if (this.logStartupInfo) {
                (new StartupInfoLogger(this.mainApplicationClass)).logStarted(this.getApplicationLog(), timeTakenToStartup);
            }
			//发布ApplicationStartedEven
            listeners.started(context, timeTakenToStartup);
            //执行Spring中@Bean下的一些操作,如静态方法
            this.callRunners(context, applicationArguments);
        } catch (Throwable var12) {
            this.handleRunFailure(context, var12, listeners);
            throw new IllegalStateException(var12);
        }

        try {
            Duration timeTakenToReady = Duration.ofNanos(System.nanoTime() - startTime);
            listeners.ready(context, timeTakenToReady);
            return context;
        } catch (Throwable var11) {
            this.handleRunFailure(context, var11, (SpringApplicationRunListeners)null);
            throw new IllegalStateException(var11);
        }
    }
重点方法一:本方法法实现的重点功能: 本demo是web工程,springboot通过反射创建上下文context:AnnotationConfigServletWebServerApplicationContext 类在构建context的无参构造方法中构建成员变量reader=new AnnotatedBeanDefinitionReader(this),在AnnotatedBeanDefinitionReader的无参构造方法中会beanFactory对象,并向beanFactory中注册5个BeanDefinition对象,重点关注ConfigurationClassPostProcessor。
context = this.createApplicationContext();
重点方法二:本方法实现的重点功能
本方法会构建启动类Demo02Application对应的BeanDefinition对象,并注册到beanFactory中,此时的context对象可见下图
this.prepareContext(context, environment, listeners, applicationArguments, printedBanner);
重点方法三:本方法实现的重点功能
该方法实际调用applicationContext的refresh方法,代码分析详见我的另一篇博客,本文后面只会分析ConfigurationClassPostProcessor对象的创建和postProcessBeanDefinitionRegistry方法的执行
    this.refreshContext(context);
    this.afterRefresh(context, applicationArguments);
this.prepareContext(context, environment, listeners, applicationArguments, printedBanner);代码执行后的截图如下:
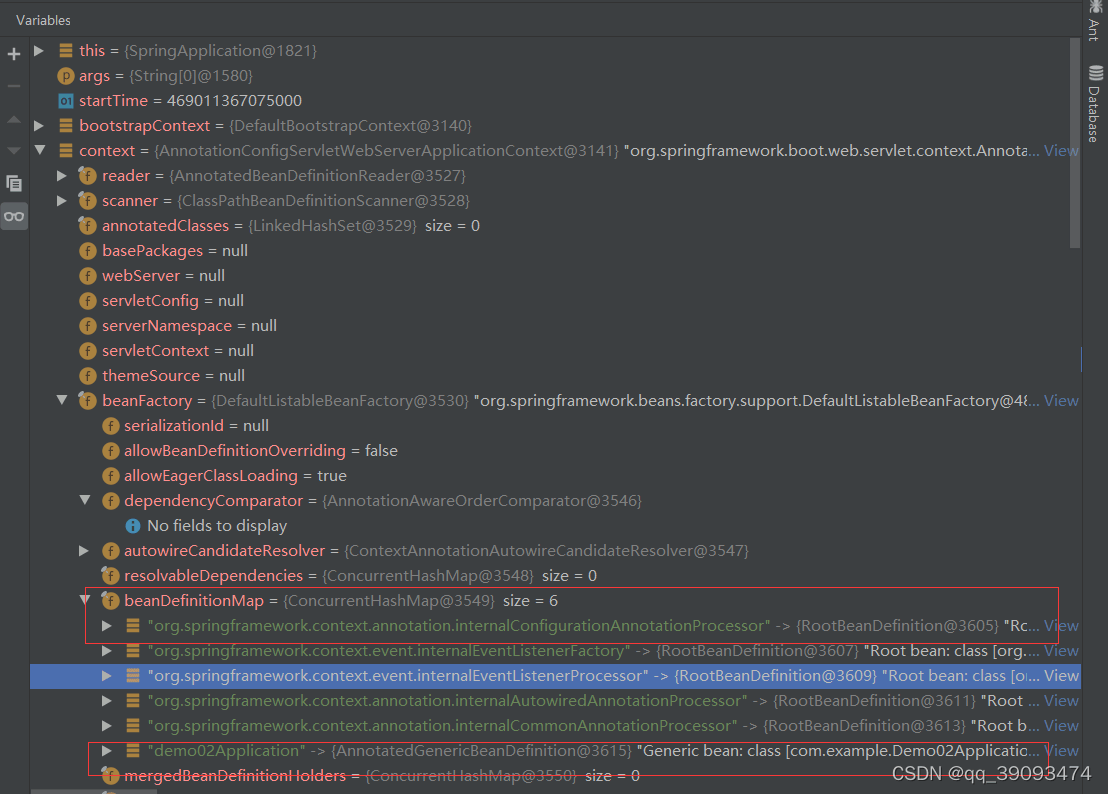
ConfigurationClassPostProcessor实现BeanFactoryPostProcessor,关于BeanFactoryPostProcessor扩展接口的作用在《spring初始化源码浅析之关键类和扩展接口》一文中有详细介绍。
ConfigurationClassPostProcessor对象的创建和方法执行的断点如下:
this.refreshContext(context);–> AbstractApplicationContext.refresh() --> invokeBeanFactoryPostProcessors() -->PostProcessorRegistrationDelegate.invokeBeanFactoryPostProcessors()->invokeBeanDefinitionRegistryPostProcessors()
下面重点看ConfigurationClassPostProcessor类的postProcessBeanDefinitionRegistry()方法如何处理@ComponentScan注解:
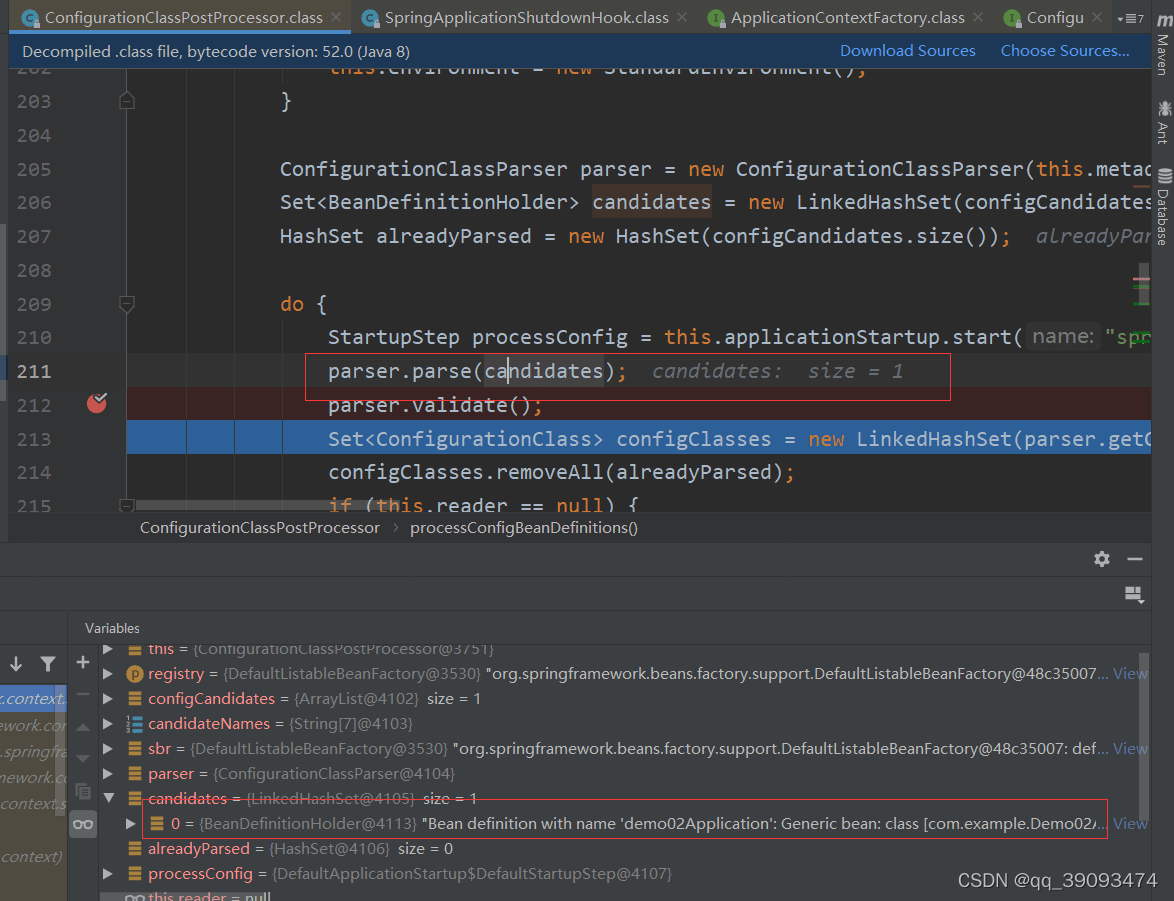
同过源代码发现最终是由ConfigurationClassParser的解析类来处理,继续查看ConfigurationClassParser.doProcessConfigurationClass
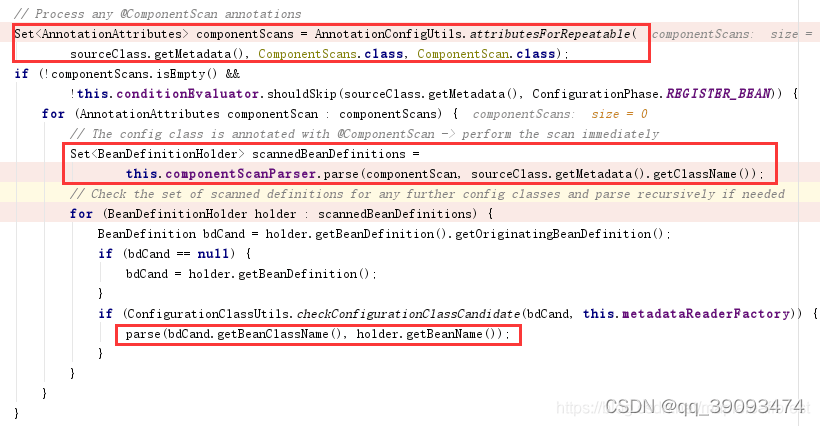
原来在这里对@ComponentScan注解做了判断,上面一段代码做了核心的几件事:
- 扫描@ComponentScan注解包下面的所有的可自动装备类,生成BeanDefinition对象,并注册到beanFactory对象中。
- 通过DeferredImportSelectorHandler处理@EnableAutoConfiguration注解,后续会有专文介绍。
- 将带有@Configuration 注解的类解析成ConfigurationClass对象并缓存,后面创建@Bean注解的Bean对象所对应的BeanDefinition时会用到
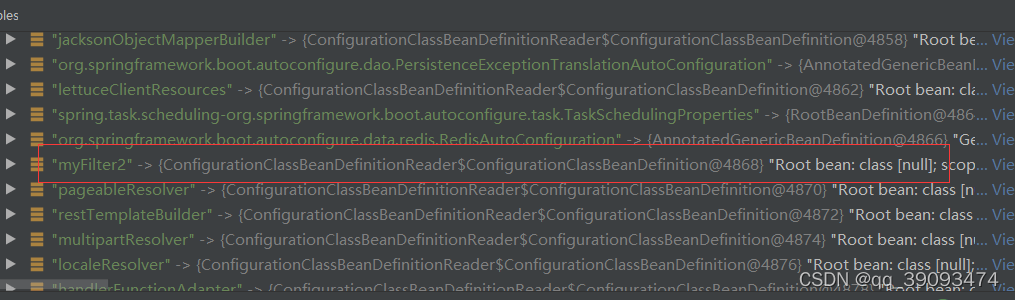
到此为止MyFilter2对应的BeanDefinition已创建完毕,如下图:
总结
到此这篇关于spring boot自动装配之@ComponentScan注解用法详解的文章就介绍到这了,更多相关@ComponentScan注解用法内容请搜索我们以前的文章或继续浏览下面的相关文章希望大家以后多多支持我们!
相关推荐
-
Spring component-scan XML配置与@ComponentScan注解配置
目录 前言 准备 @Component的bean XML配置 Java配置 配置 @Configuration的bean XML配置 配置 Java配置 配置 小结 总结 关于SpringBoot 前言 无论Spring的XML配置或者Java配置,都可以配置自动扫描,也就是在指定包及其子包下的component,都会被自动扫描并被Spring容器管理. 注:component指的是被 @Component 注解及其变种(如 @Controller . @Service . @Repositor
-
Spring注解开发@Bean和@ComponentScan使用案例
组件注册 用@Bean来注册 搭建好maven web工程 pom加入spring-context,spring-core等核心依赖 创建实例类com.hjj.bean.Person, 生成getter,setter方法 public class Person { private String name; private int age; } 创建com.hjj.config.MainConfig @Configuration //告诉spring是一个配置类 public class Main
-

@ComponentScan注解用法之包路径占位符解析
目录 代码测试 底层行为分析 总结 @ComponentScan注解的basePackages属性支持占位符吗? 答案是肯定的. 代码测试 首先编写一个属性配置文件(Properties),名字随意,放在resources目录下. 在该文件中只需要定义一个属性就可以,属性名随意,值必须是要扫描的包路径. basepackages=com.xxx.fame.placeholder 编写一个Bean,空类即可. package com.xxx.fame.placeholder; import org
-
基于@ComponentScan注解的使用详解
目录 @ComponentScan注解的使用 一.注解定义 二.使用 1.环境准备 2.excludeFilters的使用 3.includeFilters的使用 4.自定义过滤规则 关于@ComponentScan注解的一些细节 @ComponentScan注解的使用 一.注解定义 @ComponentScan注解的定义如下: @Retention(RetentionPolicy.RUNTIME) @Target(ElementType.TYPE) @Documented @Repeatabl
-
springboot @ComponentScan注解原理解析
这篇文章主要介绍了springboot @ComponentScan注解原理解析,文中通过示例代码介绍的非常详细,对大家的学习或者工作具有一定的参考学习价值,需要的朋友可以参考下 @ComponentScan 告诉Spring从哪里找到bean. 如果你的其他包都在@SpringBootApplication注解的启动类所在的包及其下级包,则你什么都不用做,SpringBoot会自动帮你把其他包都扫描了. 如果你有一些bean所在的包,不在启动类的包及其下级包,那么你需要手动加上@Compone
-
Spring自动装配与扫描注解代码详解
1 javabean的自动装配 自动注入,减少xml文件的配置信息. <?xml version="1.0" encoding="UTF-8"?> <!-- 到入xml文件的约束 --> <beans xmlns="http://www.springframework.org/schema/beans" xmlns:p="http://www.springframework.org/schema/p&quo
-
Spring Boot框架中的@Conditional注解示例详解
目录 1. @Conditional 注解 2. Spring boot 扩展 1) @ConditionalOnClass和@ConditionalOnMissingClass注解 2) @ConditionalOnBean 和@ConditionalOnMissingBean注解 3) @ConditionalOnProperty注解 1. @Conditional 注解 @Conditional注解是Spring-context模块提供了一个注解,该注解的作用是可以根据一定的条件来使@Co
-
详解Spring Boot自动装配的方法步骤
在<Spring Boot Hello World>中介绍了一个简单的spring boot例子,体验了spring boot中的诸多特性,其中的自动配置特性极大的简化了程序开发中的工作(不用写一行XML).本文我们就来看一下spring boot是如何做到自动配置的. 首先阐明,spring boot的自动配置是基于spring framework提供的特性实现的,所以在本文中,我们先介绍spring framework的相关特性,在了解了这些基础知识后,我们再来看spring boot的自
-
Spring Boot 多数据源处理事务的思路详解
目录 1. 思路梳理 2. 代码实践 2.1 案例准备 2.2 开始整活 LoadDataSource.java 3. 总结 首先我先声明一点,本文单纯就是技术探讨,要从实际应用中来说的话,我并不建议这样去玩分布式事务.也不建议这样去玩多数据源,毕竟分布式事务主要还是用在微服务场景下. 好啦,那就不废话了,开整. 1. 思路梳理 首先我们来梳理一下思路. 在上篇文章中,我们是一个微服务,在 A 中分别去调用 B 和 C,当 B 或者 C 有一个执行失败的时候,就去回滚.B 和 C 都是调用远程的
-
Spring Boot的listener(监听器)简单使用实例详解
监听器(Listener)的注册方法和 Servlet 一样,有两种方式:代码注册或者注解注册 1.代码注册方式 通过代码方式注入过滤器 @Bean public ServletListenerRegistrationBean servletListenerRegistrationBean(){ ServletListenerRegistrationBean servletListenerRegistrationBean = new ServletListenerRegistrationBean
-
Spring boot进行参数校验的方法实例详解
Spring boot开发web项目有时候我们需要对controller层传过来的参数进行一些基本的校验,比如非空.整数值的范围.字符串的长度.日期.邮箱等等.Spring支持JSR-303 Bean Validation API,可以方便的进行校验. 使用注解进行校验 先定义一个form的封装对象 class RequestForm { @Size(min = 1, max = 5) private String name; public String getName() { return n
-
Spring Boot 中PageHelper 插件使用配置思路详解
使用思路 1.引入myabtis和pagehelper依赖 2.yml中配置mybatis扫描和实体类 这2行代码 pageNum:当前第几页 pageSize:显示多少条数据 userList:数据库查询的数据数据列表 PageHelper.startPage(pageNum, pageSize); PageInfo pageInfo = new PageInfo(userList); 最后返回一个pageInfo 对象即可,pageInfo 这个对象中只有数据一些信息,但是,没有成功失败的状
-
spring boot 图片上传与显示功能实例详解
首先描述一下问题,spring boot 使用的是内嵌的tomcat, 所以不清楚文件上传到哪里去了, 而且spring boot 把静态的文件全部在启动的时候都会加载到classpath的目录下的,所以上传的文件不知相对于应用目录在哪,也不知怎么写访问路径合适,对于新手的自己真的一头雾水. 后面想起了官方的例子,没想到一开始被自己找到的官方例子,后面太依赖百度谷歌了,结果发现只有官方的例子能帮上忙,而且帮上大忙,直接上密码的代码 package hello; import static org
-
java中@SuppressWarnings注解用法详解
SuppressWarnings注解是jse提供的注解.作用是屏蔽一些无关紧要的警告.使开发者能看到一些他们真正关心的警告.从而提高开发者的效率 简介: java.lang.SuppressWarnings是J2SE 5.0中标准的Annotation之一.可以标注在类.字段.方法.参数.构造方法,以及局部变量上.作用:告诉编译器忽略指定的警告,不用在编译完成后出现警告信息. 使用: @SuppressWarnings("") @SuppressWarnings({}) @Suppre
-
Spring Boot实现登录验证码功能的案例详解
目录 验证码的作用 案例要求 前端页面准备 准备login.html页面 随机验证码工具类 后端控制器 验证码的作用 验证码的作用:可以有效防止其他人对某一个特定的注册用户用特定的程序暴力破解方式进行不断的登录尝试我们其实很经常看到,登录一些网站其实是需要验证码的,比如牛客,QQ等.使用验证码是现在很多网站通行的一种方式,这个问题是由计算机生成并且评判的,但是必须只有人类才能解答,因为计算机无法解答验证码的问题,所以回答出问题的用户就可以被认为是人类.验证码一般用来防止批量注册. 案例要求 验证