C++控制台绘图头文件实例代码
目录
- 简介
- 函数介绍
- 1、init(int x, int fz)
- 2、fill(concol color)
- 3、update()
- 4、getmousepos(pos & p)
- 5、gt(int x, int y)
- 6、HideCursor()
- 7、settextcolor(concol color)
- 8、setbackcolor(concol color)
- 9、rect(int sx, int sy, int ex, int ey, concol color)
- 10、line(int sx, int sy, int ex, int ey, concol color)
- 11、dot(int x, int y, concol color)
- 示例代码
- 示例图片
- 头文件代码
- 总结
简介
这个头文件是用来在C++控制台绘图的,借鉴了 pygame 的一些思想,提供了一些函数用来绘图,可以有效的避免多次绘制重复图像时屏闪等问题。
函数介绍
1、init(int x, int fz)
初始化屏幕, 将屏幕大小设定为 x , 字体大小为 fz 。
2、fill(concol color)
用来将整个屏幕填充为一定的颜色。
3、update()
注意!绘画完后的图像并不会立刻出现在控制台上,使用这个函数来更新。
4、getmousepos(pos & p)
获取鼠标坐标并存到 p 中
5、gt(int x, int y)
将控制台光标移到(x,y)的位置,x,y 从1开始
6、HideCursor()
隐藏控制台光标
7、settextcolor(concol color)
设置文字颜色
8、setbackcolor(concol color)
设置背景颜色
9、rect(int sx, int sy, int ex, int ey, concol color)
以(sx, sy)为左上端点、(ex, ey)为右下端点,绘制颜色为color的矩形。
10、line(int sx, int sy, int ex, int ey, concol color)
绘制一条从(sx, sy)到(ex, ey)的线。
11、dot(int x, int y, concol color)
在(x,y)的位置画一个点
先介绍到这里
里面更多的功能、函数会在以后的文章后详细解释。
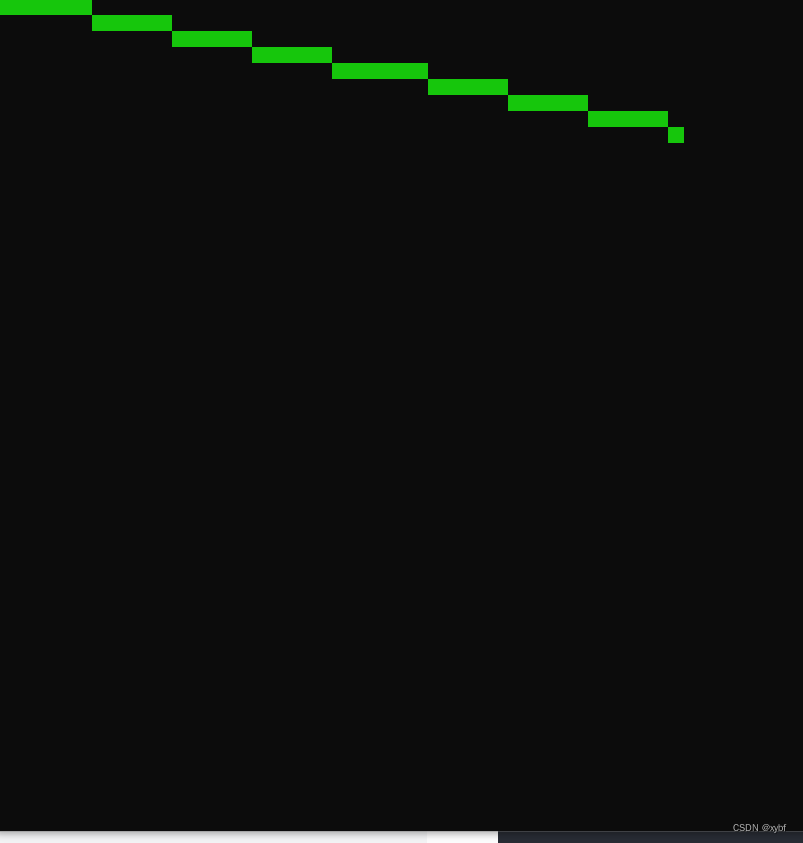
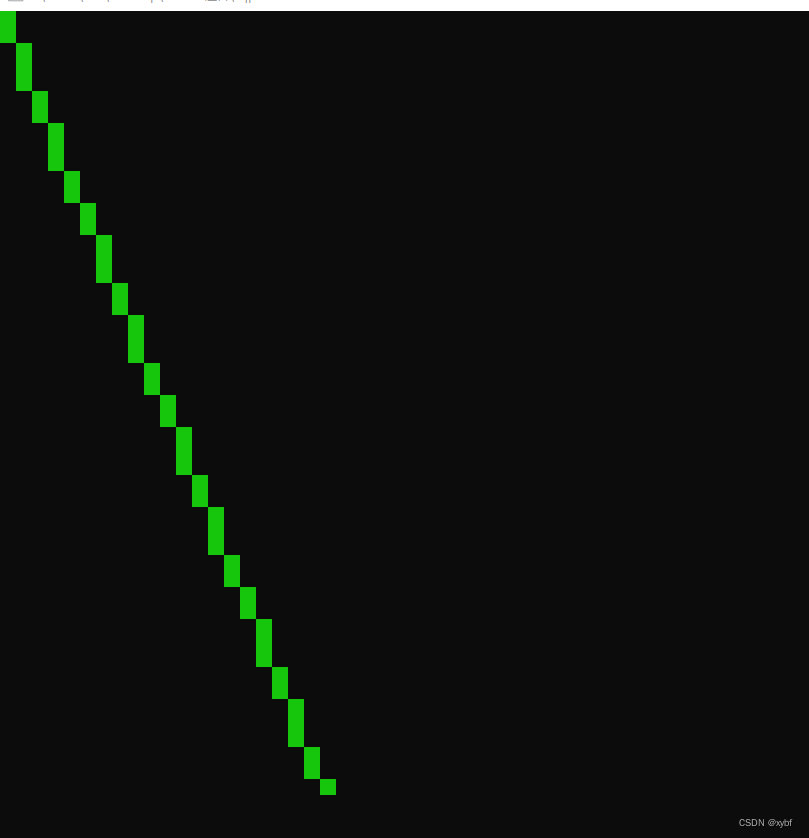
示例代码
我这里将头文件命名为 Drawer.h ,如果用了别的名字保存头文件,这里也要改过来。
功能是从(1,1)到鼠标的位置画线。
#include "Drawer.h"
using namespace std;

Pos mp; // Mouse_Pos

void game()
{
	while(1)
	{
		getmousepos(mp); // Get Mouse Pos
		fill(black); // Let Screen be black
		line(1, 1, mp.x, mp.y, green); // from (1, 1) to (mp.x, mp.y) draw Line
		//                        ^
		//                        |
		// You can change this to red, blue, white or more
		update(); // Update Screen
	}
}

int main(){
    system("mode con cols=102 lines=52");
    init(50, 16);// 50x50 Screen and font size is 16
	game();
}
示例图片
截屏截不到鼠标。。。
头文件代码
#include <windows.h>
#include <algorithm>
#include <cstdio>
#include <cmath>
#include <ctime>
#ifndef KEY_DOWN
#define KEY_DOWN(VK_NONAME) ((GetAsyncKeyState(VK_NONAME) & 0x8000) ? 1:0)
#endif
#define clean 0x2
#define box 0x4
#define full 0x1
using namespace std;

enum concol {
	black = 0,
	dark_blue = 1,
	dark_green = 2,
	dark_aqua = 3, dark_cyan = 3,
	dark_red = 4,
	dark_purple = 5, dark_pink = 5, dark_magenta = 5,
	dark_yellow = 6,
	dark_white = 7,
	gray = 8,
	blue = 9,
	green = 10,
	cyan = 11,
	red = 12,
	purple = 13, pink = 13,
	yellow = 14,
	white = 15
};

struct pixel {
	concol color;
};

struct Pos {
	int x, y;
};

struct Pos3d
{
	int x, y, z ;
};

CONSOLE_CURSOR_INFO CursorInfo;
COORD _GoToPos;
HANDLE hOut = GetStdHandle(STD_OUTPUT_HANDLE);
HWND hwnd = GetForegroundWindow();
int backcol, textcol;
pixel _LastScreen[1000][1000];
pixel _NewScreen[1000][1000];
int _ScreenSideLength;
int Py3dx = 0, Py3dy = 0 ;
int xzlen = 2, yzlen = 1 ;
int fontsize = 16;

inline void getmousepos(Pos &p) {
	POINT pt;
	GetCursorPos(&pt);
	ScreenToClient(hwnd, &pt);
	p.y = (pt.y / fontsize + 0.5);
	p.x = (pt.x / fontsize + 0.5);
}

inline void gt(short x, short y) {
	--x;
	--y;
	_GoToPos = {x * xzlen, y * yzlen};
	SetConsoleCursorPosition(hOut, _GoToPos);
}

inline void HideCursor()
{
	GetConsoleCursorInfo(hOut, &CursorInfo);
	CursorInfo.bVisible = false;
	SetConsoleCursorInfo(hOut, &CursorInfo);
}

inline void settextcolor(concol textcolor) {
	textcol = textcolor;
	unsigned short wAttributes = ((unsigned int)backcol << 4) | (unsigned int)textcol;
	SetConsoleTextAttribute(hOut, wAttributes);
}

inline void setbackcolor(concol backcolor) {
	hOut = GetStdHandle(STD_OUTPUT_HANDLE);
	backcol = backcolor;
	unsigned short wAttributes = ((unsigned int)backcol << 4) | (unsigned int)textcol;
	SetConsoleTextAttribute(hOut, wAttributes);
}

struct Button {
	Pos mp;
	const char* name;
	int len, qx, px, py;
	void rename(const char* ne) {
		name = ne;
		len = strlen(ne);
	}

	void setpos(int x, int y) {
		py = y;
		qx = (x - len / 2);
		px = (x + len / 2);
		gt(qx, y);
		printf(name);
	}
	bool check() {

		getmousepos(mp);
		if (mp.x <= px and mp.x >= qx and mp.y <= py and mp.y >= py - 2) {
			gt(qx - 2, py);
			printf(">>");
			gt(px, py);
			printf("<<");
			if (KEY_DOWN(MOUSE_MOVED)) return true;
		} else {
			gt(qx - 2, py);
			printf("  ");
			gt(px, py);
			printf("  ");
		}
		return false;
	}
};

inline void init(int x, int fz) {
	fontsize = fz;
	GetConsoleCursorInfo(hOut, &CursorInfo);
	CursorInfo.bVisible = false;
	SetConsoleCursorInfo(hOut, &CursorInfo);
	_ScreenSideLength = x;
}

inline void update() {
	for (int i = 1; i <= _ScreenSideLength ; ++i) {
		for (int j = 1; j <= _ScreenSideLength ; ++j) {
			if (_LastScreen[j][i].color != _NewScreen[j][i].color) {
				gt(j, i);
				setbackcolor(_NewScreen[j][i].color);
				for(int i=1;i<=yzlen;++i)
				{
					for(int j=1;j<=xzlen;++j)
						putchar(' ');
					puts("\n");
				}
				_LastScreen[j][i] = _NewScreen[j][i];
			}
		}
	}
}

void fill(concol color) {
	for (int i = 1; i <= _ScreenSideLength; ++i) {
		for (int j = 1; j <= _ScreenSideLength; ++j) {
			if (_NewScreen[j][i].color != color) {
				_NewScreen[j][i].color = color;
			}

		}
	}
}

void rect(int sx, int sy, int ex, int ey, concol color) {
	if (ey < sy) swap(ey, sy);
	if (ex < sx) swap(ex, sx);
	for (int i = sy; i <= ey; ++i) {
		for (int j = sx; j <= ex; ++j) {
			_NewScreen[j][i].color = color;
		}
	}
}

void ChangePy(int x, int y)
{
	Py3dx = x;
	Py3dy = y;
}

inline void dot(int x, int y, concol color) {
	_NewScreen[x][y].color = color;
}

inline void line(int sx, int sy, int ex, int ey, concol color)
{
	int xlen = ex - sx ;
	int ylen = ey - sy ;
	int len = sqrt(pow(xlen, 2) + pow(ylen, 2)) ;
	for(double i=0; i<=len; i += 1)
	{
		int x = xlen * i / len ;
		int y = ylen * i / len ;
		_NewScreen[x + sx][y + sy].color = color ;
	}
}

inline Pos pos3t2(Pos3d pos)
{
	if(pos.z == 0)
	{
		return Pos {pos.x, pos.y} ;
	}
	return Pos{pos.x / (log10(pos.z)) + Py3dx, pos.y / (log10(pos.z)) + Py3dy} ;
}

inline void line3d(Pos3d a, Pos3d b, concol color)
{
	Pos a2 = pos3t2(a);
	Pos b2 = pos3t2(b);
//	line(a2.x, b2.y, a2.y, b2.x, color);
	line(a2.x, a2.y, b2.x, b2.y, color);
}

inline int dis3d(Pos3d a, Pos3d b)
{
	int x = abs(a.x - b.x);
	int y = abs(a.y - b.y);
	int z = abs(a.z - b.z);
	return sqrt(pow(x, 2) + pow(y, 2) + pow(z, 2)) ;
}

/*
Q------W
 \    /
  A--S
*/
inline void rect3d(Pos3d q, Pos3d w, Pos3d a, Pos3d s, concol color)
{
	int qlen = dis3d(q, a);
	int plen = dis3d(w, s);
	int len = max(qlen, plen);
	for(double i=1;i<=len; i+=0.1)
	{
		Pos3d qpos = Pos3d {abs(q.x-a.x)*i/len + q.x, abs(q.y-a.y)*i/len + q.y, abs(q.z-a.z)*i/len + q.z} ;
		Pos3d ppos = Pos3d {abs(w.x-s.x)*i/len + w.x, abs(w.y-s.y)*i/len + w.y, abs(w.z-s.z)*i/len + w.z} ;
		line3d(qpos, ppos, color);
	}
}

struct cube
{

	Pos3d pos ;
	int xlen, ylen, zlen ;

	void init(int xp, int yp, int zp, int xl, int yl, int zl)
	{
		pos = Pos3d {xp - Py3dx, yp - Py3dy, zp};
		xlen = xl;
		ylen = yl;
		zlen = zl;
	}

	inline Pos3d getdotpos(int doti)
	{
		switch(doti)
		{
			case 8: return Pos3d {pos.x + xlen, pos.y + ylen, pos.z + zlen} ;
			case 7: return Pos3d {pos.x, pos.y + ylen, pos.z + zlen} ;
			case 6: return Pos3d {pos.x + xlen, pos.y, pos.z + zlen} ;
			case 4: return Pos3d {pos.x + xlen, pos.y + ylen, pos.z} ;
			case 5: return Pos3d {pos.x, pos.y, pos.z + zlen} ;
			case 3: return Pos3d {pos.x, pos.y + ylen, pos.z} ;
			case 2: return Pos3d {pos.x + xlen, pos.y, pos.z} ;
			case 1: return Pos3d {pos.x, pos.y, pos.z} ;
		}
		return {0, 0, 0}; //Else
	}
	/*
	    5----------6
	   /|         /|
	  / |        / |
	 /  |       /  |
	1----------2   |
	|   7------|---8
ylen|  /       |  /
	| /        | /zlen
	|/  xlen   |/
	3----------4
	^
	|
	O
	*/
	inline void draw(concol color, int mode)
	{
		if(mode & full)
		{
		rect3d(getdotpos(5), getdotpos(7), getdotpos(6), getdotpos(8), green);
		rect3d(getdotpos(1), getdotpos(3), getdotpos(5), getdotpos(7), red);
		rect3d(getdotpos(5), getdotpos(1), getdotpos(6), getdotpos(2), blue);
		rect3d(getdotpos(7), getdotpos(3), getdotpos(8), getdotpos(4), pink);
		rect3d(getdotpos(2), getdotpos(4), getdotpos(6), getdotpos(8), yellow);
		rect3d(getdotpos(1), getdotpos(3), getdotpos(2), getdotpos(4), white);
		}
		if(mode & clean)
		{
		line3d(getdotpos(1), getdotpos(2), color) ;
		line3d(getdotpos(1), getdotpos(3), color) ;
		line3d(getdotpos(1), getdotpos(5), color) ;
		line3d(getdotpos(2), getdotpos(6), color) ;
		line3d(getdotpos(2), getdotpos(4), color) ;
		line3d(getdotpos(3), getdotpos(4), color) ;
		line3d(getdotpos(3), getdotpos(7), color) ;
		line3d(getdotpos(4), getdotpos(8), color) ;
		line3d(getdotpos(5), getdotpos(6), color) ;
		line3d(getdotpos(5), getdotpos(7), color) ;
		line3d(getdotpos(6), getdotpos(8), color) ;
		line3d(getdotpos(7), getdotpos(8), color) ;
		}
		if(mode & box)
		{
			line3d(getdotpos(1), getdotpos(4), color) ;
			line3d(getdotpos(1), getdotpos(7), color) ;
			line3d(getdotpos(2), getdotpos(3), color) ;
			line3d(getdotpos(2), getdotpos(8), color) ;
			line3d(getdotpos(3), getdotpos(5), color) ;
			line3d(getdotpos(3), getdotpos(8), color) ;
			line3d(getdotpos(4), getdotpos(7), color) ;
			line3d(getdotpos(4), getdotpos(6), color) ;
			line3d(getdotpos(5), getdotpos(2), color) ;
			line3d(getdotpos(5), getdotpos(8), color) ;
			line3d(getdotpos(6), getdotpos(1), color) ;
			line3d(getdotpos(6), getdotpos(7), color) ;
		}
	}
};
总结
到此这篇关于C++控制台绘图头文件的文章就介绍到这了,更多相关C++控制台绘图头文件内容请搜索我们以前的文章或继续浏览下面的相关文章希望大家以后多多支持我们!
相关推荐
-
C++中头文件的概念与基本编写方法
1 标准库中的头文件 C++标准库中的一切内容都被放在名字空间std中(名字空间中的内容对外是不可见的),但是带来了一个新问题,无数现有的C++代码都依赖于使用了多年的伪标准库中的功能,如声明在<iostream.h>等头文件中的功能,使用std包装标准库导致现有代码的不可用,为了兼容这种情况,标准委员会为包装了std的那部分标准库创建了新的头文件,新的头文件的文件名与旧的一样,只是没有.h这个后缀,如<iostream.h>就变成了<iostream>.对于C头文件,
-
C++的头文件和实现文件详解
在C++编程过程中,随着项目的越来越大,代码也会越来越多,并且难以管理和分析.于是,在C++中就要分出了头(.h)文件和实现(.cpp)文件,并且也有了Package的概念. 对于以C起步,C#作为"母语"的我刚开始跟着导师学习C++对这方面还是感到很模糊.虽然我可以以C的知识面对C++的语法规范,用C#的思想领悟C++中类的使用.但是C#中定义和实现是都在一个文件中(其实都是在类里面),而使用C的时候也只是编程的刚刚起步,所写的程序也只要一个文件就够了.因此对于C++的Package
-
C++ 头文件系列(set)详解
简介 头文件包含 set . multiset 两个类模版,这里要描述的概念与map非常相似,甚至连成员函数都几乎一样,所以这篇随笔会很短. set set如果翻译成中文应该是集合的意思,这里更确切的说是 唯一有序集合 ,性质与map类似: 关联性 元素唯一性 动态增长 有序性 此外的一个重要特点是: Key与Value是同一个对象(自映射) set == map 定义使用set的时候只需要传入一个类型参数,这个类型即是key,也是value. 实际上, set是map的特殊情况 ,虽然set没
-
C++常用的#include头文件总结
本文详细罗列了C++所包含的头文件的名称及作用说明,比较适合初学者了解一下,几乎每一个C++文件的开始都要#include ,可大部分人都没有去关注#include 后面是什么,对照本文的说明相信会对大家理解C++结构多少有些帮助. #include <deque> //STL 双端队列容器 #include <exception> //异常处理类 #include <fstream> //文件输入/输出 #include <functional> //ST
-
C++中头文件和源文件详细介绍
C++中的头文件和源文件详解 一.C++编译模式 通常,在一个C++程序中,只包含两类文件--.cpp文件和.h文件.其中,.cpp文件被称作C++源文件,里面放的都是C++的源代码:而.h文件则被称作C++头文件,里面放的也是C++的源代码. C+ +语言支持"分别编译"(separate compilation).也就是说,一个程序所有的内容,可以分成不同的部分分别放在不同的.cpp文件里..cpp文件里的东西都是相对独立的,在编 译(compile)时不需要与其他文件互通,只需要
-
C++控制台绘图头文件实例代码
目录 简介 函数介绍 1.init(int x, int fz) 2.fill(concol color) 3.update() 4.getmousepos(pos & p) 5.gt(int x, int y) 6.HideCursor() 7.settextcolor(concol color) 8.setbackcolor(concol color) 9.rect(int sx, int sy, int ex, int ey, concol color) 10.line(int sx, i
-
C# 读写XML文件实例代码
C#史上最简单读写xml文件方式,创建控制台应用程序赋值代码,就可以运行,需要改动,请自行调整 using System; using System.Collections.Generic; using System.IO; using System.Linq; using System.Text; using System.Threading.Tasks; using System.Xml; namespace ConsoleApp1 { class Program { public cons
-
Ajax异步上传文件实例代码分享
非常不多说,直接给大家上干货,写的不好还请见谅. 具体代码如下所示: <!DOCTYPE html> <html> <head> <meta name="viewport" content="width=device-width" /> <script src="~/Scripts/jquery-1.8.2.min.js"></script> <title>Ind
-
Java程序打包成带参数的jar文件实例代码
这里我们通过Apache Commons CLI来完成目标功能,废话不多说直接上代码 所需的maven依赖 <dependency> <groupId>commons-cli</groupId> <artifactId>commons-cli</artifactId> <version>1.4</version> </dependency> 这里我们贴出主类代码 Options opts = new Optio
-

JavaWeb中上传和下载文件实例代码
一丶先引入上传下载的lib 二丶上传的的servlet package com.test.action; import java.io.File; import java.io.FileOutputStream; import java.io.IOException; import java.io.InputStream; import java.io.OutputStream; import java.util.List; import javax.servlet.ServletExcepti
-
PHP+AjaxForm异步带进度条上传文件实例代码
在使用ajaxForm方法之前,首先需要安装form.js的插件,网上有: 一.首先说用法,ajaxForm可以接收0或1个参数,该参数可以是一个变量.一个对象或回调函数,这个对象主要有以下参数: var object= { url:url, //form提交数据的地址 type:type, //form提交的方式(method:post/get) target:target, //服务器返回的响应数据显示的元素(Id)号 beforeSerialize:function(){} //序列化提交
-
java使用RandomAccessFile类基于指针读写文件实例代码
java API中提供了一个基于指针操作实现对文件随机访问操作的类,该类就是RandomAccessFile类,该类不同于其他很多基于流方式读写文件的类.它直接继承自Object. public class RandomAccessFile extends Objectimplements DataOutput, DataInput, Closeable{...} 1.使用该类时可以指定对要操作文件的读写模式. 第一种模式是只读模式,第二种模式是读写模式.在创建该类实例时指定. @Test pu
-
python 实现自动远程登陆scp文件实例代码
python 实现自动远程登陆scp文件实例代码 实现实例代码: #!/usr/bin/expect if {$argc!=3} { send_user "Usage: $argv0 {path1} {path2} {Password}\n\n" exit } set path1 [lindex $argv 0] set path2 [lindex $argv 1] set Password [lindex $argv 2] spawn scp ${path1} ${path2} e
-
Ajax表单异步上传文件实例代码(包括文件域)
1.起因 做前台页面时,需要调用WebAPI的Post请求,发送一些字段和文件(相当于把表单通过ajax异步发送出去,得到返回结果),然后得到返回值判断是否成功. 2.尝试 先是尝试了一下 "jQuery Form Plugin" ,这玩意就是的巨大的坑,实现他和jquery1.9.2兼容性就不是太好,好不容易把$.browser的问题解决了,发现用他上传文件得不到返回值. $("#view").submit( $("#view").ajaxSu
-
PHP unlink与rmdir删除目录及目录下所有文件实例代码
在php中删除文件与目录其实很简单只要两个函数一个是unlink一个rmdir函数,如果要实现删除目录及目录下的文件我们需要利用递归来操作. 函数代码:仅删除指定目录下的文件,不删除目录文件夹,代码如下: class shanchu { //循环目录下的所有文件 function delFileUnderDir( $dirName="../Smarty/templates/templates_c" ) { if ( $handle = opendir( "$dirName&q