MybatisPlus搭建项目环境及分页插件
目录
- 一、搭建项目环境
- 1.1 创建项目
- 1.2 配置环境
- 1.1.1 自动生成代码
- 1.1.2 配置SpringbootassetsApplication
- 1.3 配置application.yml
- 1.4 编写controller层
- 1.5 编写前台代码
- 1.6 测试
- 1.6.1 查询
- 1.6.3 修改
- 1.6.4 删除
- 二、MyBatis-Plus分页插件
- 2.1 创建插件配置类
- 2.2 编写SQL
- 2.3 mapper层
- 2.4 service层
- 2.5 controller 层
- 总结
一、搭建项目环境
1.1 创建项目

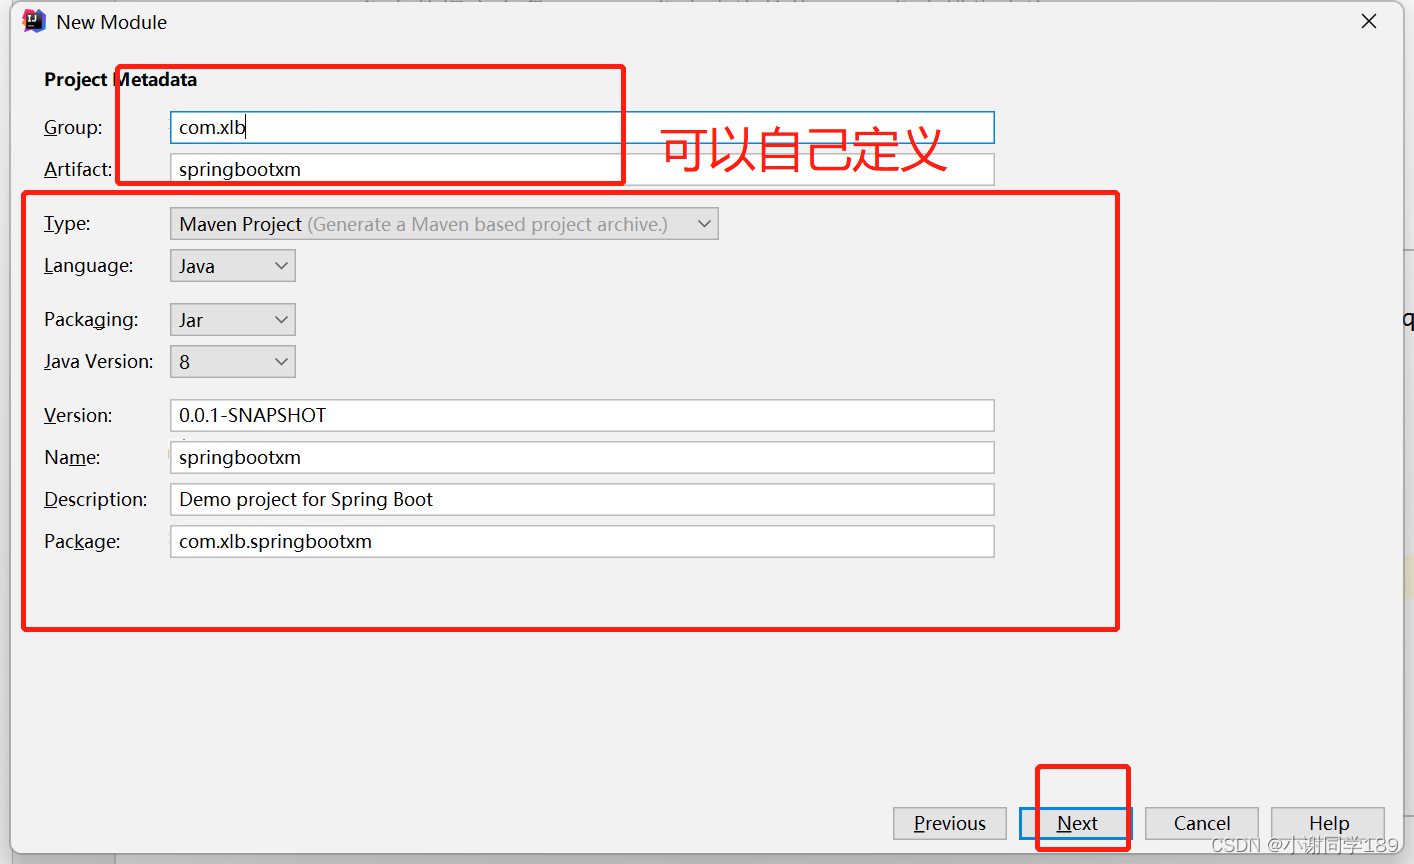
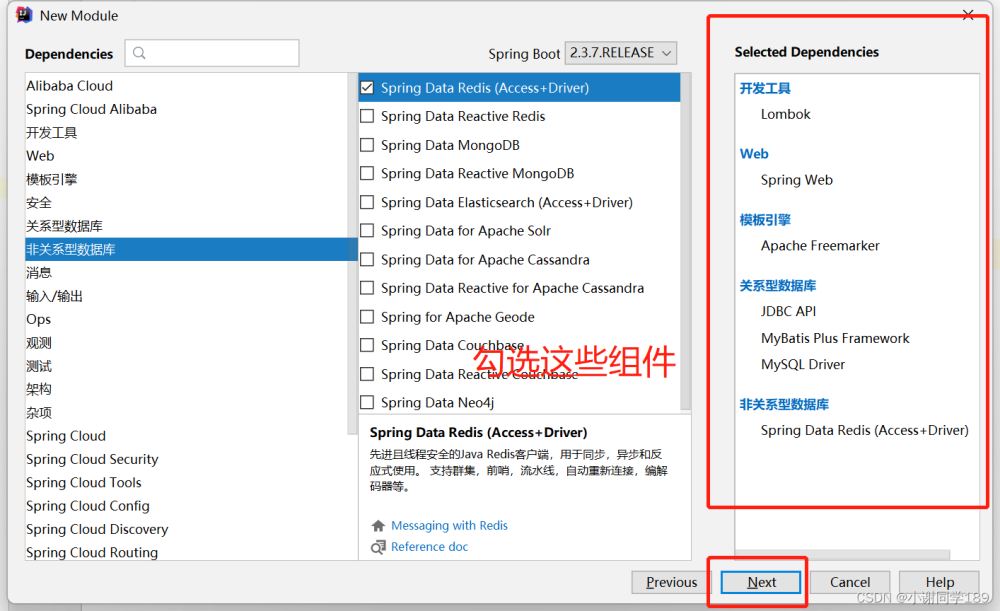

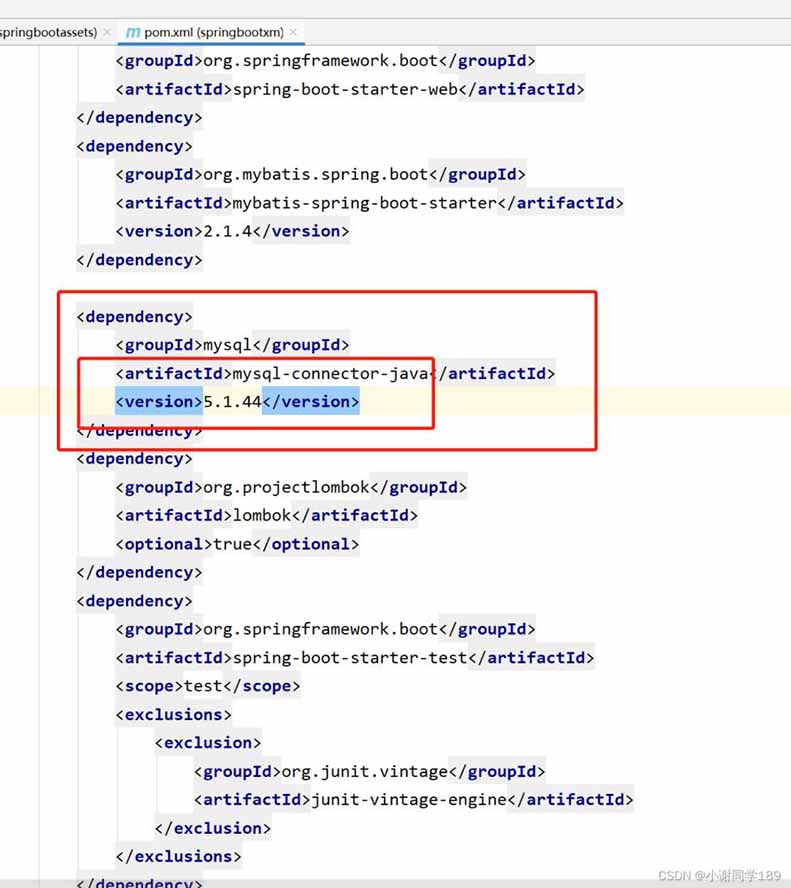
1.2 配置环境
导入分页依赖
 <!--用于生存代码-->
        <dependency>
            <groupId>com.baomidou</groupId>
            <artifactId>mybatis-plus-generator</artifactId>
            <version>3.4.1</version>
        </dependency>
        <dependency>
            <groupId>org.freemarker</groupId>
            <artifactId>freemarker</artifactId>
            <version>2.3.31</version>
        </dependency>
修改MySQL的版本
1.1.1 自动生成代码
首先在resources下创建项目mappers

修改application.yml

server:
    port: 8080
spring:
    application:
        name: springbootxm
    datasource:
        driver-class-name: com.mysql.jdbc.Driver
        name: defaultDataSource
        password: 123456
        url: jdbc:mysql://localhost:3306/y101?useUnicode=true&characterEncoding=UTF-8
        username: root
    freemarker:
        cache: false
        charset: utf-8
        expose-request-attributes: true
        expose-session-attributes: true
        suffix: .ftl
        template-loader-path: classpath:/templates/
#    resources:
#        static-locations: classpath:/static/# 应用服务 WEB 访问端口
    mvc:
        static-path-pattern: /static/**
#打印SQL语句
logging:
    level:
        com.xlb.springbootassets: debug
#配置映射
mybatis-plus:
    mapper-locations: classpath:mappers/**/*.xml
    type-aliases-package: com.xlb.springbootxm.bj.model
引入生成代码类
MPGenerator

package com.xlb.springbootxm.mp;
import com.baomidou.mybatisplus.annotation.DbType;
import com.baomidou.mybatisplus.annotation.IdType;
import com.baomidou.mybatisplus.core.exceptions.MybatisPlusException;
import com.baomidou.mybatisplus.core.toolkit.StringPool;
import com.baomidou.mybatisplus.core.toolkit.StringUtils;
import com.baomidou.mybatisplus.generator.AutoGenerator;
import com.baomidou.mybatisplus.generator.InjectionConfig;
import com.baomidou.mybatisplus.generator.config.*;
import com.baomidou.mybatisplus.generator.config.po.TableInfo;
import com.baomidou.mybatisplus.generator.config.rules.NamingStrategy;
import com.baomidou.mybatisplus.generator.engine.FreemarkerTemplateEngine;
import java.util.ArrayList;
import java.util.List;
import java.util.Scanner;
/**
* mybatis-plus代码生成
*/
public class MPGenerator {
/**
* <p>
* 读取控制台内容
* </p>
*/
public static String scanner(String tip) {
Scanner scanner = new Scanner(System.in);
StringBuilder help = new StringBuilder();
help.append("请输入" + tip);
System.out.println(help.toString());
if (scanner.hasNext()) {
String ipt = scanner.next();
if (StringUtils.isNotBlank(ipt)) {
if ("quit".equals(ipt)) return "";
return ipt;
}
}
throw new MybatisPlusException("请输入正确的" + tip + "!");
}
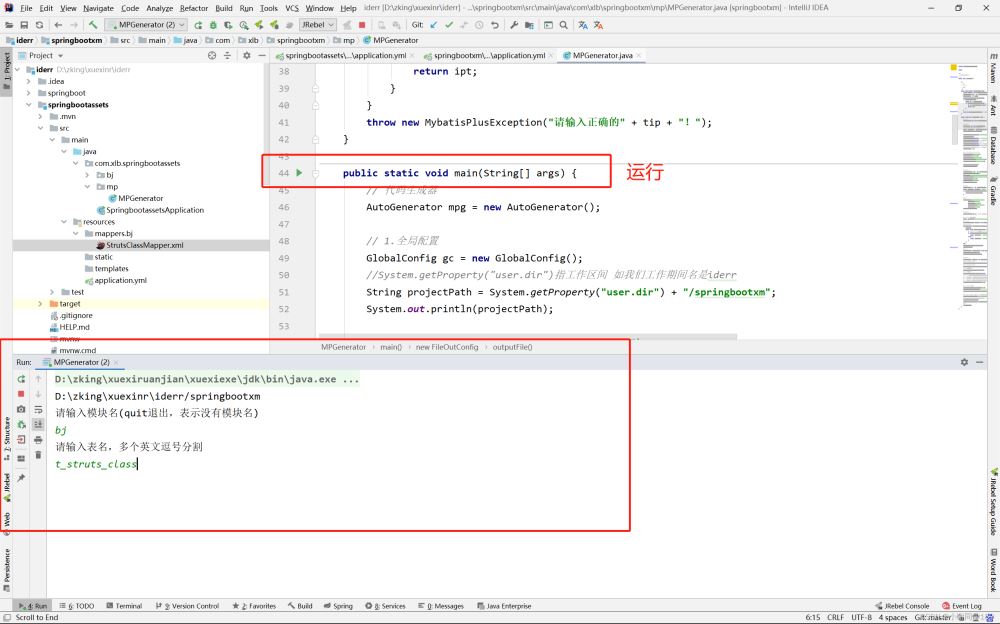
public static void main(String[] args) {
// 代码生成器
AutoGenerator mpg = new AutoGenerator();
// 1.全局配置
GlobalConfig gc = new GlobalConfig();
//System.getProperty("user.dir")指工作区间 如我们工作期间名是iderr
String projectPath = System.getProperty("user.dir") + "/springbootxm";
System.out.println(projectPath);
gc.setOutputDir(projectPath + "/src/main/java");
gc.setOpen(false);
gc.setBaseResultMap(true);//生成BaseResultMap
gc.setActiveRecord(false);// 不需要ActiveRecord特性的请改为false
gc.setEnableCache(false);// XML 二级缓存
gc.setBaseResultMap(true);// XML ResultMap
gc.setBaseColumnList(true);// XML columList
//gc.setSwagger2(true); //实体属性 Swagger2 注解
gc.setAuthor("小谢");
// 自定义文件命名,注意 %s 会自动填充表实体属性!
gc.setMapperName("%sMapper");
gc.setXmlName("%sMapper");
gc.setServiceName("%sService");
gc.setServiceImplName("%sServiceImpl");
gc.setControllerName("%sController");
gc.setIdType(IdType.AUTO);
mpg.setGlobalConfig(gc);
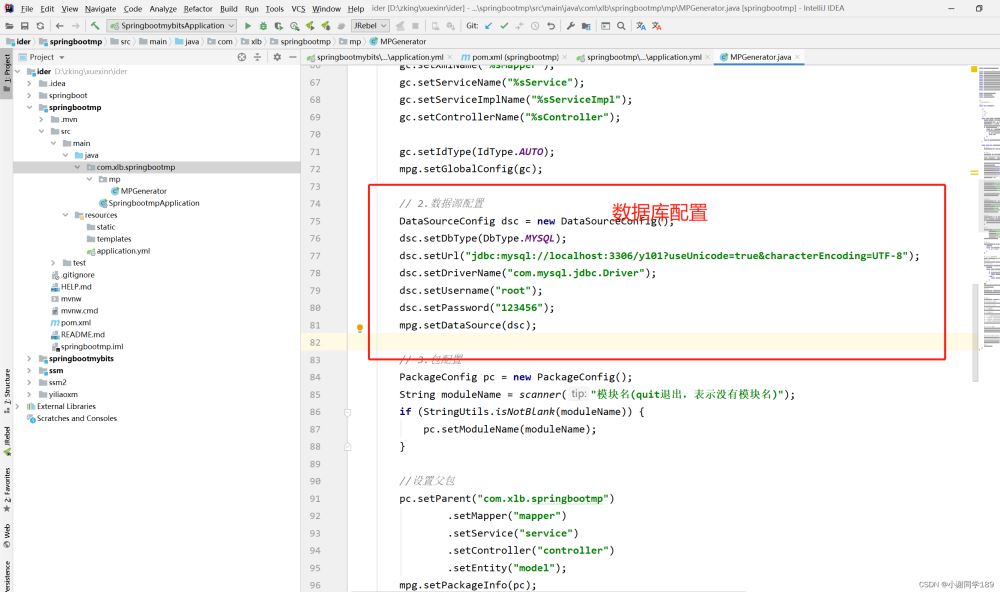
// 2.数据源配置
DataSourceConfig dsc = new DataSourceConfig();
dsc.setDbType(DbType.MYSQL);
dsc.setUrl("jdbc:mysql://localhost:3306/y101?useUnicode=true&characterEncoding=UTF-8");
dsc.setDriverName("com.mysql.jdbc.Driver");
dsc.setUsername("root");
dsc.setPassword("123456");
mpg.setDataSource(dsc);
// 3.包配置
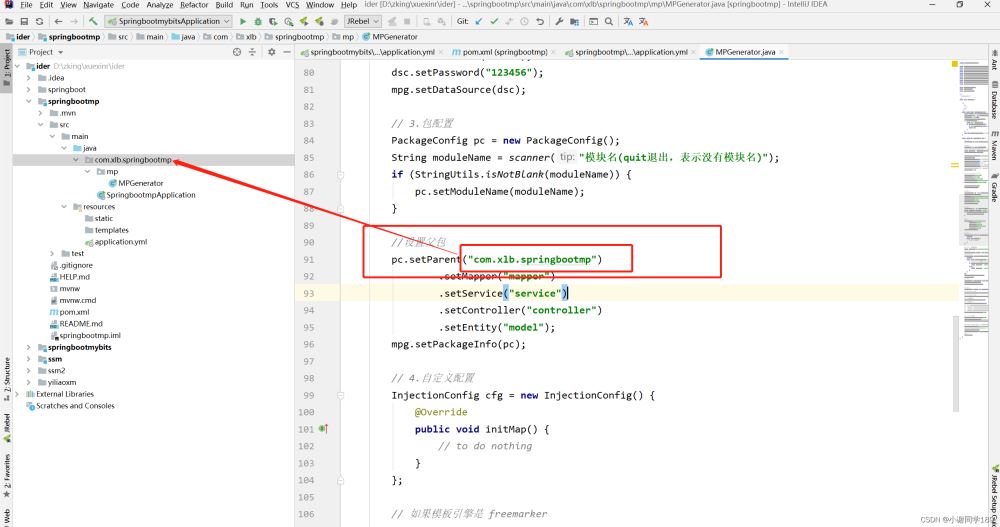
PackageConfig pc = new PackageConfig();
String moduleName = scanner("模块名(quit退出,表示没有模块名)");
if (StringUtils.isNotBlank(moduleName)) {
pc.setModuleName(moduleName);
}
//设置父包
pc.setParent("com.xlb.springbootxm")
.setMapper("mapper")
.setService("service")
.setController("controller")
.setEntity("model");
mpg.setPackageInfo(pc);
// 4.自定义配置
InjectionConfig cfg = new InjectionConfig() {
@Override
public void initMap() {
// to do nothing
}
};
// 如果模板引擎是 freemarker
String templatePath = "/templates/mapper.xml.ftl";
// 自定义输出配置
List<FileOutConfig> focList = new ArrayList<>();
// 自定义配置会被优先输出
focList.add(new FileOutConfig(templatePath) {
@Override
public String outputFile(TableInfo tableInfo) {
// 自定义输出文件名 , 如果你 Entity 设置了前后缀、此处注意 xml 的名称会跟着发生变化!!
if (StringUtils.isNotBlank(pc.getModuleName())) {
return projectPath + "/src/main/resources/mappers/" + pc.getModuleName() + "/" + tableInfo.getEntityName() + "Mapper" + StringPool.DOT_XML;
} else {
return projectPath + "/src/main/resources/mappers/" + tableInfo.getEntityName() + "Mapper" + StringPool.DOT_XML;
}
}
});
cfg.setFileOutConfigList(focList);
mpg.setCfg(cfg);
// 配置模板
TemplateConfig templateConfig = new TemplateConfig();
templateConfig.setXml(null);
mpg.setTemplate(templateConfig);
// 5.策略配置
StrategyConfig strategy = new StrategyConfig();
// 表名生成策略(下划线转驼峰命名)
strategy.setNaming(NamingStrategy.underline_to_camel);
// 列名生成策略(下划线转驼峰命名)
strategy.setColumnNaming(NamingStrategy.underline_to_camel);
// 是否启动Lombok配置
strategy.setEntityLombokModel(true);
// 是否启动REST风格配置
strategy.setRestControllerStyle(true);
// 自定义实体父类strategy.setSuperEntityClass("com.baomidou.mybatisplus.extension.activerecord.Model");
// 自定义service父接口strategy.setSuperServiceClass("com.baomidou.mybatisplus.extension.service.IService");
// 自定义service实现类strategy.setSuperServiceImplClass("com.baomidou.mybatisplus.extension.service.impl.ServiceImpl");
// 自定义mapper接口strategy.setSuperMapperClass("com.baomidou.mybatisplus.core.mapper.BaseMapper");
strategy.setSuperEntityColumns("id");
// 写于父类中的公共字段plus
strategy.setSuperEntityColumns("id");
strategy.setInclude(scanner("表名,多个英文逗号分割").split(","));
strategy.setControllerMappingHyphenStyle(true);
//表名前缀(可变参数):“t_”或”“t_模块名”,例如:t_user或t_sys_user
strategy.setTablePrefix("t_", "t_sys_");
//strategy.setTablePrefix(scanner("请输入表前缀"));
mpg.setStrategy(strategy);
mpg.setTemplateEngine(new FreemarkerTemplateEngine());
// 执行
mpg.execute();
}
}
运行生成代码
1.1.2 配置SpringbootassetsApplication
SpringbootassetsApplication
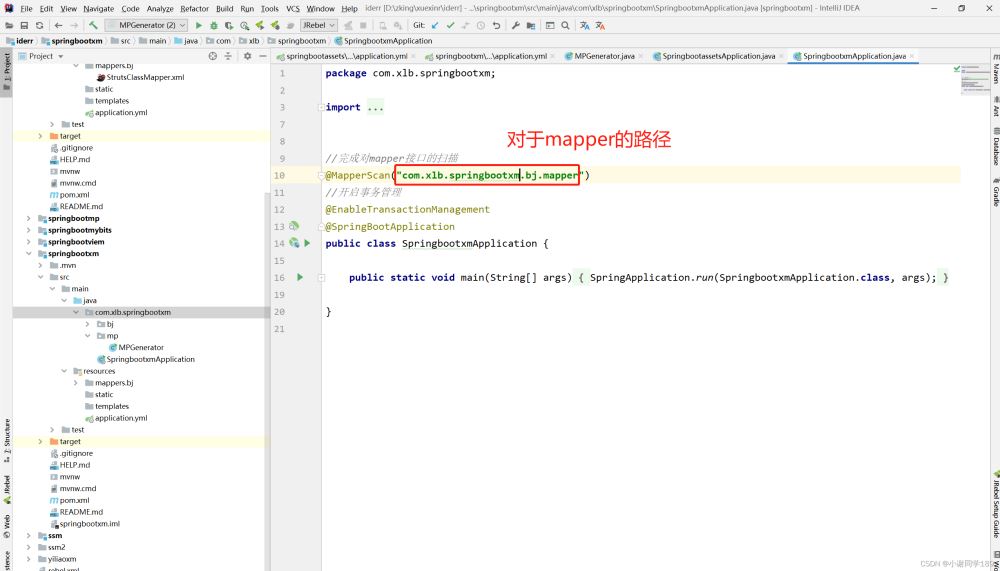
package com.xlb.springbootxm;

import org.mybatis.spring.annotation.MapperScan;
import org.springframework.boot.SpringApplication;
import org.springframework.boot.autoconfigure.SpringBootApplication;
import org.springframework.transaction.annotation.EnableTransactionManagement;

//完成对mapper接口的扫描
@MapperScan("com.xlb.springbootxm.bj.mapper")
//开启事务管理
@EnableTransactionManagement
@SpringBootApplication
public class SpringbootxmApplication {

    public static void main(String[] args) {
        SpringApplication.run(SpringbootxmApplication.class, args);
    }
}
1.3 配置application.yml
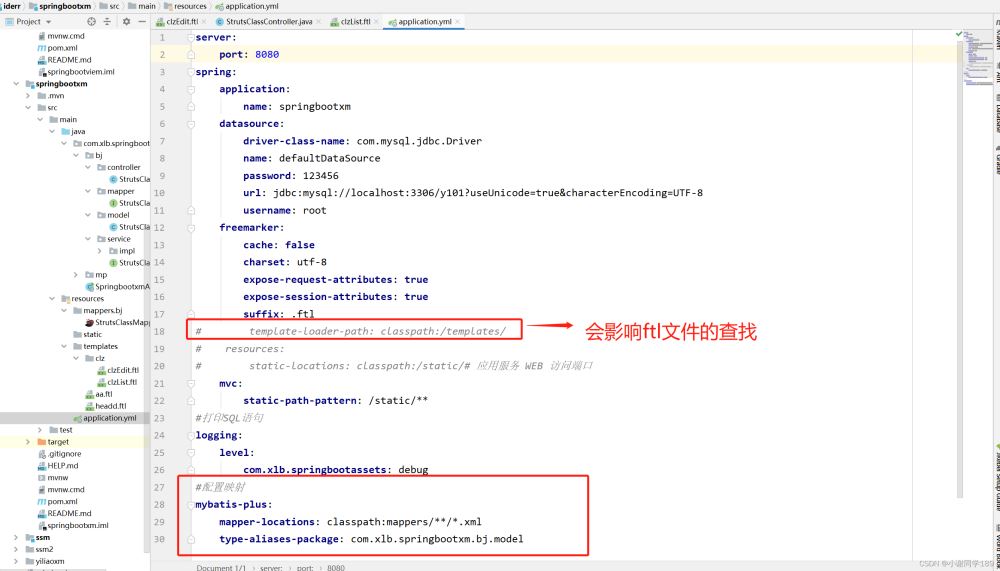
server:
    port: 8080
spring:
    application:
        name: springbootxm
    datasource:
        driver-class-name: com.mysql.jdbc.Driver
        name: defaultDataSource
        password: 123456
        url: jdbc:mysql://localhost:3306/y101?useUnicode=true&characterEncoding=UTF-8
        username: root
    freemarker:
        cache: false
        charset: utf-8
        expose-request-attributes: true
        expose-session-attributes: true
        suffix: .ftl
#        template-loader-path: classpath:/templates/
#    resources:
#        static-locations: classpath:/static/# 应用服务 WEB 访问端口
    mvc:
        static-path-pattern: /static/**
#打印SQL语句
logging:
    level:
        com.xlb.springbootassets: debug
#配置映射
mybatis-plus:
    mapper-locations: classpath:mappers/**/*.xml
    type-aliases-package: com.xlb.springbootxm.bj.model
1.4 编写controller层
因为自动生成代码注解是==@RestController==,等价于@Controller + @ResponseBody。但是@ResponseBody表示方法的返回值直接以指定的格式写入Http response body中,而不是解析为跳转路径。所以我们要把注解改为==@Controller==
StrutsClassController
package com.xlb.springbootmp.book.controller;

import com.baomidou.mybatisplus.core.conditions.query.QueryWrapper;
import com.xlb.springbootmp.book.model.MvcBook;
import com.xlb.springbootmp.book.service.MvcBookService;
import org.springframework.beans.factory.annotation.Autowired;
import org.springframework.web.bind.annotation.*;

import java.util.HashMap;
import java.util.List;
import java.util.Map;

/**
 * <p>
 *  前端控制器
 * </p>
 *
 * @author lky
 * @since 2022-11-01
 */
@Controller
@RequestMapping("/book")
public class MvcBookController {
    @Autowired
    private MvcBookService mvcBookService;

    //查询单个
    @GetMapping("/list")
    public List<MvcBook> list(){
        return mvcBookService.list();
    }

    //按条件查询
    @GetMapping("/listByCondition")
    public List<MvcBook> listByCondition(MvcBook mvcBook){
        QueryWrapper qw = new QueryWrapper();
        //key代表数据库自段  value代表查询的值 like代表模糊查询
        qw.like("bname", mvcBook.getBname());
        return mvcBookService.list(qw);
    }

    //查询单个
    @GetMapping("/get")
    public MvcBook get(MvcBook mvcBook){
        return mvcBookService.getById(mvcBook.getBid());
    }

    //增加
    @PutMapping("/add")
    public boolean add(MvcBook mvcBook){
        boolean save = mvcBookService.save(mvcBook);
        return save;
    }

    //删除
    @DeleteMapping("/del")
    public boolean del(MvcBook mvcBook){
        return mvcBookService.removeById(mvcBook.getBid());
    }

    //修改
    @PostMapping("/edit")
    public boolean edit(MvcBook mvcBook){
        return mvcBookService.saveOrUpdate(mvcBook);
    }

    // 连表查询
    @GetMapping("/userRole")
    public List<Map> userRole(String uname){
        Map map = new HashMap();
        map.put("username",uname);
        List<Map> maps = mvcBookService.queryUserRole(map);
        return maps;
    }
}
1.5 编写前台代码
目录

headd.ftl
<#--局部变量-->
<#assign ctx>
    ${springMacroRequestContext.contextPath}
</#assign>

<#--全局变量-->
<#global ctx2>
    ${springMacroRequestContext.contextPath}
</#global>
clzEdit.ftl
<!DOCTYPE html>
<html lang="en">
<head>
    <meta http-equiv="Content-Type" content="text/html; charset=UTF-8">
    <title>博客的编辑界面</title>
</head>
<body>
<#include '/headd.ftl' />
<#if b??>
   <#-- 修改-->
    <form action="${ctx }/clz/edit">

        cname:<input type="text" name="cname" value="${b.cname !}">
        cteacher:<input type="text" name="cteacher" value="${b.cteacher !}">
        pic:<input type="text" name="pic" value="${b.pic !}">
        <input type="submit">
    </form>
    <#else>
        <#-- 新增 -->
        <form action="${ctx }/clz/add" method="post">

            cname:<input type="text" name="cname" value="">
            cteacher:<input type="text" name="cteacher" value="">
            pic:<input type="text" name="pic" value="">
            <input type="submit">
        </form>
    </#if>

</body>
</html>
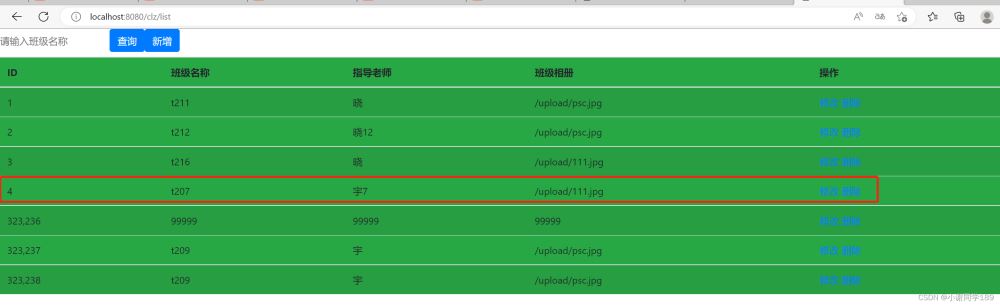
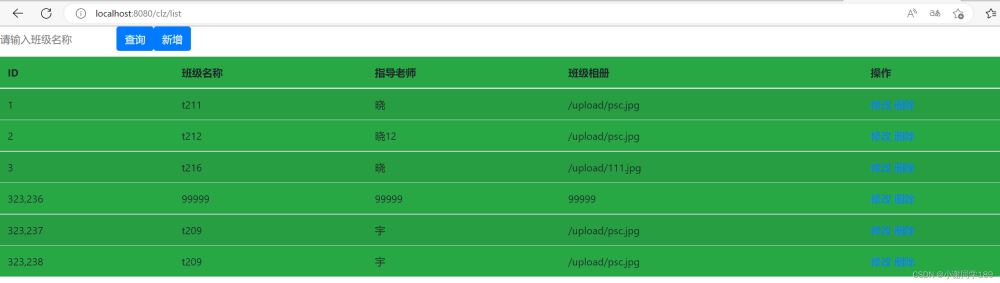
clzList.ftl
<!DOCTYPE html>
<html lang="en">
<head>
    <meta http-equiv="Content-Type" content="text/html; charset=UTF-8">
    <link
            href="https://cdn.bootcdn.net/ajax/libs/twitter-bootstrap/4.5.0/css/bootstrap.css"
            rel="stylesheet">
    <script
            src="https://cdn.bootcdn.net/ajax/libs/twitter-bootstrap/4.5.0/js/bootstrap.js"></script>
    <title>博客列表</title>
    <style type="text/css">
        .page-item input {
            padding: 0;
            width: 40px;
            height: 100%;
            text-align: center;
            margin: 0 6px;
        }

        .page-item input, .page-item b {
            line-height: 38px;
            float: left;
            font-weight: 400;
        }

        .page-item.go-input {
            margin: 0 10px;
        }
    </style>
</head>
<body>
<#include '/headd.ftl' />
<#-- 查询条件框  -->
<form class="form-inline"
      action="${ctx}/clz/list" method="post">
    <div class="form-group mb-2">
        <input type="text" class="form-control-plaintext" name="cname"
               placeholder="请输入班级名称">
    </div>
    <button type="submit" class="btn btn-primary mb-2">查询</button>
    <a class="btn btn-primary mb-2" href="${ctx}/clz/toEdit">新增</a>
</form>
<table class="table table-striped bg-success">
    <thead>
    <tr>
        <th scope="col">ID</th>
        <th scope="col">班级名称</th>
        <th scope="col">指导老师</th>
        <th scope="col">班级相册</th>
        <th scope="col">操作</th>
    </tr>
    </thead>
    <tbody>
    <#list lst as b>
        <tr>
            <td>${b.cid !}</td>
            <td>${b.cname !}</td>
            <td>${b.cteacher !}</td>
            <td>${b.pic !}</td>
            <td>
                <a href="${ctx }/clz/toEdit?cid=${b.cid}">修改</a>
                <a href="${ctx }/clz/del?cid=${b.cid}">删除</a>
            </td>
        </tr>
    </#list>
    </tbody>
</table>
</body>
</html>
1.6 测试
1.6.1 查询

1.6.2 新增
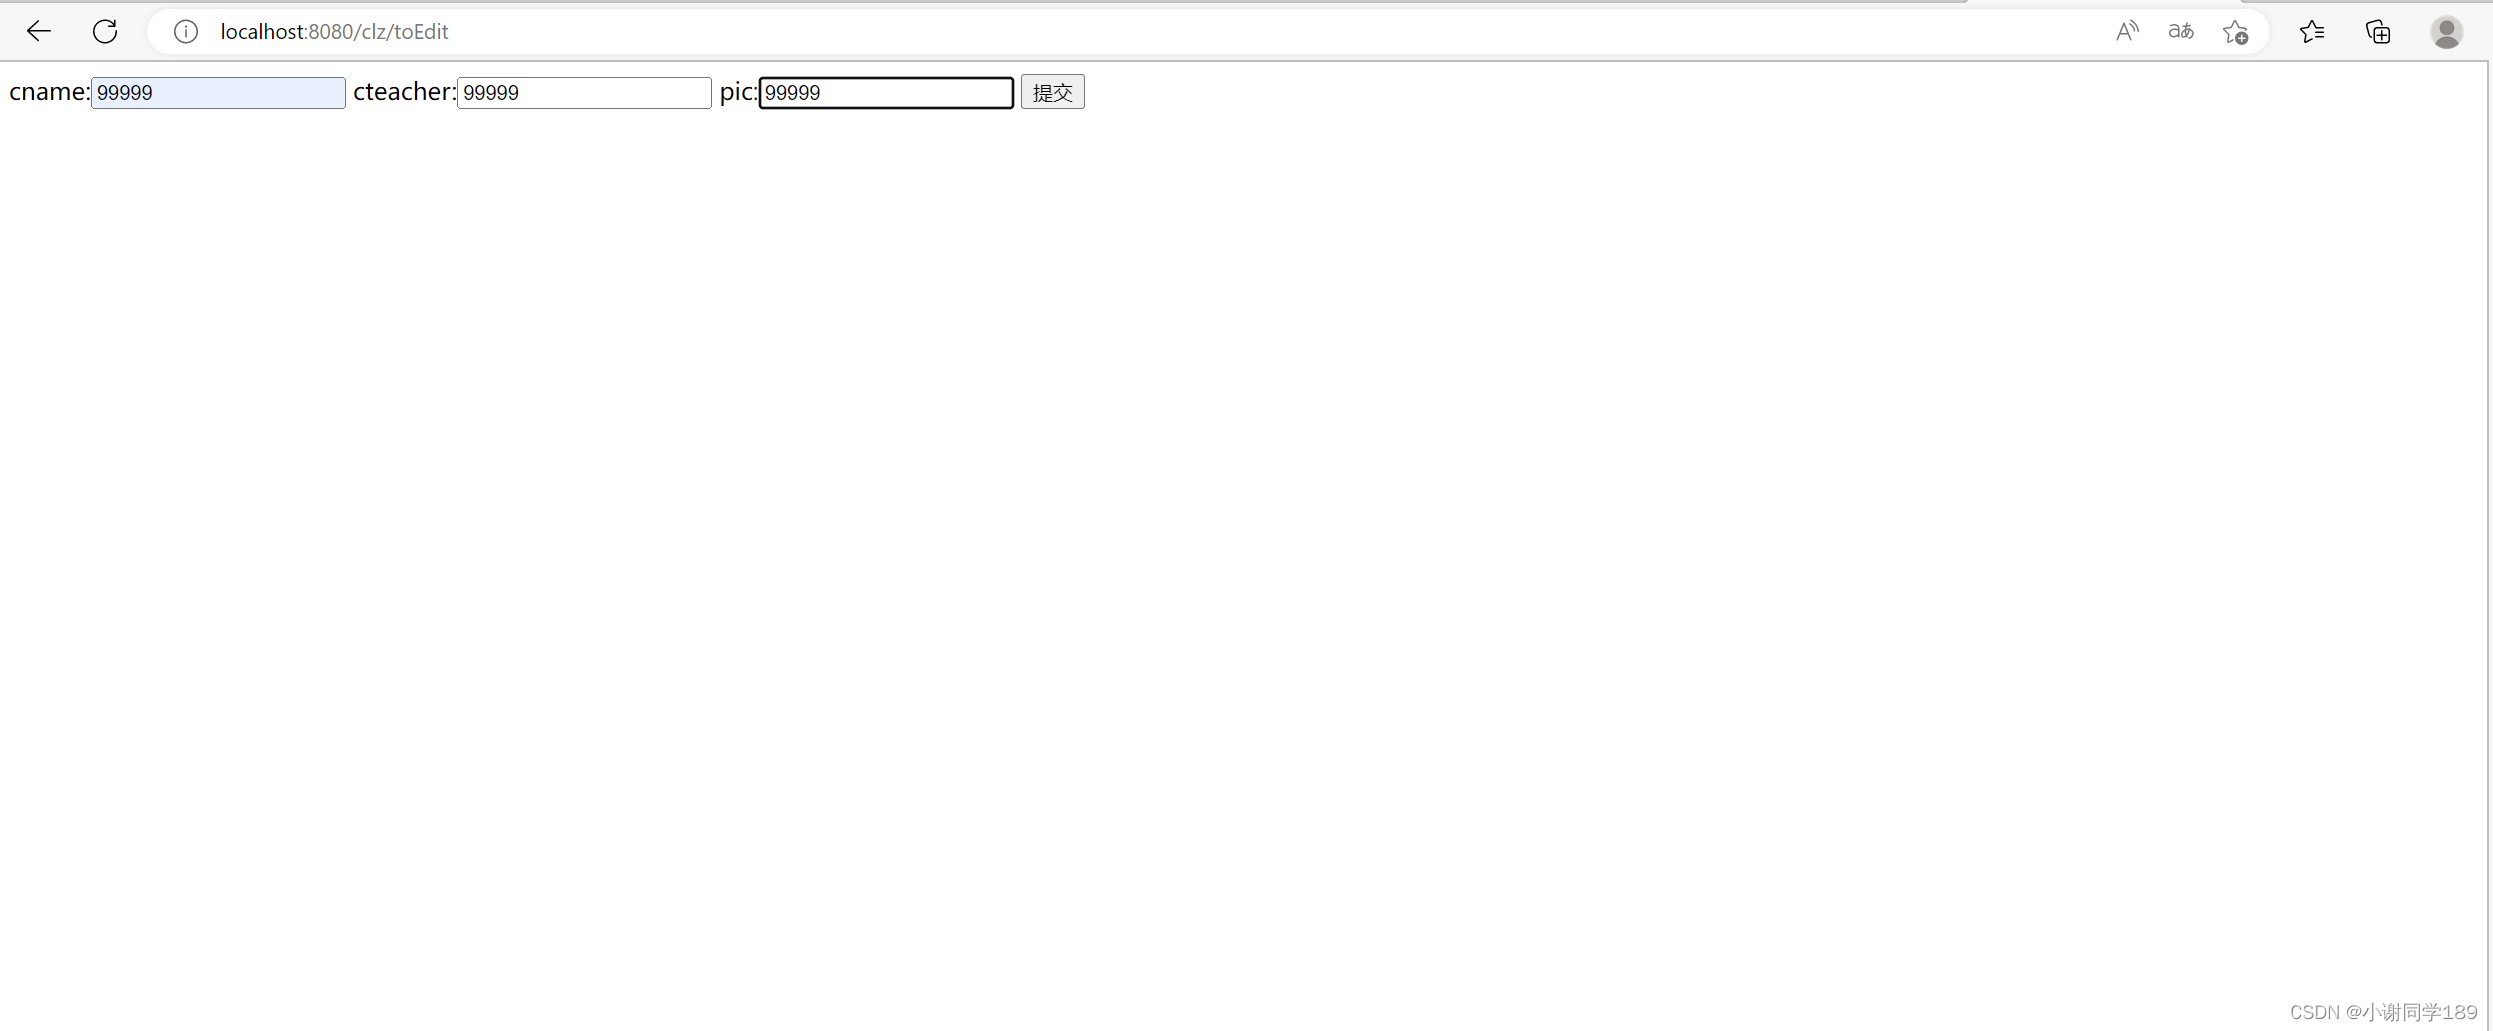

1.6.3 修改


1.6.4 删除
二、MyBatis-Plus分页插件
2.1 创建插件配置类
MybatisPlusConfig
package com.xlb.springbootassets.bj.config;

import com.baomidou.mybatisplus.annotation.DbType;
import com.baomidou.mybatisplus.extension.plugins.MybatisPlusInterceptor;
import com.baomidou.mybatisplus.extension.plugins.inner.PaginationInnerInterceptor;
import org.springframework.context.annotation.Bean;
import org.springframework.context.annotation.Configuration;

@Configuration
public class MybatisPlusConfig {

    /**
     * 分页插件配置
     *
     * @return
     */
    //从MyBatis-Plus 3.4.0开始,不再使用旧版本的PaginationInterceptor ,而是使用MybatisPlusInterceptor。
    //使用分页插件需要配置MybatisPlusInterceptor,将分页拦截器添加进来:
    @Bean
    public MybatisPlusInterceptor mybatisPlusInterceptor() {
        MybatisPlusInterceptor interceptor = new MybatisPlusInterceptor();
        // 向MyBatis-Plus的过滤器链中添加分页拦截器,需要设置数据库类型(主要用于分页方言)
        interceptor.addInnerInterceptor(new PaginationInnerInterceptor(DbType.MYSQL));
        return interceptor;
    }
}
2.2 编写SQL
StrutsClassMapper.xml
<select id="selectPageVo" resultType="com.xlb.springbootassets.bj.model.StrutsClass">
        select cid,cname,cteacher,pic FROM t_struts_class WHERE cname=#{cname}
    </select>
2.3 mapper层
//亲测这里最前面使用Ipage和Page是一样的,如果这里使用的是Page,下面也要改。但是还是推荐官网上面的Ipage,不改最好。
    IPage<StrutsClass> selectPageVo(Page<StrutsClass> page,String clazz);
2.4 service层
StrutsClassService
//分页方法
    IPage<StrutsClass> selectPageVo(Page<StrutsClass> page,String clazz);
StrutsClassServiceImpl
@Override
    public IPage<StrutsClass> selectPageVo(Page<StrutsClass> page,String clazz) {
        return strutsClassMapper.selectPageVo(page,clazz);
    }
2.5 controller 层
//分页方法
    @RequestMapping("/pagelist")
    public IPage<StrutsClass> pagelist(@RequestBody String clazz){
        Page<StrutsClass> page1 = new Page<>();
        Page<StrutsClass> page = new Page<>(1,10);
        return strutsClassService.selectPageVo(page,clazz);
    }
总结
到此这篇关于MybatisPlus搭建项目环境及分页插件的文章就介绍到这了,更多相关MybatisPlus搭建项目内容请搜索我们以前的文章或继续浏览下面的相关文章希望大家以后多多支持我们!
相关推荐
-
Mybatis-Plus 多表联查分页的实现代码
上一节,简单讲述了 Mybatis-Plus 搭建与使用入门,这一节,简单讲一下如何使用 MP 实现多表分页. 分析 使用的工程,依旧是 spring-boot,关于分页,官网给出了一个单表的demo,其实多表分页实现原理相同,都是通过 mybatis 的拦截器 (拦截器做了什么?他会在你的 sql 执行之前,为你做一些事情,例如分页,我们使用了 MP 不用关心 limit,拦截器为我们拼接.我们也不用关心总条数,拦截器获取到我们 sql 后,拼接 select count(*) 为我们查询总条
-
MyBatis-Plus 分页查询以及自定义sql分页的实现
一.引言 分页查询每个人程序猿几乎都使用过,但是有部分同学不懂什么是物理分页和逻辑分页. 物理分页:相当于执行了limit分页语句,返回部分数据.物理分页只返回部分数据占用内存小,能够获取数据库最新的状态,实施性比较强,一般适用于数据量比较大,数据更新比较频繁的场景. 逻辑分页:一次性把全部的数据取出来,通过程序进行筛选数据.如果数据量大的情况下会消耗大量的内存,由于逻辑分页只需要读取数据库一次,不能获取数据库最新状态,实施性比较差,适用于数据量小,数据稳定的场合. 那么MP中的物理分页怎么实现
-

Mybatis-Plus如何使用分页实例详解
目录 1.写个Mybatis-plus配置类: 2.写接口测试 3.注意 4.如果你还有查询条件 1.Lambda表达式 2.普通查询 总结 Mybatis-Plus(简称MP)是一个 Mybatis 的增强工具,在 Mybatis 的基础上只做增强不做改变,为简化开发.提高效率而生 1.写个Mybatis-plus配置类: 是通过拦截器实现分页 @Configuration public class MybatisConfig { @Bean public MybatisPlusInterce
-
SpringBoot+MyBatisPlus+Vue 前后端分离项目快速搭建过程(后端)
数据库准备 data_test.sql: /* SQLyog Enterprise v12.08 (64 bit) MySQL - 5.7.31 : Database - data_test ********************************************************************* */ /*!40101 SET NAMES utf8 */; /*!40101 SET SQL_MODE=''*/; /*!40014 SET @OLD_UNIQUE_
-
mybatis-plus分页查询的实现示例
按照官方文档进行的配置:快速开始|mybatis-plus 引入依赖: <!-- 引入mybatisPlus --> <dependency> <groupId>com.baomidou</groupId> <artifactId>mybatis-plus-boot-starter</artifactId> <version>3.2.0</version> </dependency> <!--
-
MyBatisPlus分页的同时指定排序规则说明
分页配置 MyBatis Plus要想使用分页,需要添加如下配置: @Configuration @ConditionalOnClass(value = {PaginationInterceptor.class}) public class MybatisPlusConfig { /** * 分页插件 * @return */ @Bean public PaginationInterceptor paginationInterceptor() { PaginationInterceptor pa
-
MybatisPlus搭建项目环境及分页插件
目录 一.搭建项目环境 1.1 创建项目 1.2 配置环境 1.1.1 自动生成代码 1.1.2 配置SpringbootassetsApplication 1.3 配置application.yml 1.4 编写controller层 1.5 编写前台代码 1.6 测试 1.6.1 查询 1.6.3 修改 1.6.4 删除 二.MyBatis-Plus分页插件 2.1 创建插件配置类 2.2 编写SQL 2.3 mapper层 2.4 service层 2.5 controller 层 总结
-
Feign+mybatisplus搭建项目遇到的坑及解决
目录 出现的错误 原因(简洁说明) 代码 consumer工程代码 prodvider工程 总结 出现的错误 1.Failed to bind properties under ‘spring.datasource’ to javax.sql.DataSource: 2.@org.springframework.beans.factory.annotation.Autowired(required=true)等 原因(简洁说明) 使用代码生成器的service层需要继承extends IServ
-
SpringBoot项目中分页插件PageHelper无效的问题及解决方法
在Springboot项目中使用分页插件的时候 发现PageHelper插件失效了 我导入的是: 后来才发 <dependency> <groupId>com.github.pagehelper</groupId> <artifactId>pagehelper</artifactId> <version>5.1.10</version> </dependency> 现 PageHelper若要在Springbo
-
MyBatis-Plus集成Druid环境搭建的详细教程
一.简介 Mybatis-Plus是一款 MyBatis 动态 sql 自动注入 crud 简化 增 删 改 查 操作中间件.启动加载 XML 配置时注入 mybatis 单表 动态 SQL 操作 ,为简化开发工作.提高生产率而生.Mybatis-Plus 启动注入非拦截实现.性能更优. 1.1.原理 1.2.特性 无侵入:Mybatis-Plus 在 Mybatis 的基础上进行扩展,只做增强不做改变,引入 Mybatis-Plus 不会对您现有的 Mybatis 构架产生任何影响,而且 MP
-
MyBatis-Plus分页插件不生效的解决方法
描述 项目中用到boot 整合 mybatis-plus , 个人在使用分页条件查询的时候一直查不出 total, pages, 终于找到原因了. 环境 <springboot.version>2.1.5.RELEASE</springboot.version> <mybatisplus.version>3.1.1</mybatisplus.version> 配置 1.自定义MybatisPlusConfig 配置分页插件 package com.eyela
-
vue项目环境搭建 启动 移植操作示例及目录结构分析
目录 项目搭建 项目创建 项目启动停止 项目目录结构分析 全局脚本配置 index.html详细介绍 main.js入口文件详细 App.vue跟组件介绍 router-index.js 路由介绍 项目搭建 下载node 官网下载安装包,傻瓜式安装:https://nodejs.org/zh-cn/ 安装cnpm,用淘宝源: npm install -g cnpm --registry=https://registry.npm.taobao.org 检测是否安装成功:cnpm -version
-
django搭建项目配置环境和创建表过程详解
1. 搭建项目配置环境和创建表 创建一个ttsx的项目 django-admin startproject ttsx 在ttsx下的__init__中导入mysql import pymysql pymysql.install_as_MySQLdb() 配置mysql 读写分离配置 # default:默认的配置的是主数据库 'default': { 'ENGINE': 'django.db.backends.mysql', 'HOST': 'localhost', 'PORT': 3306,
-
django项目环境搭建及在虚拟机本地创建django项目的教程
1.Python虚拟环境创建 首先我们为什么要创建虚拟环境呢?因为不同的项目所依赖的环境不一样,他们需要不同的第三方库等等.为了避免冲突,所以我们要创建虚拟环境,在次此我用的的Linux ubuntu和pycharm. 在虚拟机上创建Python虚拟环境命令为: mkvirtualenv -p /usr/bin/python3 虚拟环境名字 (-p参数选择虚拟环境要用的Python解释器) 2.创建django项目 第一步:进入到你要创建项目的目录 cd ~/project 第二步:安装djan
-
MyBatisPlus PaginationInterceptor分页插件的使用详解
实现 配置插件 来到项目下的applicationContext.xml中配置sqlSessionFactoryBean的地方. <!-- 配置SqlSessionFactoryBean Mybatis提供的: org.mybatis.spring.SqlSessionFactoryBean MP提供的:com.baomidou.mybatisplus.spring.MybatisSqlSessionFactoryBean --> <bean id="sqlSessionFac
-
Nginx+SpringCloud Gateway搭建项目访问环境
目录 安装Nginx 准备SpringBoot应用 添加网关 现如今的项目开发基本都是微服务方式,导致一个系统中会有很多的服务,每个模块都对应着不同的端口,为了方便访问,通常会让某个服务绑定一个域名,比如商品服务:product.xxx.com:订单服务:order.xxx.com,此时可以使用Nginx来搭建一个域名访问环境,基于前后端分离开发的项目经常会遇到跨域问题,使用Nginx也能轻松解决. 安装Nginx 首先拉取nginx的镜像: docker pull nginx:1.10 然后随