
Android入门之Fragment嵌套Fragment的用法详解
目录
- 从现实需求来看场景
- Fragment的嵌套
- fg_content.xml
- pet_the_cat.xml
- fg_content layout所属的Fragment Java端代码
从现实需求来看场景
我们经常会在现实需求中碰到这样的场景,如下图所示。
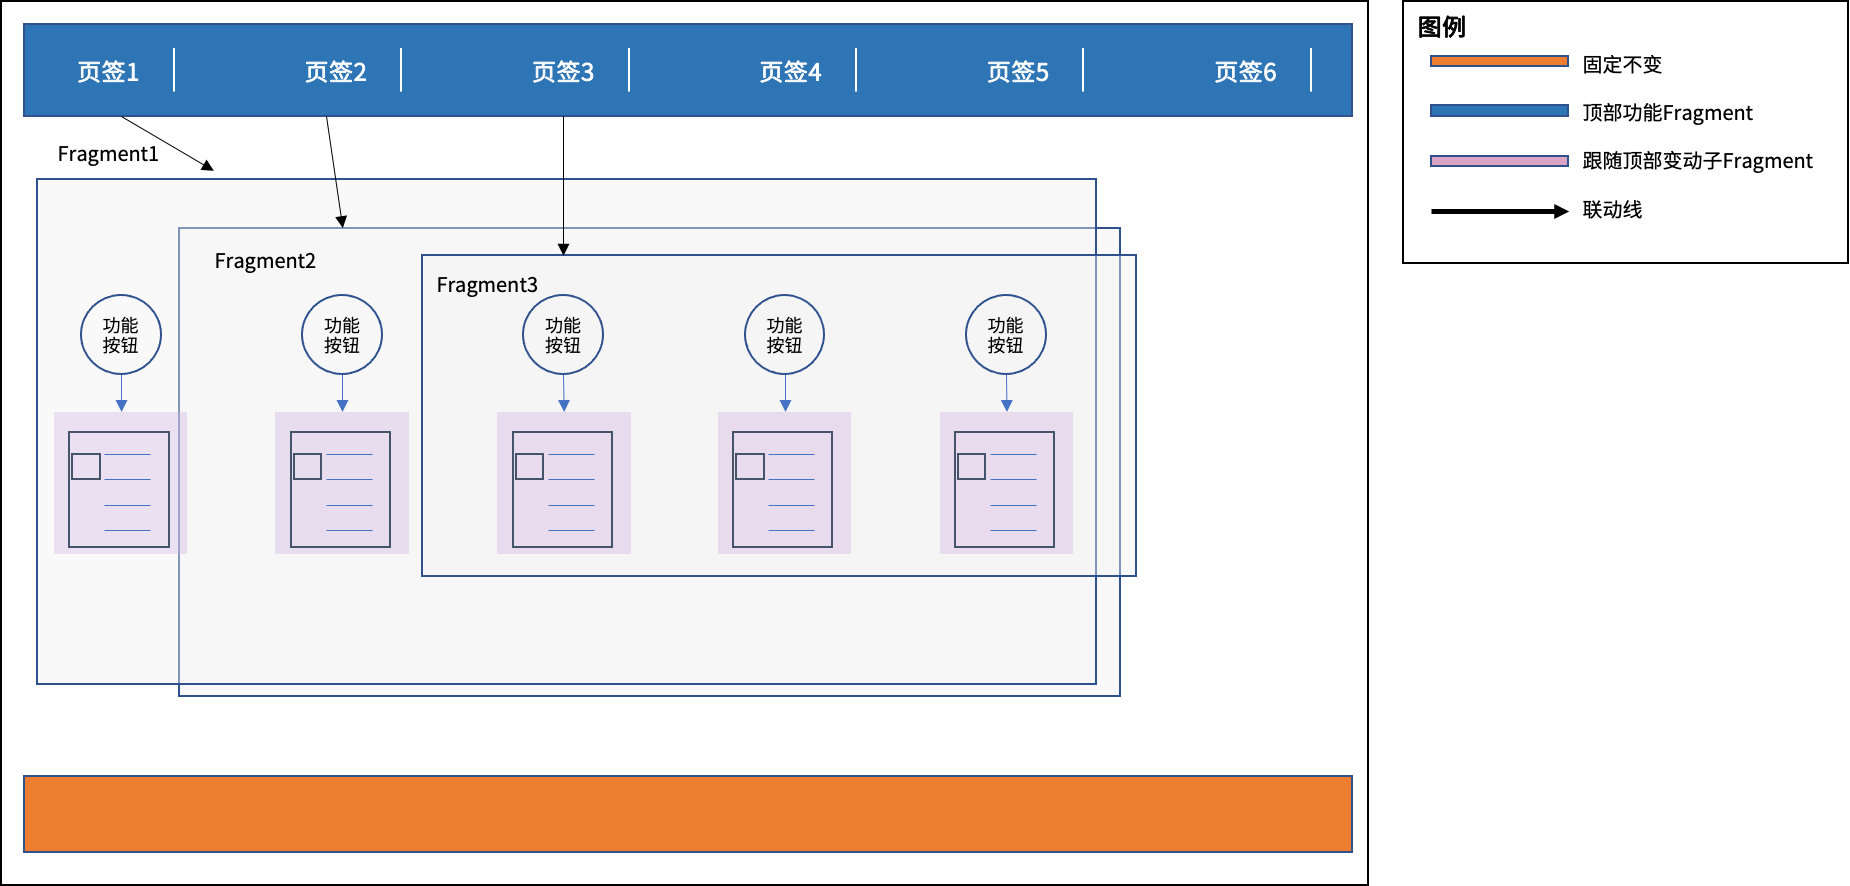
一个手机APP的首页,一般在布局时会有:
- 永久固定区;
- 一级联动区;
- 二级(多级)联动区;
如果是一级联动区域,它跟随着固定区域的功能按钮点击而不断变化这个还好理解一些。烦是烦在二级(甚至多级联动)如我图中所标出的深蓝色部分,深蓝色部分有一排功能按钮,然后当用户在点击这些按钮时下部的Fragment也在跟随着顶部的功能按钮(页签)的点而变化着不同的内容。
而。。。更复杂的是每一个页签的点击时,在本Fragment里还有二级按钮(圆型),而在点击这些二级按钮时,本身内部还有一堆孙子Fragment的内容也在发生着变化。
我们来看一个实际生产界面的例子你们就可以感受到上述我描述的场景了。
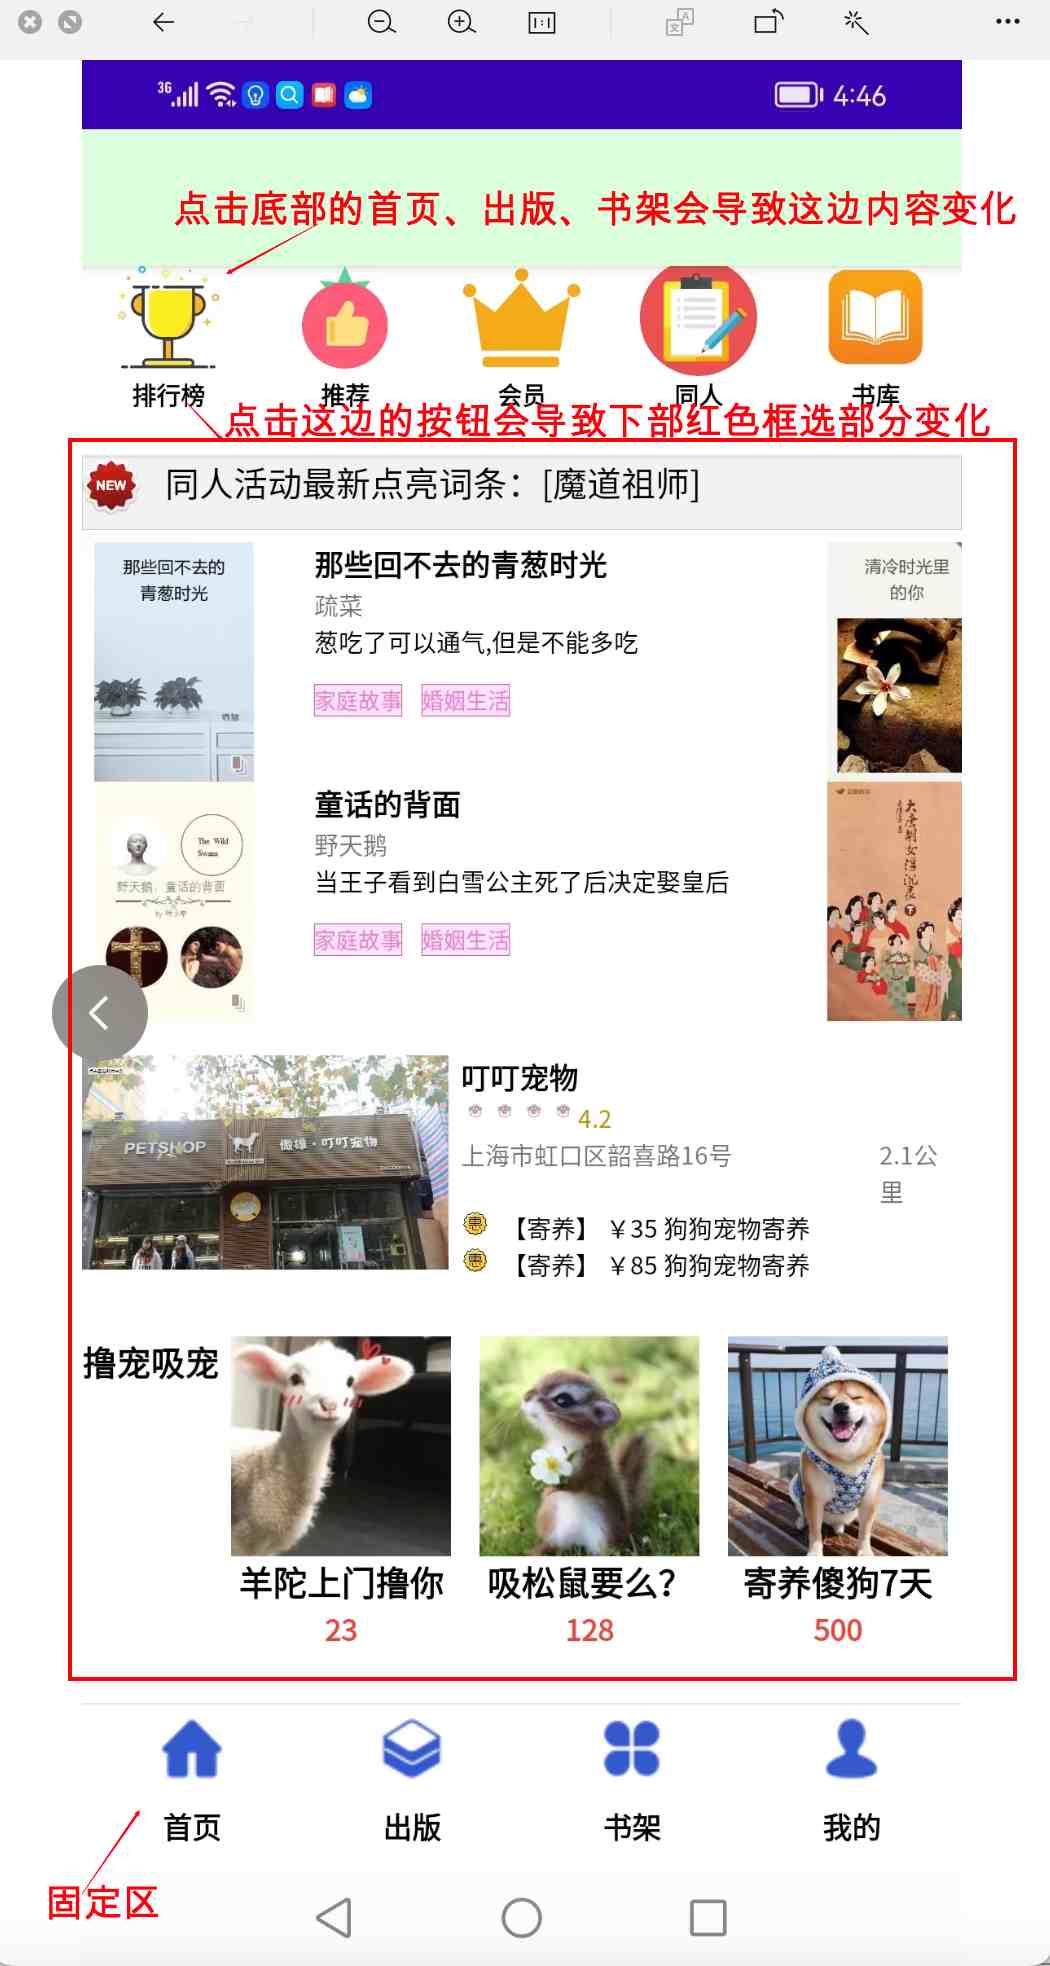
这边顶部的按钮为一级Fragment,它跟随着下部的按钮联动。
而这边用红色方框框起来的区域就是我说的,它需要被嵌在一级Fragment里的。
比如说点击“排行榜”下部显示的内容和点击“推荐”是完全不一样的。
现在再来看一块子区域:下部的“撸宠吸宠”,这部分也竟然被业务提出了要可以切换比如说有一个按钮叫“换一批”的需求。因此,这边又是一个个的“三行四列”,“单行三列”,“2行单列”的孙子fragment。

Fragment的嵌套
首先我们说嵌套Fragment调用这种用法是合理的,也是存在的。在现实中应用到的场景实在是太多太多。问题是很多初学者在使用时,就直接在Fragment嵌套时当Fragment应用在Activity里一样那样用了。甚至运行时由于Log输出过多疏忽了一些报错,结果呢在有些开发机上运行的好好的而实际在一些真机上或者是换了一台开发机如:windows换mac或者是mac换windows后,报了一堆本来不会报的错而根本无从入手。
这就是Fragment没有完全学好其原理,特别是其生命周期。所以这边我们给出正确的Fragment嵌套的用法。
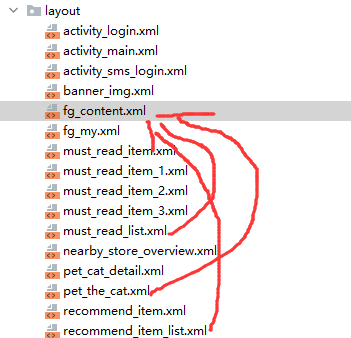
就拿上例来说,我们外层有一个fg_content.xml,在fg_content.xml里我们嵌了多个孙子Fragment。此处:
- pet_the_cat(撸猫)
- must_read_list(必读)
- recommend_item_list(推荐)
以及后面我们还会增加一些孙子Fragment,它们都从属于fg_content.xml。
来看下面代码。
fg_content.xml
<?xml version="1.0" encoding="utf-8"?>
<layout xmlns:android="http://schemas.android.com/apk/res/android"
    xmlns:app="http://schemas.android.com/apk/res-auto"
    xmlns:tools="http://schemas.android.com/tools">
    <!--绑定数据-->
    <data>

        <variable
            name="viewModel"
            type="com.mkyuan.aset.mall.android.home.HomeContentViewModel" />
    </data>

    <LinearLayout
        android:layout_width="match_parent"
        android:layout_height="match_parent"
        android:background="@color/bg_white"
        android:orientation="vertical"
        android:clipChildren="false"
        android:showDividers="end">

        <com.google.android.material.tabs.TabLayout
            android:id="@+id/tl"
            android:layout_width="match_parent"
            android:layout_height="30dp"
            android:background="@color/white"
            app:tabIndicatorColor="@color/tab_indicator_color"
            app:tabMaxWidth="200dp"
            app:tabMinWidth="100dp"
            app:tabMode="scrollable"
            app:tabSelectedTextColor="@color/black"
            app:tabTextAppearance="@style/MyCustomTabText"
            app:tabTextColor="@color/black" />

        <com.youth.banner.Banner
            android:id="@+id/ad_banner"
            android:layout_width="match_parent"
            android:layout_height="100dp"
            android:gravity="center"
            app:banner_loop_time="2000"
            app:banner_radius="10dp" />

        <FrameLayout
            android:id="@+id/fg_recommend"
            android:layout_width="match_parent"
            android:layout_height="80dp"
            android:layout_gravity="center_horizontal"
            android:layout_marginTop="5dp" />

        <ImageView
            android:layout_width="match_parent"
            android:layout_height="1dp"
            android:background="#ECECEC" />

        <LinearLayout
            android:layout_width="match_parent"
            android:layout_height="30dp"
            android:background="@drawable/layout_gray_background"
            android:orientation="horizontal">

            <ImageView
                android:layout_width="24dp"
                android:layout_height="24dp"
                android:layout_gravity="top"
                android:scaleType="fitStart"
                android:src="@mipmap/newest_1"></ImageView>

            <TextView
                android:layout_width="match_parent"
                android:layout_height="match_parent"
                android:layout_gravity="top"
                android:layout_marginLeft="10dp"
                android:includeFontPadding="false"
                android:text="同人活动最新点亮词条:[魔道祖师]"
                android:textColor="@color/black" />
        </LinearLayout>
        <androidx.viewpager.widget.ViewPager
            android:id="@+id/vpMustRead"
            android:layout_marginLeft="5dp"
            android:layout_marginRight="5dp"
            android:layout_marginTop="5dp"
            android:layout_marginBottom="5dp"
            android:layout_width="300dp"
            android:layout_height="200dp"
            android:layout_gravity="top"
            android:clipChildren="false">
        </androidx.viewpager.widget.ViewPager>

        <FrameLayout
            android:id="@+id/fg_nearbystore"
            android:layout_width="match_parent"
            android:layout_height="wrap_content"
            android:layout_gravity="center_horizontal"
            android:layout_marginTop="5dp" />

        <FrameLayout
            android:id="@+id/fg_petthecat"
            android:layout_width="match_parent"
            android:layout_height="150dp"
            android:layout_gravity="center_horizontal"
            android:layout_marginTop="5dp" />
    </LinearLayout>

</layout>
注意此处的:<FrameLayout android:id="@+id/fg_petthecat"这边就是用来显示孙子Fragment-pet_the_cat.xml的。
于是我们来看pet_the_cat.xml。
pet_the_cat.xml
它是用一个Fragment来加载的。
先来看它的前端layout。
pet_the_cat.xml的layout
<?xml version="1.0" encoding="utf-8"?>
<layout xmlns:android="http://schemas.android.com/apk/res/android"
    xmlns:app="http://schemas.android.com/apk/res-auto"
    xmlns:tools="http://schemas.android.com/tools">

    <LinearLayout
        android:layout_width="match_parent"
        android:layout_height="match_parent"
        android:orientation="horizontal">

        <TextView
            android:layout_width="wrap_content"
            android:layout_height="wrap_content"
            android:includeFontPadding="false"
            android:padding="0dp"
            android:text="撸宠吸宠"
            android:textColor="@color/black"
            android:textSize="14dp"
            android:textStyle="bold" />

        <GridView
            android:id="@+id/grid_petthecat"
            android:layout_width="match_parent"
            android:layout_height="match_parent"
            android:gravity="center"
            android:horizontalSpacing="5px"
            android:numColumns="3"
            android:stretchMode="columnWidth"
            android:verticalSpacing="5px" />
    </LinearLayout>

</layout>
而这个pet_the_cat里要用到Adapter即撸宠吸宠的“具体内容了”。我们下面顺便再来看pet_cat_detail.xml
pet_cat_detail.xml
<?xml version="1.0" encoding="utf-8"?>
<layout xmlns:android="http://schemas.android.com/apk/res/android"
    xmlns:app="http://schemas.android.com/apk/res-auto"
    xmlns:tools="http://schemas.android.com/tools">

    <data>
        <variable
            name="petCatBean"
            type="com.mkyuan.aset.mall.android.home.petthecat.PetTheCatBean"/>
    </data>

    <LinearLayout
        android:layout_width="match_parent"
        android:layout_height="match_parent"
        android:orientation="vertical">

        <ImageView
            android:id="@+id/ivPetCatImg"
            android:layout_width="90dp"
            android:layout_height="90dp"
            android:layout_gravity="center"
            android:scaleType="fitStart"
            app:petImgUrl="@{petCatBean.pegImg}" />

        <TextView
            android:id="@+id/tvPetCatDescr"
            android:layout_width="wrap_content"
            android:layout_height="wrap_content"
            android:layout_gravity="center"
            android:gravity="top"
            android:includeFontPadding="false"
            android:padding="0dp"
            android:text="@{petCatBean.descrText}"
            android:textColor="@color/black"
        android:textSize="14dp"
        android:textStyle="bold" />

        <TextView
            android:id="@+id/tvPetCatPrice"
            android:layout_width="wrap_content"
            android:layout_height="wrap_content"
            android:layout_gravity="center"
            android:gravity="top"
            android:includeFontPadding="false"
            android:padding="0dp"
            android:text="@{petCatBean.price}"
            android:textColor="@color/custom_red"
            android:textSize="12dp"
            android:textStyle="bold" />
    </LinearLayout>
</layout>
知道了样式文件后关键我们来看在fg_content里如何套入这个pet_the_cat的layout的。
pet_the_cat的后端代码-FragmentPetTheCat.java
package com.mkyuan.aset.mall.android.home.petthecat;

import android.content.Context;
import android.os.Bundle;
import android.util.Log;
import android.view.LayoutInflater;
import android.view.View;
import android.view.ViewGroup;
import android.widget.GridView;

import androidx.databinding.DataBindingUtil;
import androidx.fragment.app.Fragment;

import com.mkyuan.aset.mall.android.BR;
import com.mkyuan.aset.mall.android.R;
import com.mkyuan.aset.mall.android.databinding.PetTheCatBinding;
import com.mkyuan.aset.mall.android.home.DatabindingGridAdapter;
import com.mkyuan.aset.mall.android.util.AsetMallConstants;

import java.util.ArrayList;
import java.util.List;

public class FragmentPetTheCat extends Fragment {
    protected static final String TAG = "AsetMall";
    private Context ctx;
    //private Banner adBanner;
    private GridView petCatGridView;
    private PetTheCatBinding dataBinding;

    @Override
    public View onCreateView(LayoutInflater inflater, ViewGroup container,
                             Bundle savedInstanceState) {
        ctx = this.getActivity();
        dataBinding = DataBindingUtil.inflate(inflater, R.layout.pet_the_cat, container,
                false);
        petCatGridView = dataBinding.gridPetthecat;
        Log.i(TAG, ">>>>>FragmentPetTheCat->get dataBinding");
        initPetTheCatDataList();
        return dataBinding.getRoot();

    }

    private void initPetTheCatDataList() {
        List<PetTheCatBean> list = new ArrayList<PetTheCatBean>();
        list.add(new PetTheCatBean(AsetMallConstants.CDN_URL + "/img/petthecat/pet_the_cat_1.jpg",
                "羊陀上门撸你", "23"));
        list.add(new PetTheCatBean(AsetMallConstants.CDN_URL + "/img/petthecat/pet_the_cat_2.jpg",
                "吸松鼠要么?", "128"));
        list.add(new PetTheCatBean(AsetMallConstants.CDN_URL + "/img/petthecat/pet_the_cat_3.png",
                "寄养傻狗7天", "500"));
        DatabindingGridAdapter<PetTheCatBean> adapter =
                new DatabindingGridAdapter<PetTheCatBean>(ctx,
                R.layout.pet_cat_detail, list,
                BR.petCatBean);
        petCatGridView.setAdapter(adapter);
    }
}
我们这边可以看到,这个Fragment通过我们在之前MVVM与ListView课程内使用到的那个“万能DataBinding Adapter“了。它把pet_cat_detail加载到了一个1行3列的GridView里进行显示。
现在我们就来看在fg_content里,怎么显示这个子Fragment。
fg_content layout所属的Fragment Java端代码
在fg_content里加载子Fragment-FragmentPetTheCat需要注意的地方
fg_content的后端Java代码为FragmentContent.
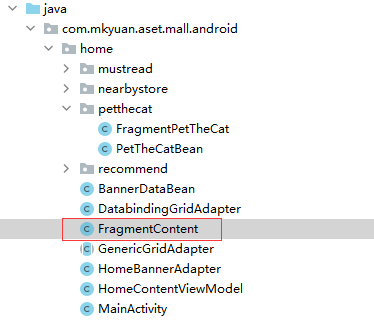
private FgContentBinding dataBinding;
private FragmentManager fManager;
private Fragment fragmentRecommend;
private Fragment fragmentNearbyStore;
private Fragment fragmentPetTheCat;

dataBinding = DataBindingUtil.inflate(inflater, R.layout.fg_content, container, false);
fManager = getChildFragmentManager();
if (fragmentPetTheCat == null) {
   fragmentPetTheCat = new FragmentPetTheCat();
   fTransaction.add(R.id.fg_petthecat, fragmentPetTheCat);
}
fTransaction.show(fragmentPetTheCat);
fTransaction.commit();
这边我们可以看到有这么一行,特别关键,要敲黑板了:
fManager = getChildFragmentManager();而不是我们在Fragment使用那一课里使用的:fManager = getFragmentManager();。
这是因为我们要嵌套子Fragment,因此对于子Fragment来说它的parent可不一样,很多人正是在这边烦了错。
接着我们回到fg_content的孙子Fragment-pet_the_cat.xml的后端代码-FragmentPetTheCat.java 。
从FragmentPetTheCata.java里加载完数据后如何返回到FragmentContent
在FragmentPetTheCat.java的public View onCreateView最后return你必须使用以下写法:
return dataBinding.getRoot();//这边要用dataBind.getRoot()返回的view再返回activity,因为此处非MainActivity
即:子Fragment向父Fragment返回view时你已经不能再用
Android入门第47天-Fragment的基本使用中以下这样的写法了,是错误的:
return view;
正确的写法为:
return dataBinding.getRoot();
以上就是Android入门之Fragment嵌套Fragment的用法详解的详细内容,更多关于Android Fragment嵌套Fragment的资料请关注我们其它相关文章!
相关推荐
-
Android Fragment的具体使用方式详解
目录 Fragment的简单用法 动态添加Fragment 在Fragment中实现返回栈 Fragment和Activity之间的交互 Fragment的简单用法 在一个Activity中添加两个Fragment,并让这两个Fragment平分Activity空间 新建左侧Fragment的布局left_fragment.xml <?xml version="1.0" encoding="utf-8"?> <LinearLayout xmlns:
-

Android Fragment实现顶部、底部导航栏
前言 无论是顶部还是底部导航栏,都是大多数APP的标配,网络上的相关实现教程也非常之多.最近回忆起以前写的小项目,发现对这块内容有些遗忘,不妨就再整理一遍代码逻辑,记录下来,方便日后查阅(指复制粘贴). 实现的方式有很多,本文采用以下方式实现: 底部导航栏:Fragment + BottomNavigationView 顶部导航栏:Fragment + ViewPager2 + TabLayout 底部导航栏 <布局文件> <?xml version="1.0" en
-
Android性能优化之ViewPagers + Fragment缓存优化
目录 前言 1 ViewPager懒加载优化 1.1 ViewPager的缓存机制 1.2 ViewPager懒加载方案 2 ViewPager2与ViewPager的区别 前言 大家看标题,可能会有点儿懵,什么是ViewPagers,因为在很久之前,我们使用的都是ViewPager,但是现在更多的是在用ViewPager2,因此用ViewPagers(ViewPager.ViewPager2)来代替两者,主要介绍两者的区别. ViewPagers嵌套Fragment架构,在我们常用的App中随
-
Android开发之Fragment懒加载的几种方式及性能对比
目录 1. Support时代的懒加载 2. AndrodX时代的懒加载 3. ViewPager2时代的懒加载 4. ViewPage和ViewPager2的性能对比 Android开发中ViewPager+Fragment的懒加载 TabLayout+ViewPager+Fragment是我们开发常用的组合.ViewPager的默认机制就是把全部的Fragment都加载出来,而为了保障一些用户体验,我们使用懒加载的Fragment,就是让我们再用户可见这个Fragment之后才处理业务逻辑.
-
Android Fragment源码分析Add方法
目录 前言 Add() 前言 本篇我们就来讲讲Fragment管理中的 Add() 方法 Add() 在我们动态的添加.管理Fragment中,Add属于最基础的方法了: 用法也很简单,如下就是向Activity添加一个Fragment: getSupportFragmentManager().beginTransaction().add(R.id.fragmenta,new FragmentA()).commit(); 一般时候我们使用到Fragment的时候,都是不止一个,比如微信界面,底部
-
Android入门教程之ListView的具体使用详解
目录 ListView 的简单用法 定制 ListView 的界面 提升 ListView 的运行效率 ListView 的点击事件 ListView 的简单用法 在布局中加入 ListView 控件还算简单,先为 ListView 指定一个 id,然后将宽度和高度都设置为 match_parent,这样 ListView 就占满了整个布局的空间 <LinearLayout xmlns:android="http://schemas.android.com/apk/res/android&
-
Android入门教程之RecyclerView的具体使用详解
目录 RecyclerView 的基本用法 横向滚动 RecyclerView 点击事件 RecyclerView 的基本用法 和我们之前学习的控件不一样,RecyclerView 属于新增控件,所以我们需要在项目的 build.gradle 中添加 RecyclerView 库的依赖,才能使用该控件 dependencies { implementation "org.jetbrains.kotlin:kotlin-stdlib:$kotlin_version" implementa
-
SpringBatch从入门到精通之StepScope作用域和用法详解
目录 1.StepSope 是一种scope 2.StepSope 是一种自定义step 3.如何使用.@Value是支持spel表达式的 3.1 大部分场景是Spel 表达式.在底层reader/process/writer 中使用@Value获取jobParamter/stepContext/jobContext 3.2 SpEL引用bean 3.3 系统属性 3.4 运算符号 4.可能遇到问题 5.StepScope原理 6.自定义一个scope 1.StepSope 是一种scope 在
-
Android开发中方向传感器定义与用法详解【附指南针实现方法】
本文实例讲述了Android开发中方向传感器定义与用法.分享给大家供大家参考,具体如下: Android中的方向传感器在生活中是一个很好的应用,典型的例子是指南针的使用,我们先来简单介绍一下传感器中三个参数x,y,z的含义,以一幅图来说明. 补充说明:图中的坐标轴x,y,z和传感器中的X,Y,Z没有任何联系! 如上图所示,绿色部分表示一个手机,带有小圈那一头是手机头部 传感器中的X:如上图所示,规定X正半轴为北,手机头部指向OF方向,此时X的值为0,如果手机头部指向OG方向,此时X值为90,指向
-
Android中的TimePickerView(时间选择器)的用法详解
这是一个第三方从底部弹出来的日期选择器.先看一下具体的效果: 首先在项目里面先添加: implementation 'com.contrarywind:Android-PickerView:3.2.7' 在页面放一个按钮点击弹出日期选择器: @Override protected void onCreate(@Nullable Bundle savedInstanceState) { //在onCreate方法里面先调用一下 //初始化日期选择器 showTimePicker(); } //显示
-
Android 中 Fragment 嵌套 Fragment使用存在的bug附完美解决方案
自从Android3.0引入了Fragment之后,使用Activity去嵌套一些Fragment的做法也变得更加流行,这确实是Fragment带来的一些优点,比如说:Fragment可以使你能够将activity分离成多个可重用的组件,每个都有它自己的生命周期和UI,更重要的是Fragment解决了Activity间的切换不流畅,实现了一种轻量及的切换,但是在官方提供的android.support.v4包中,Fragment还是或多或少的存在一些BUG,今天就与大家分享一下这些BUG和解决方
-
Android中fragment嵌套fragment问题解决方法
都说fragment好用,duang~~,又遇到问题了,记录一下,分享给遇到这个问题的同学! 1.fragment嵌套fragment时出现getActivity()为null activity A嵌套fragment B,B嵌套fragment C,C跳转到activity D,当activity D被finish掉之后,C中容易爆出getActivity为空.如果你的activity被回收了,那你需要在bundle中保存一下fragment信息,我的解决方法:fragment实例化之后会到a
-
Android 中Fragment与Activity通讯的详解
Android 中Fragment与Activity通讯的详解 与activity通讯 尽管fragment的实现是独立于activity的,可以被用于多个activity,但是每个activity所包含的是同一个fragment的不同的实例. Fragment可以调用getActivity()方法很容易的得到它所在的activity的对象,然后就可以查找activity中的控件们(findViewById()). 例如: ViewlistView =getActivity().findView
-
android之SeekBar控件用法详解
MainActivity.java package com.example.mars_2400_seekbar; import android.support.v7.app.ActionBarActivity; import android.support.v7.app.ActionBar; import android.support.v4.app.Fragment; import android.app.Activity; import android.os.Bundle; import a
-
android之RatingBar控件用法详解
MainActivity.java package com.example.mars_2500_ratingbar; import android.support.v7.app.ActionBarActivity; import android.support.v7.app.ActionBar; import android.support.v4.app.Fragment; import android.app.Activity; import android.os.Bundle; import