详解Python之Scrapy爬虫教程NBA球员数据存放到Mysql数据库
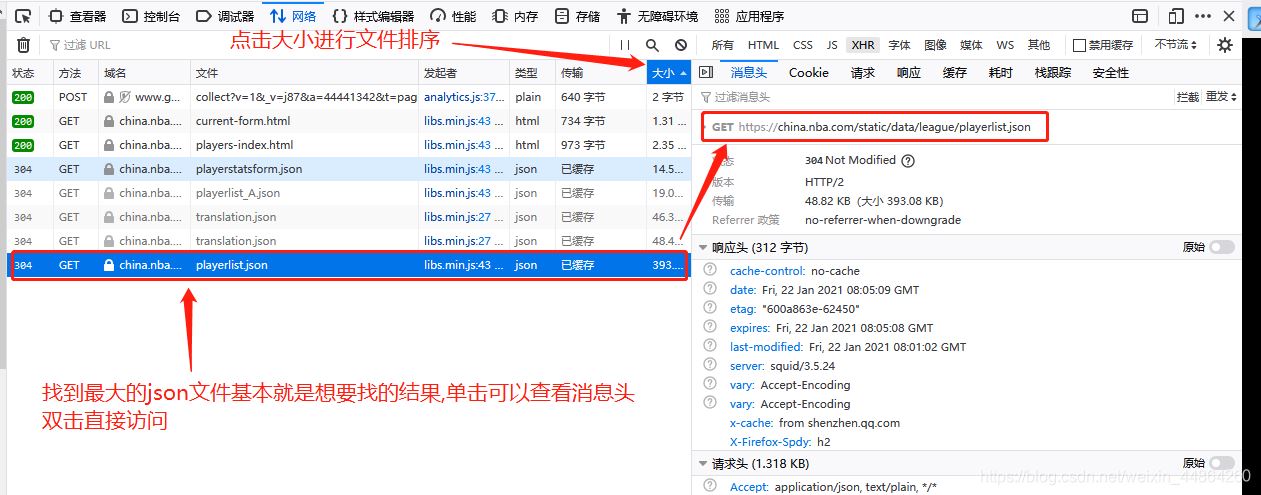
获取要爬取的URL


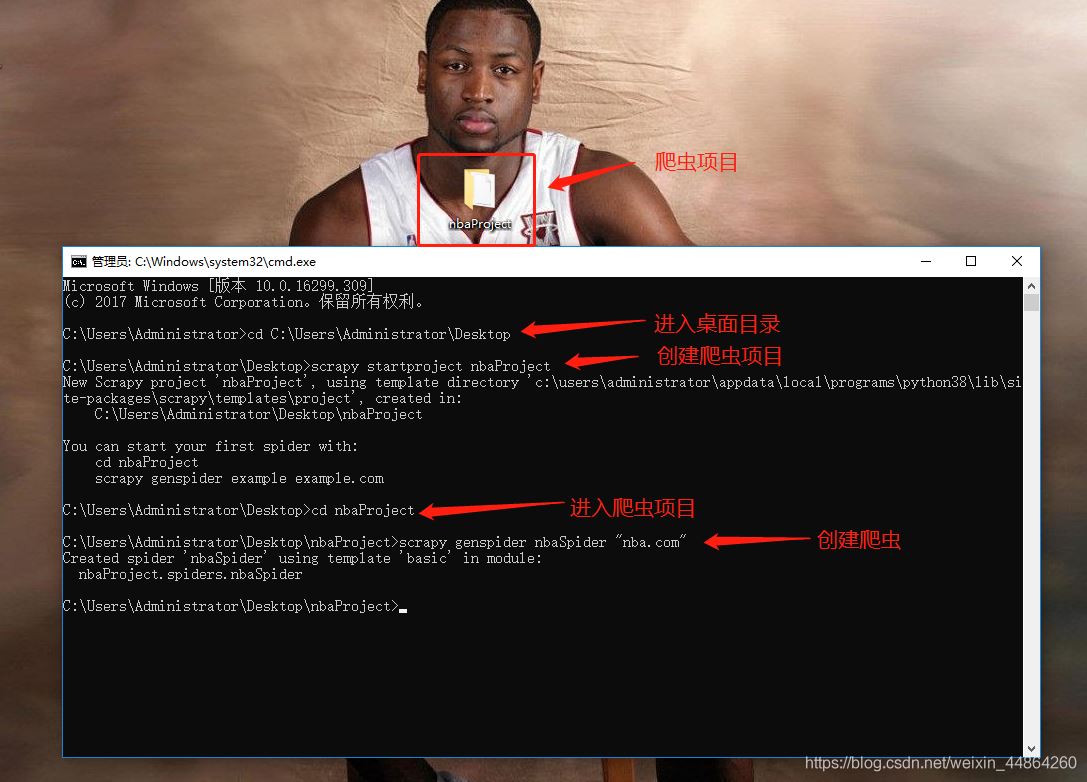
爬虫前期工作

用Pycharm打开项目开始写爬虫文件
字段文件items
# Define here the models for your scraped items
#
# See documentation in:
# https://docs.scrapy.org/en/latest/topics/items.html

import scrapy

class NbaprojectItem(scrapy.Item):
  # define the fields for your item here like:
  # name = scrapy.Field()
  # pass
  # 创建字段的固定格式-->scrapy.Field()
  # 英文名
  engName = scrapy.Field()
  # 中文名
  chName = scrapy.Field()
  # 身高
  height = scrapy.Field()
  # 体重
  weight = scrapy.Field()
  # 国家英文名
  contryEn = scrapy.Field()
  # 国家中文名
  contryCh = scrapy.Field()
  # NBA球龄
  experience = scrapy.Field()
  # 球衣号码
  jerseyNo = scrapy.Field()
  # 入选年
  draftYear = scrapy.Field()
  # 队伍英文名
  engTeam = scrapy.Field()
  # 队伍中文名
  chTeam = scrapy.Field()
  # 位置
  position = scrapy.Field()
  # 东南部
  displayConference = scrapy.Field()
  # 分区
  division = scrapy.Field()
爬虫文件
import scrapy
import json
from nbaProject.items import NbaprojectItem

class NbaspiderSpider(scrapy.Spider):
  name = 'nbaSpider'
  allowed_domains = ['nba.com']
  # 第一次爬取的网址,可以写多个网址
  # start_urls = ['http://nba.com/']
  start_urls = ['https://china.nba.com/static/data/league/playerlist.json']
  # 处理网址的response
  def parse(self, response):
    # 因为访问的网站返回的是json格式,首先用第三方包处理json数据
    data = json.loads(response.text)['payload']['players']
    # 以下列表用来存放不同的字段
    # 英文名
    engName = []
    # 中文名
    chName = []
    # 身高
    height = []
    # 体重
    weight = []
    # 国家英文名
    contryEn = []
    # 国家中文名
    contryCh = []
    # NBA球龄
    experience = []
    # 球衣号码
    jerseyNo = []
    # 入选年
    draftYear = []
    # 队伍英文名
    engTeam = []
    # 队伍中文名
    chTeam = []
    # 位置
    position = []
    # 东南部
    displayConference = []
    # 分区
    division = []
    # 计数
    count = 1
    for i in data:
      # 英文名
      engName.append(str(i['playerProfile']['firstNameEn'] + i['playerProfile']['lastNameEn']))
      # 中文名
      chName.append(str(i['playerProfile']['firstName'] + i['playerProfile']['lastName']))
      # 国家英文名
      contryEn.append(str(i['playerProfile']['countryEn']))
      # 国家中文
      contryCh.append(str(i['playerProfile']['country']))
      # 身高
      height.append(str(i['playerProfile']['height']))
      # 体重
      weight.append(str(i['playerProfile']['weight']))
      # NBA球龄
      experience.append(str(i['playerProfile']['experience']))
      # 球衣号码
      jerseyNo.append(str(i['playerProfile']['jerseyNo']))
      # 入选年
      draftYear.append(str(i['playerProfile']['draftYear']))
      # 队伍英文名
      engTeam.append(str(i['teamProfile']['code']))
      # 队伍中文名
      chTeam.append(str(i['teamProfile']['displayAbbr']))
      # 位置
      position.append(str(i['playerProfile']['position']))
      # 东南部
      displayConference.append(str(i['teamProfile']['displayConference']))
      # 分区
      division.append(str(i['teamProfile']['division']))

      # 创建item字段对象,用来存储信息 这里的item就是对应上面导的NbaprojectItem
      item = NbaprojectItem()
      item['engName'] = str(i['playerProfile']['firstNameEn'] + i['playerProfile']['lastNameEn'])
      item['chName'] = str(i['playerProfile']['firstName'] + i['playerProfile']['lastName'])
      item['contryEn'] = str(i['playerProfile']['countryEn'])
      item['contryCh'] = str(i['playerProfile']['country'])
      item['height'] = str(i['playerProfile']['height'])
      item['weight'] = str(i['playerProfile']['weight'])
      item['experience'] = str(i['playerProfile']['experience'])
      item['jerseyNo'] = str(i['playerProfile']['jerseyNo'])
      item['draftYear'] = str(i['playerProfile']['draftYear'])
      item['engTeam'] = str(i['teamProfile']['code'])
      item['chTeam'] = str(i['teamProfile']['displayAbbr'])
      item['position'] = str(i['playerProfile']['position'])
      item['displayConference'] = str(i['teamProfile']['displayConference'])
      item['division'] = str(i['teamProfile']['division'])
      # 打印爬取信息
      print("传输了",count,"条字段")
      count += 1
      # 将字段交回给引擎 -> 管道文件
      yield item
配置文件->开启管道文件


# Scrapy settings for nbaProject project
#
# For simplicity, this file contains only settings considered important or
# commonly used. You can find more settings consulting the documentation:
#
#   https://docs.scrapy.org/en/latest/topics/settings.html
#   https://docs.scrapy.org/en/latest/topics/downloader-middleware.html
#   https://docs.scrapy.org/en/latest/topics/spider-middleware.html
# ----------不做修改部分---------
BOT_NAME = 'nbaProject'

SPIDER_MODULES = ['nbaProject.spiders']
NEWSPIDER_MODULE = 'nbaProject.spiders'
# ----------不做修改部分---------

# Crawl responsibly by identifying yourself (and your website) on the user-agent
#USER_AGENT = 'nbaProject (+http://www.yourdomain.com)'

# Obey robots.txt rules
# ----------修改部分(可以自行查这是啥东西)---------
# ROBOTSTXT_OBEY = True
# ----------修改部分---------

# Configure maximum concurrent requests performed by Scrapy (default: 16)
#CONCURRENT_REQUESTS = 32

# Configure a delay for requests for the same website (default: 0)
# See https://docs.scrapy.org/en/latest/topics/settings.html#download-delay
# See also autothrottle settings and docs
#DOWNLOAD_DELAY = 3
# The download delay setting will honor only one of:
#CONCURRENT_REQUESTS_PER_DOMAIN = 16
#CONCURRENT_REQUESTS_PER_IP = 16

# Disable cookies (enabled by default)
#COOKIES_ENABLED = False

# Disable Telnet Console (enabled by default)
#TELNETCONSOLE_ENABLED = False

# Override the default request headers:
#DEFAULT_REQUEST_HEADERS = {
#  'Accept': 'text/html,application/xhtml+xml,application/xml;q=0.9,*/*;q=0.8',
#  'Accept-Language': 'en',
#}

# Enable or disable spider middlewares
# See https://docs.scrapy.org/en/latest/topics/spider-middleware.html
#SPIDER_MIDDLEWARES = {
#  'nbaProject.middlewares.NbaprojectSpiderMiddleware': 543,
#}

# Enable or disable downloader middlewares
# See https://docs.scrapy.org/en/latest/topics/downloader-middleware.html
#DOWNLOADER_MIDDLEWARES = {
#  'nbaProject.middlewares.NbaprojectDownloaderMiddleware': 543,
#}

# Enable or disable extensions
# See https://docs.scrapy.org/en/latest/topics/extensions.html
#EXTENSIONS = {
#  'scrapy.extensions.telnet.TelnetConsole': None,
#}

# Configure item pipelines
# See https://docs.scrapy.org/en/latest/topics/item-pipeline.html
# 开启管道文件
# ----------修改部分---------
ITEM_PIPELINES = {
  'nbaProject.pipelines.NbaprojectPipeline': 300,
}
# ----------修改部分---------
# Enable and configure the AutoThrottle extension (disabled by default)
# See https://docs.scrapy.org/en/latest/topics/autothrottle.html
#AUTOTHROTTLE_ENABLED = True
# The initial download delay
#AUTOTHROTTLE_START_DELAY = 5
# The maximum download delay to be set in case of high latencies
#AUTOTHROTTLE_MAX_DELAY = 60
# The average number of requests Scrapy should be sending in parallel to
# each remote server
#AUTOTHROTTLE_TARGET_CONCURRENCY = 1.0
# Enable showing throttling stats for every response received:
#AUTOTHROTTLE_DEBUG = False

# Enable and configure HTTP caching (disabled by default)
# See https://docs.scrapy.org/en/latest/topics/downloader-middleware.html#httpcache-middleware-settings
#HTTPCACHE_ENABLED = True
#HTTPCACHE_EXPIRATION_SECS = 0
#HTTPCACHE_DIR = 'httpcache'
#HTTPCACHE_IGNORE_HTTP_CODES = []
#HTTPCACHE_STORAGE = 'scrapy.extensions.httpcache.FilesystemCacheStorage'
管道文件 -> 将字段写进mysql
# Define your item pipelines here
#
# Don't forget to add your pipeline to the ITEM_PIPELINES setting
# See: https://docs.scrapy.org/en/latest/topics/item-pipeline.html

# useful for handling different item types with a single interface
from itemadapter import ItemAdapter

import pymysql
class NbaprojectPipeline:
	# 初始化函数
  def __init__(self):
    # 连接数据库 注意修改数据库信息
    self.connect = pymysql.connect(host='域名', user='用户名', passwd='密码',
                    db='数据库', port=端口号)
    # 获取游标
    self.cursor = self.connect.cursor()
    # 创建一个表用于存放item字段的数据
    createTableSql = """
              create table if not exists `nbaPlayer`(
              playerId INT UNSIGNED AUTO_INCREMENT,
              engName varchar(80),
              chName varchar(20),
              height varchar(20),
              weight varchar(20),
              contryEn varchar(50),
              contryCh varchar(20),
              experience int,
              jerseyNo int,
              draftYear int,
              engTeam varchar(50),
              chTeam varchar(50),
              position varchar(50),
              displayConference varchar(50),
              division varchar(50),
              primary key(playerId)
              )charset=utf8;
              """
    # 执行sql语句
    self.cursor.execute(createTableSql)
    self.connect.commit()
    print("完成了创建表的工作")
	#每次yield回来的字段会在这里做处理
  def process_item(self, item, spider):
  	# 打印item增加观赏性
  	print(item)
    # sql语句
    insert_sql = """
    insert into nbaPlayer(
    playerId, engName,
    chName,height,
    weight,contryEn,
    contryCh,experience,
    jerseyNo,draftYear
    ,engTeam,chTeam,
    position,displayConference,
    division
    ) VALUES (null,%s,%s,%s,%s,%s,%s,%s,%s,%s,%s,%s,%s,%s,%s)
    """
    # 执行插入数据到数据库操作
    # 参数(sql语句,用item字段里的内容替换sql语句的占位符)
    self.cursor.execute(insert_sql, (item['engName'], item['chName'], item['height'], item['weight']
                     , item['contryEn'], item['contryCh'], item['experience'], item['jerseyNo'],
                     item['draftYear'], item['engTeam'], item['chTeam'], item['position'],
                     item['displayConference'], item['division']))
    # 提交,不进行提交无法保存到数据库
    self.connect.commit()
    print("数据提交成功!")
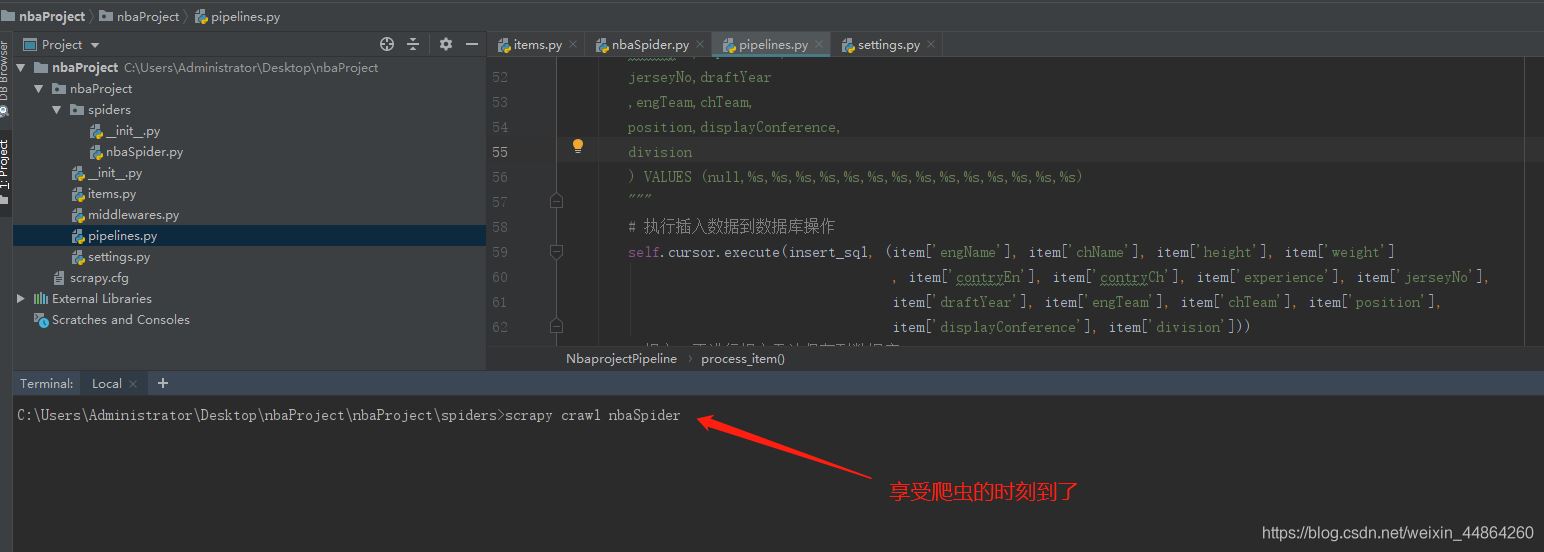
启动爬虫

屏幕上滚动的数据

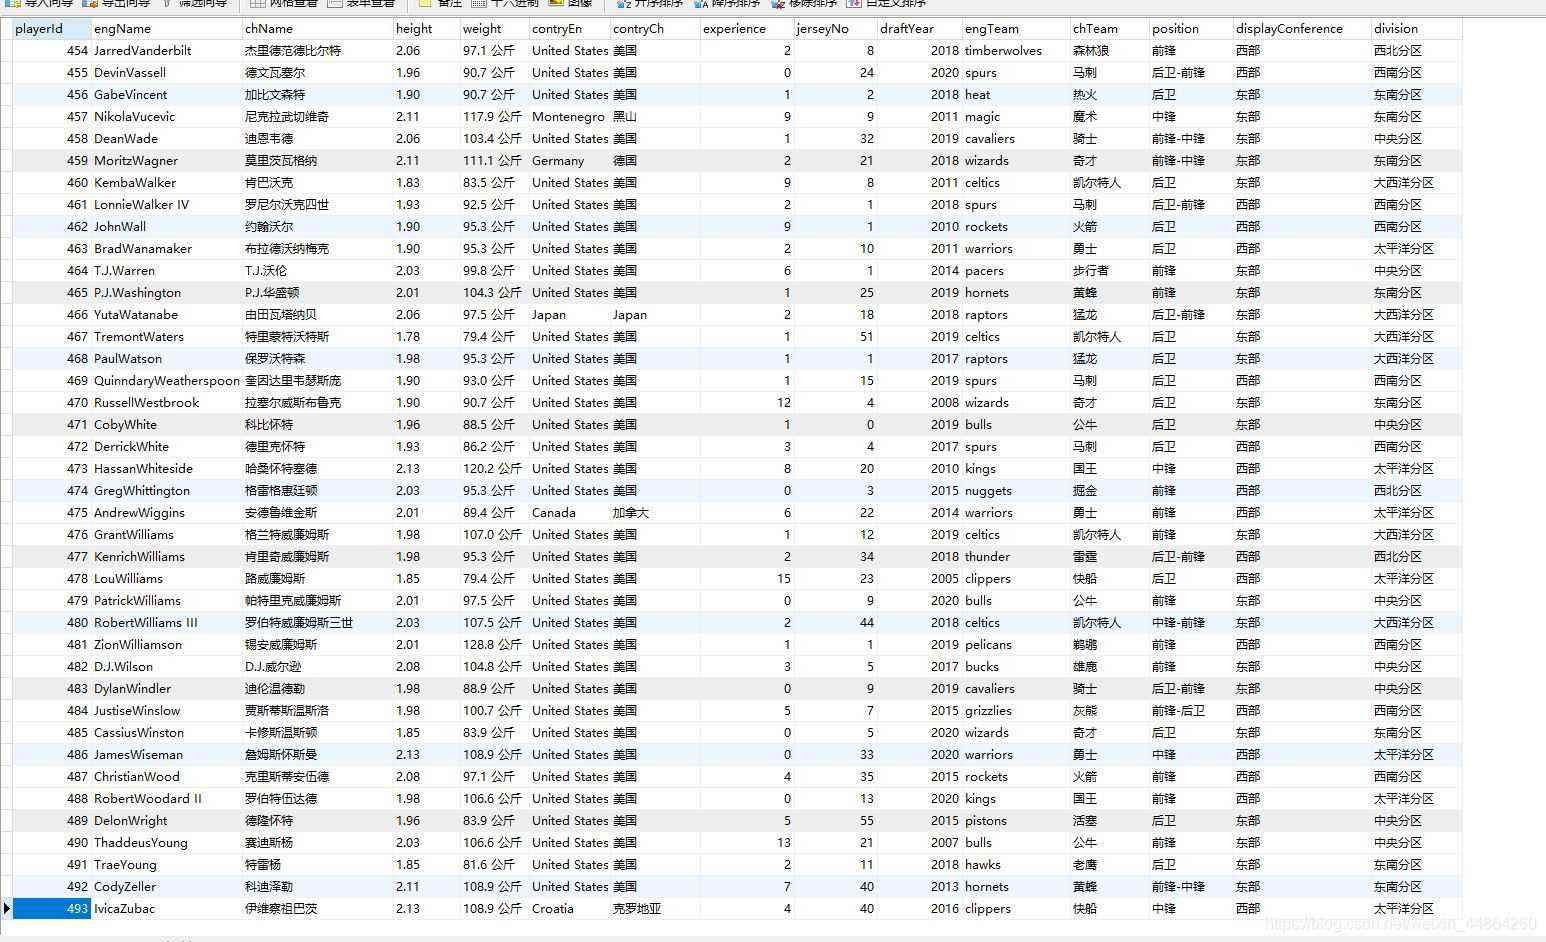
去数据库查看数据

简简单单就把球员数据爬回来啦~
到此这篇关于详解Python之Scrapy爬虫教程NBA球员数据存放到Mysql数据库的文章就介绍到这了,更多相关Scrapy爬虫员数据存放到Mysql内容请搜索我们以前的文章或继续浏览下面的相关文章希望大家以后多多支持我们!
赞 (0)

