MVC+EasyUI+三层新闻网站建立 后台登录界面的搭建(二)
新闻网站建立,后台登录界面的搭建
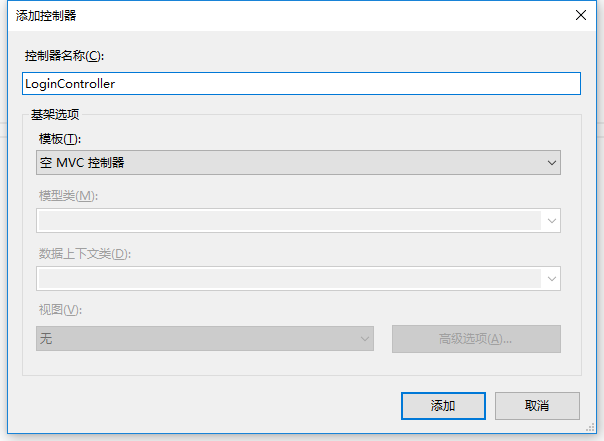
首先我们在Controllers里面新添加一个控制器就叫LoginController,右键点击Controllers添加控制器就可以了(注意后面一定是Controller结尾,这是一种约定)
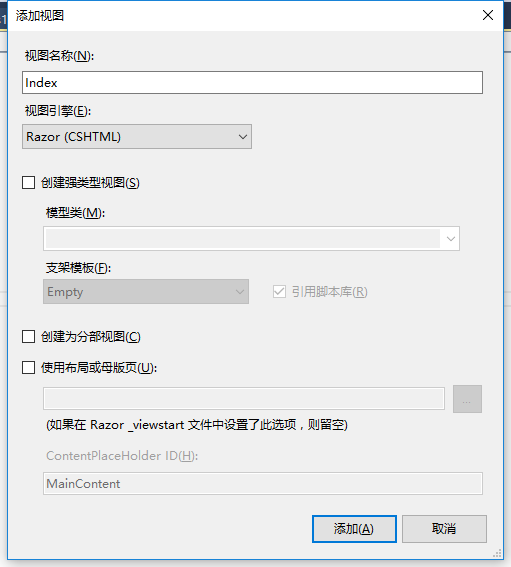
其次:右键点击index建立Index视图。(不选择使用母版页)
现在我们就可以在Index视图中设计我们的登录页面了。
这里需要我们引入几个Css样式和JS文件
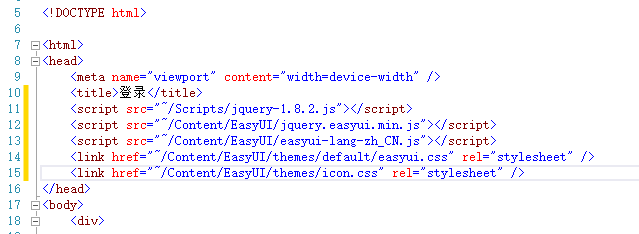
简单的进行登录界面的布局
<html>
<head>
 <meta name="viewport" content="width=device-width" />
 <title>登录</title>
 <script src="~/Scripts/jquery-1.8.2.js"></script>
 <script src="~/Content/EasyUI/jquery.easyui.min.js"></script>
 <script src="~/Content/EasyUI/easyui-lang-zh_CN.js"></script>
 <link href="~/Content/EasyUI/themes/default/easyui.css" rel="external nofollow" rel="stylesheet" />
 <link href="~/Content/EasyUI/themes/icon.css" rel="external nofollow" rel="stylesheet" />
 <script type="text/javascript">
  $(function () {
   initWin(); //初始化登录窗体
  });
  function initWin() {
   $("#win").window({
    title: "登录",
    width: 400,
    height: 270,
    collapsible: false,
    minimizable: false,
    maximizable: false,
    closable: false,
    modal: true,
    resizable: false,
   });
  }
 </script>
</head>
<body>
 <div id="win"class="easyui-window">
  <div>
   <div style="height:20px"></div>
   <table>
    <tr>
     <td style="width:20px"></td>
     <td>用户名:</td>
     <td><input type="text"class="easyui-textbox" id="txtName" name="txtName"/></td>
     <td><span id="spanName" style="color:red"></span></td>
    </tr>
    <tr style="height:10px"></tr>

    <tr>
     <td style="width:20px"></td>
     <td>密 码:</td>
     <td><input type="password/"class="easyui-textbox"id="txtPwd" name="txtPwd"></td>
     <td><span id="spanPwd" style="color:red"></span></td>
    </tr>
    <tr style="height:10px"></tr>
    <tr>
     <td style="width:20px"></td>
     <td>验证码:</td>
     <td><input type="text"class="easyui-textbox" id="txtVcode" name="txtVcode"/></td>
     <td><span id="spanVcode"style="color:red"></span></td>
    </tr>

    <tr style="height:10px"></tr>

    <tr>
     <td style="width:20px"></td>
     <td><img id="image" src="" style="float: left; height: 24px;" /></td>
     <td><a href="javascript:void(0)" rel="external nofollow" rel="external nofollow" id="changeVcode">看不清,换一张</a></td>
    </tr>

   </table>
  </div>
  <div style="height:10px"></div>
  <div data-options="region:'south',border:false" style="text-align:center;padding:5px 0 0;">
   <a class="easyui-linkbutton" data-options="iconCls:'icon-ok'" href="javascript:void(0)" rel="external nofollow" rel="external nofollow" id="btnOk" style="width:80px">登录</a>
  </div>
  </div>
</body>
</html>
运行的结果图:
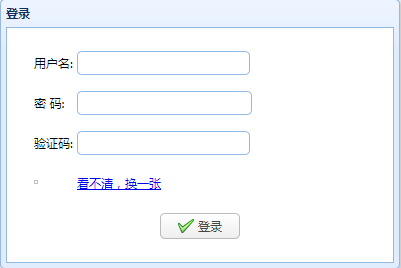
这里验证码的图片没有显示出来,这是没有关系的,在下一节中就讲怎么把验证码显示出来。
以上就是本文的全部内容,希望对大家的学习有所帮助,也希望大家多多支持我们。
相关推荐
-

MVC+EasyUI+三层新闻网站建立 实现登录功能(四)
MVC新闻网站建立,实现登录功能 首先在数据库中建立一张UserInfo表. 注:以下讲的这些可以用动软代码生成器直接生成,但是对于新手来说还是动手敲一下的好,了解以下实现的过程. 然后在Model中建立UserInfo的实体层. public class UserInfo { public int Id { get; set; } public string UserName { get; set; } public string UserPwd { get; set; } public st
-
MVC+EasyUI+三层新闻网站建立 tabs标签制作方法(六)
MVC新闻网站建立,完成tabs标签的制作. 首先对 Center 进行一个简单的布局 <!--------------中间布局开始----------------> <div data-options="region:'center',title:'Center'" > <div class="easyui-tabs" style="width:700px;height:250px" fit="true&
-
一步步打造简单的MVC电商网站BooksStore(2)
一步步打造一个简单的 MVC 电商网站 - BooksStore(二) 本系列的 GitHub地址:https://github.com/liqingwen2015/Wen.BooksStore <一步步打造一个简单的 MVC 电商网站 - BooksStore(一)> <一步步打造一个简单的 MVC 电商网站 - BooksStore(二)> <一步步打造一个简单的 MVC 电商网站 - BooksStore(三)> <一步步打造一个简单的 MVC 电商网站 -
-
MVC4制作网站教程第四章 浏览栏目4.2
序 一.用户 二.用户组 三.栏目 3.1添加栏目 3.2浏览栏目 浏览栏目这块做个一个树形列表,添加栏目的左侧部分只写了句"左侧列表"就是指这个树形列表,等我们写完替换一下就可以了. 先在[CategoryController]里面添加[ManagePartialTree]action,这里的Partial用来说明是分部视图 /// <summary> /// 栏目列表局部树视图 /// </summary> /// <returns></r
-
MVC4制作网站教程第四章 更新栏目4.3
序 一.用户 二.用户组 三.栏目 3.1添加栏目 3.2浏览栏目 3.3更新栏目 上次在树形列表里面点击栏目名称后跳转到详细信息页面~/Category/ManageDetails/id.在详细页面里点修改,来完成栏目资料修改. 先打开[CategoryController]添加[ManageDetails(int id)]action /// <summary> /// 栏目详细资料 /// </summary> /// <param name="id&
-
MVC4制作网站教程第四章 添加栏目4.1
好几天没时间写了.今天有写时间在学一点. 今天状态也不是很好,晕晕沉沉的写吧. 序 一.用户 二.用户组 三.栏目 3.1添加栏目 首先添加[CategoryController]控制器, 那么我想我的视图里,首先显示的应该是栏目类型,这里应该是一个下拉框,用户可以选择"一般栏目","单页栏目","外部链接".那么首先应该在[CategoryController]添加一个属性,用来返回栏目类型列表. #region Attribute publi
-
MVC+EasyUI+三层新闻网站建立 验证码生成(三)
我们在项目中的NewWeb.Common类库里面建立一个类用来存放生成验证码的代码. 这里我类的名字叫 ValidateCode 生成验证码(ValidateCode)类的代码: using System; using System.Collections.Generic; using System.Drawing; using System.Drawing.Drawing2D; using System.Drawing.Imaging; using System.IO; using Syste
-
MVC+EasyUI+三层新闻网站建立 主页布局的方法(五)
MVC新闻网站建立,实现主页布局. 首先建立Home控制器,然后再建立Index视图. 和前面登录页面一样也需要引入几个文件. 接着就是找到你下载的easyui文件夹里面的demo里面的layout里面的full 浏览器运行后右键查看代码把里面的body里面的代码复制到Index视图的body里面去.没找到的可以直接复制下面的代码. <body class="easyui-layout"> <div data-options="region:'north',
-
一步步打造简单的MVC电商网站BooksStore(1)
一步步打造一个简单的 MVC 电商网站 - BooksStore(一) 本系列的 GitHub地址:https://github.com/liqingwen2015/Wen.BooksStore <一步步打造一个简单的 MVC 电商网站 - BooksStore(一)> <一步步打造一个简单的 MVC 电商网站 - BooksStore(二)> <一步步打造一个简单的 MVC 电商网站 - BooksStore(三)> <一步步打造一个简单的 MVC 电商网站 -
-
MVC+EasyUI+三层新闻网站建立 建站准备工作(一)
这一次的项目是建立一个小型的新闻发布网站,所以就不需要用一些高大上的框架.三层+MVC+easyUI就足够了. 首先:搭建起项目框架 其次:到easyui官网去下载easyUI 我这里用的是我在很久的项目中用过的版本jquery-easyui-1.5.2 下载链接:http://www.jeasyui.com/download/list.php 最后就是把easyui引入到项目中去. 现在Content文件夹下建立一个叫EasyUi的文件夹,把需要用到的文件复制到其中,具体如下图所示: 以上就是