Android小程序实现个人信息管理系统
本文实例为大家分享了Android实现个人信息管理系统的具体代码,供大家参考,具体内容如下
要求:使用SQLite实现个人信息管理系统,个人信息包括姓名,年龄,性别以及学历
(1)DBHelper.java代码如下:
package com.example.system;

import android.content.ContentValues;
import android.content.Context;
import android.database.Cursor;
import android.database.sqlite.SQLiteDatabase;
import android.database.sqlite.SQLiteOpenHelper;

public class DBHelper extends SQLiteOpenHelper{

 private static final String DB_NAME ="people.db";
 private static final String TBL_NAME="Message";
 private SQLiteDatabase db;

 public DBHelper(Context c){
 super(c,DB_NAME,null,2);
 }

 @Override
 public void onCreate(SQLiteDatabase db){
 this.db=db;
 String CREATE_TBL="create table Message(_id integer primary key autoincrement,name text,age text,sex text,edu text)";
 db.execSQL(CREATE_TBL);
 }

 public void insert(ContentValues values){
 SQLiteDatabase db=getWritableDatabase();
 db.insert(TBL_NAME, null, values);
 db.close();
 }

 public Cursor query(){
 SQLiteDatabase db=getWritableDatabase();
 Cursor c=db.query(TBL_NAME, null, null, null, null, null, null);
 return c;
 }

 @Override
 public void onUpgrade(SQLiteDatabase arg0, int arg1, int arg2) {
 // TODO Auto-generated method stub

 }

}
(2)MainActivity.java代码如下:
package com.example.system;

import android.app.Activity;
import android.content.Intent;
import android.os.Bundle;
import android.view.Menu;
import android.view.MenuItem;
import android.view.View;
import android.view.View.OnClickListener;
import android.widget.Button;
import android.widget.TextView;

public class MainActivity extends Activity {

 private TextView textview;
 private Button btn1,btn2;

 @Override
 protected void onCreate(Bundle savedInstanceState) {
 super.onCreate(savedInstanceState);
 setContentView(R.layout.activity_main);

 textview = (TextView)findViewById(R.id.textview);
 btn1 = (Button)findViewById(R.id.btn1);
 btn2 = (Button)findViewById(R.id.btn2);

 //添加监听器
 btn1.setOnClickListener(new OnClickListener() {

 @Override
 public void onClick(View v) {
 // TODO Auto-generated method stub

 Intent intent = new Intent(MainActivity.this,AddActivity.class);
 startActivity(intent);
 }
 });

 btn2.setOnClickListener(new OnClickListener() {

 @Override
 public void onClick(View v) {
 // TODO Auto-generated method stub

 Intent intent = new Intent(MainActivity.this,QueryActivity.class);
 startActivity(intent);

 }
 });

 }
}
对应布局文件如下:
<RelativeLayout xmlns:android="http://schemas.android.com/apk/res/android"
 xmlns:tools="http://schemas.android.com/tools"
 android:layout_width="match_parent"
 android:layout_height="match_parent">

 <TextView
 android:id="@+id/textview"
 android:layout_width="fill_parent"
 android:layout_height="wrap_content"
 android:layout_marginTop="90dp"
 android:gravity="center"
 android:text="个人信息管理系统"
 android:textSize="40dp" />

 <Button
 android:id="@+id/btn2"
 android:layout_width="wrap_content"
 android:layout_height="wrap_content"
 android:layout_alignBaseline="@+id/btn1"
 android:layout_alignBottom="@+id/btn1"
 android:layout_alignParentRight="true"
 android:layout_marginRight="60dp"
 android:text="查询" />

 <Button
 android:id="@+id/btn1"
 android:layout_width="wrap_content"
 android:layout_height="wrap_content"
 android:layout_alignParentLeft="true"
 android:layout_below="@+id/textview"
 android:layout_marginLeft="60dp"
 android:layout_marginTop="100dp"
 android:text="添加" />
</RelativeLayout>
(3)AddActivity.java代码如下:
package com.example.system;

import android.app.Activity;
import android.content.ContentValues;
import android.content.Intent;
import android.os.Bundle;
import android.view.View;
import android.view.View.OnClickListener;
import android.widget.Button;
import android.widget.EditText;

public class AddActivity extends Activity {
 //声明组件
 private EditText name,age,sex,edu;
 private Button add;

 @Override
 public void onCreate(Bundle savedInstanceState) {
 super.onCreate(savedInstanceState);
 setContentView(R.layout.activity_add);

 name=(EditText)findViewById(R.id.name);
 age=(EditText)findViewById(R.id.age);
 sex=(EditText)findViewById(R.id.sex);
 edu=(EditText)findViewById(R.id.edu);
 add=(Button)findViewById(R.id.ButtonAdd);

 //根据ID 获取组件
 add.setOnClickListener(new OnClickListener() {
 @Override
 public void onClick(View v) {
 // TODO Auto-generated method stub

 String name1=name.getText().toString();
 String age1=age.getText().toString();
 String sex1=sex.getText().toString();
 String edu1=edu.getText().toString();

 //封装信息
 ContentValues values=new ContentValues();
 values.put("name", name1);
 values.put("age", age1);
 values.put("sex", sex1);
 values.put("edu", edu1);

 DBHelper helper=new DBHelper(getApplicationContext());
 helper.insert(values);

 Intent intent = new Intent(AddActivity.this,MainActivity.class);
 startActivity(intent);

 }
 });

 }
}
对应布局文件如下:
<LinearLayout xmlns:android="http://schemas.android.com/apk/res/android"
 android:layout_width="fill_parent"
 android:layout_height="fill_parent"
 android:orientation="vertical"
 android:padding="10dp">

 <TableLayout
 android:id="@+id/TableLayout"
 android:layout_width="wrap_content"
 android:layout_height="wrap_content"
 android:stretchColumns="1">

 <TableRow
 android:id="@+id/TableRow01"
 android:layout_width="wrap_content"
 android:layout_height="wrap_content">

 <TextView
 android:id="@+id/textview1"
 android:layout_width="wrap_content"
 android:layout_height="wrap_content"
 android:text="姓名"/>
 <EditText
 android:id="@+id/name"
 android:layout_width="fill_parent"
 android:layout_height="wrap_content"
 android:text=""/>
 </TableRow>

 <TableRow
 android:id="@+id/TableRow02"
 android:layout_width="wrap_content"
 android:layout_height="wrap_content">

 <TextView
 android:id="@+id/textview2"
 android:layout_width="wrap_content"
 android:layout_height="wrap_content"
 android:text="年龄"/>
 <EditText
 android:id="@+id/age"
 android:layout_width="fill_parent"
 android:layout_height="wrap_content"
 android:text=""/>
 </TableRow>

 <TableRow
 android:id="@+id/TableRow03"
 android:layout_width="wrap_content"
 android:layout_height="wrap_content">

 <TextView
 android:id="@+id/textview3"
 android:layout_width="wrap_content"
 android:layout_height="wrap_content"
 android:text="性别"/>
 <EditText
 android:id="@+id/sex"
 android:layout_width="fill_parent"
 android:layout_height="wrap_content"
 android:text=""/>
 </TableRow>

 <TableRow
 android:id="@+id/TableRow04"
 android:layout_width="wrap_content"
 android:layout_height="wrap_content">

 <TextView
 android:id="@+id/textview4"
 android:layout_width="wrap_content"
 android:layout_height="wrap_content"
 android:text="学历"/>
 <EditText
 android:id="@+id/edu"
 android:layout_width="fill_parent"
 android:layout_height="wrap_content"
 android:text=""/>
 </TableRow>

 <Button
 android:id="@+id/ButtonAdd"
 android:layout_width="wrap_content"
 android:layout_height="wrap_content"
 android:text="添加"/>
 </TableLayout>
</LinearLayout>
(4)QueryActivity.java代码如下:
package com.example.system;

import android.app.AlertDialog;
import android.app.ListActivity;
import android.content.DialogInterface;
import android.database.Cursor;
import android.os.Bundle;
import android.view.View;
import android.widget.AdapterView;
import android.widget.AdapterView.OnItemClickListener;
import android.widget.ListView;
import android.widget.SimpleCursorAdapter;

public class QueryActivity extends ListActivity{

 private ListView listview=null;

 @Override
 public void onCreate(Bundle savedInstanceState){
 super.onCreate(savedInstanceState);

 this.setTitle("浏览信息");

 listview=getListView();

 final DBHelper helper=new DBHelper(this);

 Cursor c=helper.query();

 String[] from={"_id","name","age","sex","edu"};

 int[] to={R.id.text0,R.id.text1,R.id.text2,R.id.text3,R.id.text4};

 SimpleCursorAdapter adapter=new SimpleCursorAdapter(this, R.layout.activity_query, c, from, to);
 listview.setAdapter(adapter);
 }
}
对应布局文件如下:
<LinearLayout xmlns:android="http://schemas.android.com/apk/res/android"
 android:layout_width="match_parent"
 android:layout_height="match_parent">
<TextView
 android:id="@+id/text0"
 android:layout_width="wrap_content"
 android:layout_height="wrap_content"
 />

<TextView
 android:id="@+id/text1"
 android:layout_width="wrap_content"
 android:layout_height="wrap_content"
 />
<TextView
 android:id="@+id/text2"
 android:layout_width="wrap_content"
 android:layout_height="wrap_content"
 />
<TextView
 android:id="@+id/text3"
 android:layout_width="wrap_content"
 android:layout_height="wrap_content"
 />
<TextView
 android:id="@+id/text4"
 android:layout_width="wrap_content"
 android:layout_height="wrap_content"
 />
</LinearLayout>
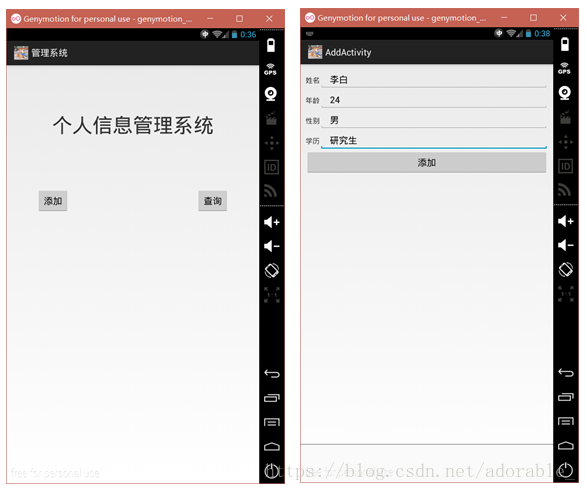
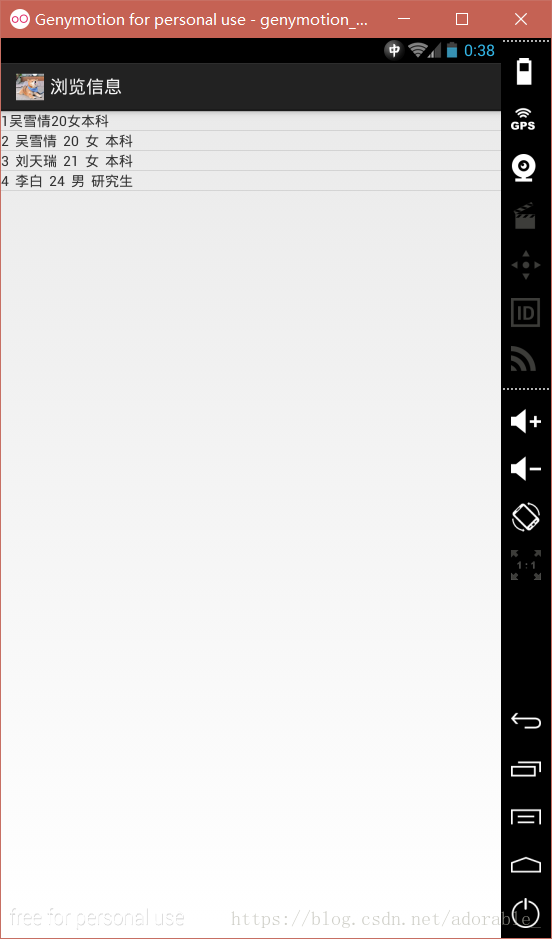
实现效果如下:
更多学习资料请关注专题《管理系统开发》。
以上就是本文的全部内容,希望对大家的学习有所帮助,也希望大家多多支持我们。
相关推荐
-

直接可用的Android studio学生信息管理系统
百度上流传最广的版本有所欠缺,并不能直接使用,同时有很多不必要的功能,这是我进行删减.修改.核查后的版本,根据下面的步骤一步步来直接能够运行程序. 本程序实现的功能是增删改查以及全选 首先是程序提纲 主要部分是java文件和xml文件. activity放在java文件里面,xml文件就是布局文件,用来规定界面的显示格式. 类定义的Java文件 StudentDao StudnetDBHelper Student TableContanst 其他文件 string .xml color.xml
-
Android版学生管理系统
用户可以输入姓名.性别.年龄三个字段,通过点击添加学生按钮,将学生信息展示到开始为空的ScrollView控件中,ScrollView控件只能包裹一个控件,我这里包裹的是LinearLayout.点击保存数据按钮将数据通过XmlSerializer对象将数据保存到sd卡中,当点击恢复数据按钮时将sd卡文件中的数据读取出来回显到ScrollView中.大概功能就是这样的,下面我们来看看具体的代码吧. 因为要读写文件,所以要在清单文件中添加两个权限: <uses-permission android
-
Android实现学生管理系统
本文实例为大家分享了Android实现学生管理系统的关键性代码,供大家参考,具体内容如下 局部效果图: 实现代码: 1.布局 <?xml version="1.0" encoding="utf-8"?> <manifest xmlns:android="http://schemas.android.com/apk/res/android" package="com.itheima27.sutdentmanager&qu
-
简单实现Android学生管理系统(附源码)
本文实例讲述了Android实现学生管理系统,分享给大家供大家参考.具体如下: (1)管理系统实现的功能主要是:学生.教师的注册登录,和选课,以及修改学生的成绩等基本简单的功能,最主要的是实现一些Dialog的使用. 界面如下: (2)主要代码如下:(个人留作笔记,如需要完整代码,在最下边免费下载) 下边是一个适配器,适配器是为了一个listvie进行设置值,其中加载的是一个itemview,适配器中还是用了继承的方法,用于通知适配器进行更新. public class CourseAdapte
-
Android小程序实现个人信息管理系统
本文实例为大家分享了Android实现个人信息管理系统的具体代码,供大家参考,具体内容如下 要求:使用SQLite实现个人信息管理系统,个人信息包括姓名,年龄,性别以及学历 (1)DBHelper.java代码如下: package com.example.system; import android.content.ContentValues; import android.content.Context; import android.database.Cursor; import andr
-
Thinkphp5微信小程序获取用户信息接口的实例详解
Thinkphp5微信小程序获取用户信息接口的实例详解 首先在官网下载示例代码, 选php的, 这里有个坑 官方的php文件,编码是UTF-8+的, 所以要把文件改为UTF-8 然后在Thinkphp5 extend文件夹下建立Wxxcx命名空间,把官方的几个类文件放进去(这里要注意文件夹名, 命名空间名, 类名的, 大小写,一定要一样,官方的文件名和类名大小写不一样) 然后是自己的thinkphp接口代码: <?php /** * Created by PhpStorm. * User: le
-
微信小程序获取用户信息的两种方法wx.getUserInfo与open-data实例分析
本文实例讲述了微信小程序获取用户信息的两种方法wx.getUserInfo与open-data.分享给大家供大家参考,具体如下: 在此之前,小程序获取微信的头像,昵称之类的用户信息,我用的都是wx.getUserInfo,例如: onLoad: function (options) { var that = this; //获取用户信息 wx.getUserInfo({ success: function (res) { console.log(res); that.data.userInfo
-
微信小程序获取用户信息并保存登录状态详解
前言 微信小程序的运行环境不是在浏览器下运行的.所以不能以cookie来维护登录态.下面我就来说说我根据官方给出的方法来写出的维护登录态的方法吧. 一.登录态维护 官方的文档地址:https://mp.weixin.qq.com/debug/wxadoc/dev/api/api-login.html#wxloginobject 通过 wx.login() 获取到用户登录态之后,需要维护登录态.开发者要注意不应该直接把 session_key.openid 等字段作为用户的标识或者 session
-
微信小程序获取用户信息及手机号(后端TP5.0)
本文实例为大家分享了微信小程序获取用户信息及手机号的具体代码,供大家参考,具体内容如下 wxml页面 <view wx:if="{{config.tipsshow1}}" class='dialog-container'> <view class='dialog-mask'></view> <view class='dialog-info'> <view class='dialog-title'>login prompt<
-
微信小程序清空输入框信息与实现屏幕往上滚动的示例代码
微信小程序,是属于小程序的一种,英文名为Wechat Mini Program,是一种不需要下载安装即可使用的应用,它实现了应用"触手可及"的梦想,用户扫一扫或搜一下即可打开应用.微信小程序也是基于H5,JS的开发. 一. 清空输入框信息(重置输入框信息恢复默认值) 这是我在微信小程序实训开发的过程中出现的问题,多次思考后终于解决了输入框内已发送的消息无法被清空这个问题.从另一个角度说可以把清空输入框信息理解为重置输入框信息恢复初始默认值.以下是我的解决方案,希望对你们有所帮助. 首先
-
SpringBoot小程序推送信息的项目实践
目录 1.小程序推送信息列如我们去餐厅等位有预约提醒,剩余桌数 2.申请小程序信息,申请信息模板 3.根据开发文档开发 4.代码如下: 5.推送结果 1.小程序推送信息列如我们去餐厅等位有预约提醒,剩余桌数 首先申请一个小程序,微信开放平台:小程序 2.申请小程序信息,申请信息模板 appid AppSecret 3.根据开发文档开发 subscribeMessage.send | 微信开放文档 4.代码如下: 引入依赖 <dependency> <groupId>org.apac
-
小程序获取用户信息的两种方法详解(getUserProfile和头像昵称填写)
目录 第一种使用 getUserProfile 第二种使用 头像昵称填写 总结 相信大家之前也经常使用open-data获取用户的头像和昵称吧,但微信的这个改编意味着我们要使用新的方法获取信息了.在讨论区引发了很大的讨论,接下来我们一起尝试两种获取信息的方法. 第一种使用 getUserProfile 我们可以查看一下官方文档 wx.getUserProfile(Object object),获取用户信息.页面产生点击事件(例如 button 上 bindtap 的回调中)后才可调用,每次请求都
-
Android小程序实现访问联系人
本文实例为大家分享了Android实现访问联系人的具体代码,供大家参考,具体内容如下 要求: 编写程序,使用ContentProvider实现访问联系人 ContentProvider类的作用: ContentProvider(内容提供器)是所有应用程序之间数据存储和检索的一个桥梁,其作用是是各个应用程序之间能共享数据:主要功能是存储.检索数据并向应用程序提供访问数据的接口. 基本操作: 查询:使用ContentResolver的query()方法查询数据与 SQLite查询一样,返回一个指向结
-
Android小程序实现音乐播放列表
本文实例为大家分享了Android实现音乐播放列表的具体代码,供大家参考,具体内容如下 (1)创建一个数据类工具类DBHelper,该类继承SQLiteOpenHelper,重写onCreate()和onUpgrade()方法,并添加insert().delete().query()方法,分别实现数据的添加.删除和查询.DBHelper类的代码如下: package com.example.musiclist; import android.content.ContentValues; impo