NCCL深度学习Bootstrap网络连接建立源码解析
目录
- 引言
- rank0节点执行ncclGetUniqueId生成ncclUniqueId
- 执行initTransportsRank
- 看下bootstrapInit
- 首先看下commState
- 然后通过bootstrapNetCloseSend关闭fd
- 然后再回去接着看bootstrapInit
- 最后gather所有rank的ip port
引言
上次介绍到rank0的机器生成了ncclUniqueId,并完成了机器的bootstrap网络和通信网络的初始化,这节接着看下所有节点间bootstrap的连接是如何建立的。
rank0节点执行ncclGetUniqueId生成ncclUniqueId
通过mpi将Id广播到所有节点,然后所有节点都会执行ncclCommInitRank,这里其他节点也会进行初始化bootstrap网络和通信网络的操作,然后会执行到ncclCommInitRankSync。
ncclResult_t ncclCommInitRankSync(ncclComm_t* newcomm, int nranks, ncclUniqueId commId, int myrank, int cudaDev) {
  ncclResult_t res;
  CUDACHECK(cudaSetDevice(cudaDev));
  NCCLCHECKGOTO(commAlloc(newcomm, nranks, myrank), res, cleanup);
  NCCLCHECKGOTO(initTransportsRank(*newcomm, &commId), res, cleanup);
  NCCLCHECKGOTO(devCommSetup(*newcomm), res, cleanup);
  INFO(NCCL_INIT,"comm %p rank %d nranks %d cudaDev %d busId %x - Init COMPLETE", *newcomm, myrank, nranks, (*newcomm)->cudaDev, (*newcomm)->busId);
  return ncclSuccess;
cleanup:
  if ((*newcomm) && (*newcomm)->bootstrap) bootstrapAbort((*newcomm)->bootstrap);
  *newcomm = NULL;
  return res;
}
ncclComm_t是指向ncclComm的指针,ncclComm是一个大杂烩,包含了通信用到的所有上下文信息,里面的字段等用到的时候再介绍,然后通过commAlloc分配newcom,并且完成初始化,比如当前是哪个卡,对应的pcie busid是什么,
执行initTransportsRank
static ncclResult_t initTransportsRank(struct ncclComm* comm, ncclUniqueId* commId) {
  // We use 3 AllGathers
  // 1. { peerInfo, comm }
  // 2. ConnectTransport[nranks], ConnectValue[nranks]
  // 3. { nThreads, nrings, compCap, prev[MAXCHANNELS], next[MAXCHANNELS] }
  int rank = comm->rank;
  int nranks = comm->nRanks;
  uint64_t commHash = getHash(commId->internal, NCCL_UNIQUE_ID_BYTES);
  TRACE(NCCL_INIT, "comm %p, commHash %lx, rank %d nranks %d - BEGIN", comm, commHash, rank, nranks);
  NCCLCHECK(bootstrapInit(commId, rank, nranks, &comm->bootstrap));
  // AllGather1 - begin
  struct {
    struct ncclPeerInfo peerInfo;
    struct ncclComm* comm;
  } *allGather1Data;
  NCCLCHECK(ncclCalloc(&allGather1Data, nranks));
  allGather1Data[rank].comm = comm;
  struct ncclPeerInfo* myInfo = &allGather1Data[rank].peerInfo;
  NCCLCHECK(fillInfo(comm, myInfo, commHash));
  NCCLCHECK(bootstrapAllGather(comm->bootstrap, allGather1Data, sizeof(*allGather1Data)));
  NCCLCHECK(ncclCalloc(&comm->peerInfo, nranks+1)); // Extra rank to represent CollNet root
  for (int i = 0; i < nranks; i++) {
    memcpy(comm->peerInfo+i, &allGather1Data[i].peerInfo, sizeof(struct ncclPeerInfo));
    if ((i != rank) && (comm->peerInfo[i].hostHash == myInfo->hostHash) && (comm->peerInfo[i].busId == myInfo->busId)) {
      WARN("Duplicate GPU detected : rank %d and rank %d both on CUDA device %x", rank, i, myInfo->busId);
      return ncclInvalidUsage;
    }
  }
看下bootstrapInit
ncclResult_t bootstrapInit(ncclUniqueId * id, int rank, int nranks, void** commState) {
  ncclNetHandle_t* netHandle = (ncclNetHandle_t*) id;
  bool idFromEnv = getenv("NCCL_COMM_ID") != NULL;
  struct extState* state;
  NCCLCHECK(ncclCalloc(&state, 1));
  state->rank = rank;
  state->nranks = nranks;
  *commState = state;
  TRACE(NCCL_INIT, "rank %d nranks %d", rank, nranks);
  struct extInfo info = { 0 };
  info.rank = rank;
  info.nranks = nranks;
  void *tmpSendComm, *tmpRecvComm;
  // Pass the remote address to listen via info
  if (idFromEnv) {
    memcpy(&info.extHandleListen, netHandle, sizeof(ncclNetHandle_t));
    memcpy(&info.extHandleListenRoot, netHandle, sizeof(ncclNetHandle_t));
  }
  // listen will return the local address via info (specify interface type 'findSubnetIf')
  state->dev = idFromEnv ? findSubnetIf : 0;
  void* extBstrapListenCommRoot;
  NCCLCHECK(bootstrapNetListen(state->dev, &info.extHandleListen, &state->extBstrapListenComm));
  NCCLCHECK(bootstrapNetListen(state->dev, &info.extHandleListenRoot, &extBstrapListenCommRoot));
  // stagger connection times to avoid an overload of the root at very high rank counts
  if (nranks > 128) {
    long msec = rank;
    struct timespec tv;
    tv.tv_sec = msec / 1000;
    tv.tv_nsec = 1000000 * (msec % 1000);
    TRACE(NCCL_INIT, "rank %d delaying connection to root by %ld msec", rank, msec);
    (void) nanosleep(&tv, NULL);
  }
  // send info on my listening socket to root
  NCCLCHECK(bootstrapNetConnect(state->dev, netHandle, &tmpSendComm));
  NCCLCHECK(bootstrapNetSend(tmpSendComm, &info, sizeof(info)));
  NCCLCHECK(bootstrapNetCloseSend(tmpSendComm));
  // get info on my "next" rank in the bootstrap ring from root
}
首先看下commState
即ncclComm的bootstrap,类型为extState。
struct extState {
  void* extBstrapListenComm;
  void* extBstrapRingRecvComm;
  void* extBstrapRingSendComm;
  ncclNetHandle_t* peerBstrapHandles;
  struct unexConn* unexpectedConnections;
  int rank;
  int nranks;
  int dev;
};
其中extBstrapRingSendComm是当前节点连接next的socket连接,extBstrapRingRecvComm是当前节点和prev节点的socket连接,extBstrapListenComm是当前节点的监听socket,peerBstrapHandles是所有rank的ip port(对应extBstrapListenComm),dev默认为0,表示用第几个ip地址。
然后通过bootstrapNetListen创建extHandleListen和extHandleListenRoot两个bootstrap comm,如前文所述,bootstrap comm其实就是保存了fd,这里创建两个comm的原因是extHandleListen是rank之间实际使用的bootstrap连接,extHandleListenRoot是rank0节点和其他所有rank进行通信使用的连接。
static ncclResult_t bootstrapNetListen(int dev, ncclNetHandle_t* netHandle, void** listenComm)
bootstrapNetListen函数上节有介绍过,会获取到第dev个当前机器的ip,然后listen获取监听fd,将ip port写到nethandle,获取到的bootstrap comm写到listencomm。
然后将rank,nrank,extHandleListen和extHandleListenRoot写到extInfo里。
struct extInfo {
  int rank;
  int nranks;
  ncclNetHandle_t extHandleListenRoot;
  ncclNetHandle_t extHandleListen;
};
netHandle为ncclUniqueId,即rank0的ip port,然后通过bootstrapNetConnect创建bootstrap send comm,类比bootstrapNetListen,bootstrapNetConnect就是建立到netHandle的socket连接,将socket写到sendComm里,这里dev并没有用到。
static ncclResult_t bootstrapNetConnect(int dev, ncclNetHandle_t* netHandle, void** sendComm)
然后通过bootstrapNetSend将extInfo发送出去,即发给rank0:
static ncclResult_t bootstrapNetSend(void* sendComm, void* data, int size) {
  struct bootstrapNetComm* comm = (struct bootstrapNetComm*)sendComm;
  NCCLCHECK(socketSend(comm->fd, &size, sizeof(int)));
  NCCLCHECK(socketSend(comm->fd, data, size));
  return ncclSuccess;
}
其中socketSend就是执行send接口发送数据。
然后通过bootstrapNetCloseSend关闭fd
rank0收到数据后会做什么工作呢,回顾一下,rank0的节执行ncclGetUniqueId生成ncclUniqueId,其中在执行bootstrapCreateRoot的最后会启动一个线程执行bootstrapRoot。
static void *bootstrapRoot(void* listenComm) {
  struct extInfo info;
  ncclNetHandle_t *rankHandles = NULL;
  ncclNetHandle_t *rankHandlesRoot = NULL; // for initial rank <-> root information exchange
  ncclNetHandle_t zero = { 0 }; // for sanity checking
  void* tmpComm;
  ncclResult_t res;
  setFilesLimit();
  TRACE(NCCL_INIT, "BEGIN");
  /* Receive addresses from all ranks */
  int nranks = 0, c = 0;
  do {
    NCCLCHECKGOTO(bootstrapNetAccept(listenComm, &tmpComm), res, out);
    NCCLCHECKGOTO(bootstrapNetRecv(tmpComm, &info, sizeof(info)), res, out);
    NCCLCHECKGOTO(bootstrapNetCloseRecv(tmpComm), res, out);
    if (c == 0) {
      nranks = info.nranks;
      NCCLCHECKGOTO(ncclCalloc(&rankHandles, nranks), res, out);
      NCCLCHECKGOTO(ncclCalloc(&rankHandlesRoot, nranks), res, out);
    }
    if (nranks != info.nranks) {
      WARN("Bootstrap Root : mismatch in rank count from procs %d : %d", nranks, info.nranks);
      goto out;
    }
    if (memcmp(&zero, &rankHandlesRoot[info.rank], sizeof(ncclNetHandle_t)) != 0) {
      WARN("Bootstrap Root : rank %d of %d ranks has already checked in", info.rank, nranks);
      goto out;
    }
    // Save the connection handle for that rank
    memcpy(rankHandlesRoot+info.rank, info.extHandleListenRoot, sizeof(ncclNetHandle_t));
    memcpy(rankHandles+info.rank, info.extHandleListen, sizeof(ncclNetHandle_t));
    ++c;
    TRACE(NCCL_INIT, "Received connect from rank %d total %d/%d",  info.rank, c, nranks);
  } while (c < nranks);
  TRACE(NCCL_INIT, "COLLECTED ALL %d HANDLES", nranks);
  // Send the connect handle for the next rank in the AllGather ring
  for (int r=0; r<nranks; ++r) {
    int next = (r+1) % nranks;
    void *tmpSendComm;
    NCCLCHECKGOTO(bootstrapNetConnect(0, rankHandlesRoot+r, &tmpSendComm), res, out);
    NCCLCHECKGOTO(bootstrapNetSend(tmpSendComm, rankHandles+next, sizeof(ncclNetHandle_t)), res, out);
    NCCLCHECKGOTO(bootstrapNetCloseSend(tmpSendComm), res, out);
  }
  TRACE(NCCL_INIT, "SENT OUT ALL %d HANDLES", nranks);
out:
  bootstrapNetCloseListen(listenComm);
  if (rankHandles) free(rankHandles);
  if (rankHandlesRoot) free(rankHandlesRoot);
  TRACE(NCCL_INIT, "DONE");
  return NULL;
}
listenComm是上一个博文中rank0创建的监听fd,bootstrapNetAccept是从listenComm中获取一个新连接,使用新连接的fd创建recvcomm。
static ncclResult_t bootstrapNetAccept(void* listenComm, void** recvComm)
然后通过bootstrapNetRecv读取tmpComm的数据,即其他rank发送来的extInfo,然后保存其他rank的extHandleListen和extHandleListenRoot,这个时候rank0就获取到其他所有rank的ip和port了。
获取完所有rank的info之后开始建环,将节点(r+1) % nranks的extHandleListen发送给节点r,就是说将节点r的next节点的nethandle发送给节点r。这里可以看出,每个节点创建了两个listen comm,其中rank0使用extHandleListenRoot进行通信,其他节点之间通过extHandleListen进行通信。
然后再回去接着看bootstrapInit
ncclResult_t bootstrapInit(ncclUniqueId * id, int rank, int nranks, void** commState) {
  // get info on my "next" rank in the bootstrap ring from root
  ncclNetHandle_t extHandleNext;
  NCCLCHECK(bootstrapNetAccept(extBstrapListenCommRoot, &tmpRecvComm));
  NCCLCHECK(bootstrapNetRecv(tmpRecvComm, &extHandleNext, sizeof(extHandleNext)));
  NCCLCHECK(bootstrapNetCloseRecv(tmpRecvComm));
  NCCLCHECK(bootstrapNetCloseListen(extBstrapListenCommRoot));
  NCCLCHECK(bootstrapNetConnect(state->dev, &extHandleNext, &state->extBstrapRingSendComm));
  // Accept the connect request from the previous rank in the AllGather ring
  NCCLCHECK(bootstrapNetAccept(state->extBstrapListenComm, &state->extBstrapRingRecvComm));
  // AllGather all listen handlers
  NCCLCHECK(ncclCalloc(&state->peerBstrapHandles, nranks));
  memcpy(state->peerBstrapHandles+rank, info.extHandleListen, sizeof(ncclNetHandle_t));
  NCCLCHECK(bootstrapAllGather(state, state->peerBstrapHandles, sizeof(ncclNetHandle_t)));
  TRACE(NCCL_INIT, "rank %d nranks %d - DONE", rank, nranks);
  return ncclSuccess;
}
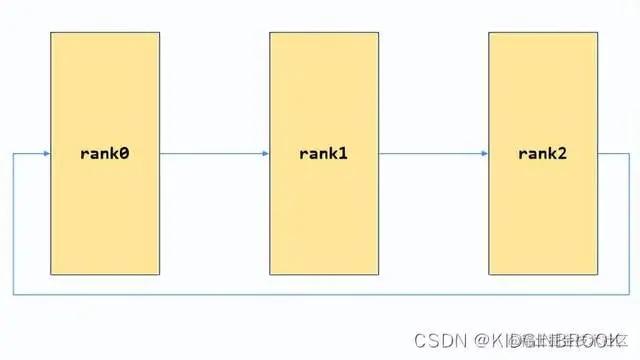
接着所有rank都会在extHandleListenRoot上接收新连接创建tmpRecvComm,然后接收到当前rank的next的ip,port;然后连接next创建bscomm到state->extBstrapRingSendComm,接收prev的连接创建bscomm到state->extBstrapRingRecvComm,到现在bootstrap网络连接就完全建立起来了,如下图:
最后gather所有rank的ip port
首先将自己的nethandle放到peerBstrapHandles的对应位置,如下所示。
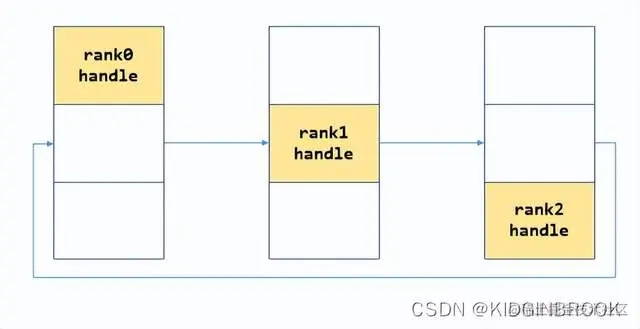
然后执行bootstrapAllGather:
ncclResult_t bootstrapAllGather(void* commState, void* allData, int size) {
  struct extState* state = (struct extState*)commState;
  char* data = (char*)allData;
  int rank = state->rank;
  int nranks = state->nranks;
  TRACE(NCCL_INIT, "rank %d nranks %d size %d", rank, nranks, size);
  /* Simple ring based AllGather
   * At each step i receive data from (rank-i-1) from left
   * and send previous step's data from (rank-i) to right
   */
  for (int i=0; i<nranks-1; i++) {
    size_t rslice = (rank - i - 1 + nranks) % nranks;
    size_t sslice = (rank - i + nranks) % nranks;
    // Send slice to the right
    NCCLCHECK(bootstrapNetSend(state->extBstrapRingSendComm, data+sslice*size, size));
    // Recv slice from the left
    NCCLCHECK(bootstrapNetRecv(state->extBstrapRingRecvComm, data+rslice*size, size));
  }
  TRACE(NCCL_INIT, "rank %d nranks %d size %d - DONE", rank, nranks, size);
  return ncclSuccess;
}
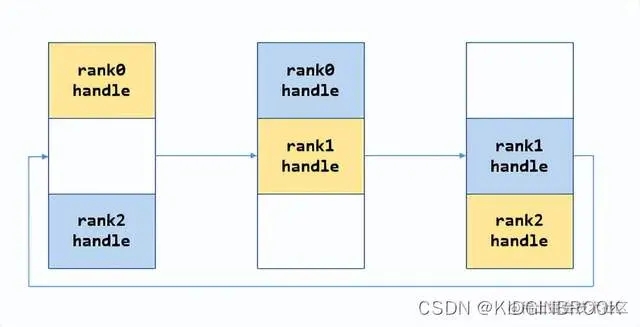
每一次将自己的data发送给对应的rank,然后接收其他rank发送过来的data,如下图。
第一步:
第二步:
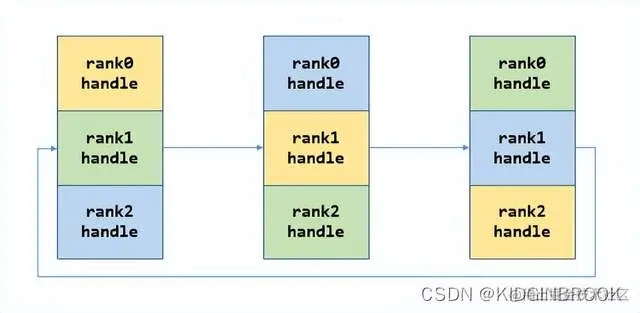
到这里每个rank就都有了全局所有rank的ip port。
最后总结一下,本节主要创建了bootstrap环形网络连接,并保存到ncclComm里。
欢迎 Star、试用 OneFlow 最新版本:github.com/Oneflow-Inc…
以上就是NCCL深度学习Bootstrap网络连接建立源码解析的详细内容,更多关于NCCL Bootstrap网络连接的资料请关注我们其它相关文章!
相关推荐
-
NCCL深度学习之初始化及ncclUniqueId的产生源码解析
目录 作者|KIDGINBROOK 更新|潘丽晨 NCCL是英伟达开源的GPU通信库,支持集合通信和点对点通信. 看下官方给的一个demo: #include <stdio.h> #include "cuda_runtime.h" #include "nccl.h" #include "mpi.h" #include <unistd.h> #include <stdint.h> #define MPICHECK
-
深度学习之GPU,CUDA和cuDNN的理解
我们知道做深度学习离不开GPU,不过一直以来对GPU和CPU的差别,CUDA以及cuDNN都不是很了解,所以找了些资料整理下,希望不仅可以帮助自己理解,也能够帮助到其他人理解. 先来讲讲CPU和GPU的关系和差别吧.截图来自资料1(CUDA的官方文档): 从上图可以看出GPU(图像处理器,Graphics Processing Unit)和CPU(中央处理器,Central Processing Unit)在设计上的主要差异在于GPU有更多的运算单元(如图中绿色的ALU),而Control和Ca
-

BootStrap Tooltip插件源码解析
Tooltip插件可以让你把要显示的内容以弹出框的形式来展示,如: 因为自己在工作的过程中,用到了Tooltip这个插件,并且当时正想学习一下元素定位的问题,如:提示框显示的位置就是触发提示框元素的位置,可以配置在上.下.左.右等位置,所以就去看了源码.对于整个插件源码没有看全,但也学到了许多的知识点.能力有限,可能其中有认识错误的地方,以后再补充吧 1 使用方法不介绍 ,可以参照 Bootstrap 提示工具(Tooltip)插件 2 源码解析 +function ($) { 'use str
-
Bootstrap模态窗口源码解析
前言: bootstrap的 js插件的源码写的非常好,也算是编写jquery插件的模范写法,本来还想大篇详细的分析一下呢,唉,没时间啊,很早之前看过的源码了,现在贴在了博客上, 300来行的代码,其中有很多jquery的高级用法,建议,从github上下载一下源码,然后把本篇的代码复制过去,然后,边运行,边阅读,如果有不明白的地方,可以给我留言,我给解答. 下面是基本每行都加了注释,供大家参考,具体内容如下 /* ========================================
-
深度源码解析Java 线程池的实现原理
java 系统的运行归根到底是程序的运行,程序的运行归根到底是代码的执行,代码的执行归根到底是虚拟机的执行,虚拟机的执行其实就是操作系统的线程在执行,并且会占用一定的系统资源,如CPU.内存.磁盘.网络等等.所以,如何高效的使用这些资源就是程序员在平时写代码时候的一个努力的方向.本文要说的线程池就是一种对 CPU 利用的优化手段. 线程池,百度百科是这么解释的: 线程池是一种多线程处理形式,处理过程中将任务添加到队列,然后在创建线程后自动启动这些任务.线程池线程都是后台线程.每个线程都使用默认的
-
Android 网络html源码查看器详解及实例
Android 网络html源码查看器详解及实例 IO字节流的数据传输了解 Handler的基本使用 1.作品展示 2.需要掌握的知识 FileInputStream,FIleOutputStream,BufferInputStream,BufferOutStream的读写使用与区别 //进行流的读写 byte[] buffer = new byte[1024 * 8]; //创建一个写到内存的字节数组输出流 ByteArrayOutputStream byteArrayOutputStream
-
ReentrantLock从源码解析Java多线程同步学习
目录 前言 管程 管程模型 MESA模型 主要特点 AQS 共享变量 资源访问方式 主要方法 队列 node节点等待状态 ReentrantLock源码分析 实例化ReentrantLock 加锁 A线程加锁成功 B线程尝试加锁 释放锁 总结 前言 如今多线程编程已成为了现代软件开发中的重要部分,而并发编程中的线程同步问题更是一道难以逾越的坎.在Java语言中,synchronized是最基本的同步机制,但它也存在着许多问题,比如可重入性不足.死锁等等.为了解决这些问题,Java提供了更加高级的
-
Java源码解析之object类
在源码的阅读过程中,可以了解别人实现某个功能的涉及思路,看看他们是怎么想,怎么做的.接下来,我们看看这篇Java源码解析之object的详细内容. Java基类Object java.lang.Object,Java所有类的父类,在你编写一个类的时候,若无指定父类(没有显式extends一个父类)编译器(一般编译器完成该步骤)会默认的添加Object为该类的父类(可以将该类反编译看其字节码,不过貌似Java7自带的反编译javap现在看不到了). 再说的详细点:假如类A,没有显式继承其他类,编译
-
Android图片加载利器之Picasso源码解析
看到了这里,相信大家对Picasso的使用已经比较熟悉了,本篇博客中将从基本的用法着手,逐步的深入了解其设计原理. Picasso的代码量在众多的开源框架中算得上非常少的一个了,一共只有35个class文件,但是麻雀虽小,五脏俱全.好了下面跟随我的脚步,出发了. 基本用法 Picasso.with(this).load(imageUrl).into(imageView); with(this)方法 public static Picasso with(Context context) { if
-
Vue源码解析之数组变异的实现
力有不逮的对象 众所周知,在 Vue 中,直接修改对象属性的值无法触发响应式.当你直接修改了对象属性的值,你会发现,只有数据改了,但是页面内容并没有改变. 这是什么原因? 原因在于: Vue 的响应式系统是基于Object.defineProperty这个方法的,该方法可以监听对象中某个元素的获取或修改,经过了该方法处理的数据,我们称其为响应式数据.但是,该方法有一个很大的缺点,新增属性或者删除属性不会触发监听,举个栗子: var vm = new Vue({ data () { return
-
Vue3源码解析watch函数实例
目录 引言 一.watch参数类型 1. 选项options 2. 回调cb 3. 数据源source 二.watch函数 三.watch的核心:doWatch 函数 引言 想起上次面试,问了个古老的问题:watch和computed的区别.多少有点感慨,现在已经很少见这种耳熟能详的问题了,网络上八股文不少.今天,我更想分享一下从源码的层面来区别这八竿子打不着的两者.本篇针对watch做分析,下一篇分析computed. 一.watch参数类型 我们知道,vue3里的watch接收三个参数:侦听