
vue-amap安装和用法步骤
之前分享了异步加载高德地图api的用法,现在记录一下vue-amap的用法。
vue-amap是饿了么开源的一套基于 Vue 2.0 和高德地图的地图组件。 数据状态与地图状态单向绑定,开发者无需关心地图的具体操作。
官方文档:https://elemefe.github.io/vue-amap/
步骤如下:
1.npm 安装
npm install vue-amap --save
如果是CDN方式,目前可通过unpkg.com/vue-amap获取最新版本的资源。
<script src="https://unpkg.com/vue-amap/dist/index.js"></script>
2.使用实例
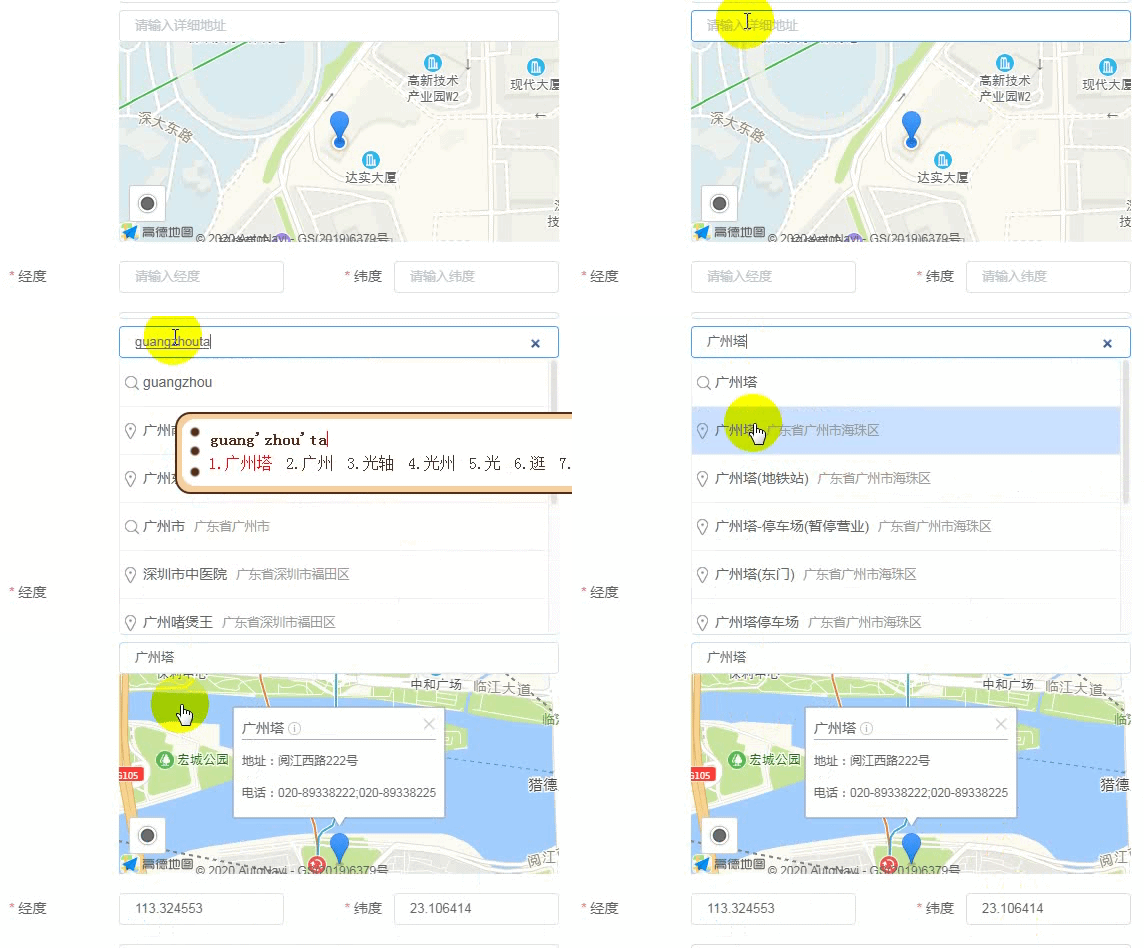
实例需求描述:搜索并选择地址,选中后地图定位到该地址,并获取经纬度自动填入下方的输入框中。
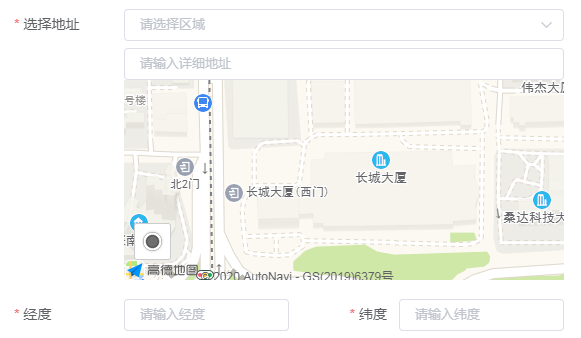
注:实例中使用的框架是ElementUI,其表单组件使用比较方便。
实现步骤:
(1)安装后在main.js中设置以下内容:
import VueAMap from "vue-amap";
Vue.use(VueAMap);
// 初始化vue-amap
VueAMap.initAMapApiLoader({
  key: "your key", // 这里写你申请的高德地图的key
  plugin: ["AMap.Autocomplete", "AMap.Geocoder", "AMap.Geolocation"],
  v: "1.4.15",
  uiVersion: "1.1"
});
(2)定义地图搜索组件 base/mapSearch/baseMapSearch.vue
<template>
  <div>
    <div class="search-box">
      <el-input
        v-model="searchKey"
        type="search"
        id="search"
        placeholder="请输入详细地址"
      ></el-input>
      <!--<button @click="searchByHand">搜索</button>-->
      <div class="tip-box" id="searchTip"></div>
    </div>
    <!--
      amap-manager: 地图管理对象
      vid:地图容器节点的ID
      zooms: 地图显示的缩放级别范围,在PC上,默认范围[3,18],取值范围[3-18];在移动设备上,默认范围[3-19],取值范围[3-19]
      center: 地图中心点坐标值
      plugin:地图使用的插件
      events: 事件
    -->
    <div class="amap-box">
      <el-amap
        :amap-manager="amapManager"
        :vid="'amap-vue'"
        :zoom="zoom"
        :plugin="plugin"
        :center="center"
        :events="events"
      >
        <!-- 标记 -->
        <el-amap-marker
          v-for="(marker, index) in markers"
          :position="marker"
          :key="index"
        ></el-amap-marker>
      </el-amap>
    </div>
  </div>
</template>
<script>
import { AMapManager, lazyAMapApiLoaderInstance } from "vue-amap";
let amapManager = new AMapManager();
export default {
  props: ["city", "value", "longitude", "latitude", "isEdit"],
  data() {
    let self = this;
    return {
      address: null,
      searchKey: "",
      amapManager,
      markers: [],
      searchOption: {
        city: this.city ? this.city : "全国",
        citylimit: true
      },
      center: [121.329402, 31.228667],
      zoom: 17,
      lng: 0,
      lat: 0,
      loaded: false,
      events: {
        init() {
          lazyAMapApiLoaderInstance.load().then(() => {
            self.initSearch();
          });
        },
        // 点击获取地址的数据
        click(e) {
          self.markers = [];
          let { lng, lat } = e.lnglat;
          self.lng = lng;
          self.lat = lat;
          self.center = [lng, lat];
          self.markers.push([lng, lat]);
          // 这里通过高德 SDK 完成。
          let geocoder = new AMap.Geocoder({
            radius: 1000,
            extensions: "all"
          });
          geocoder.getAddress([lng, lat], function(status, result) {
            if (status === "complete" && result.info === "OK") {
              if (result && result.regeocode) {
                self.address = result.regeocode.formattedAddress;
                self.searchKey = result.regeocode.formattedAddress;
                self.$emit("updateLocation", lng, lat, self.searchKey);
                self.$nextTick();
              }
            }
          });
        }
      },
      // 一些工具插件
      plugin: [
        {
          // 定位
          pName: "Geolocation",
          events: {
            init(o) {
              // o是高德地图定位插件实例
              o.getCurrentPosition((status, result) => {
                if (result && result.position) {
                  if (self.isEdit) {
                    // 设置经度
                    self.lng = self.longitude;
                    // 设置维度
                    self.lat = self.latitude;
                    // 设置坐标
                    self.center = [self.longitude, self.latitude];
                    self.markers.push([self.longitude, self.latitude]);
                  } else {
                    // 设置经度
                    self.lng = result.position.lng;
                    // 设置维度
                    self.lat = result.position.lat;
                    // 设置坐标
                    self.center = [self.lng, self.lat];
                    self.markers.push([self.lng, self.lat]);
                  }
                  // load
                  self.loaded = true;
                  // 页面渲染好后
                  self.$nextTick();
                }
              });
            }
          }
        }
      ]
    };
  },
  created() {
    if (this.value) {
      this.searchKey = this.value;
      this.address = this.value;
    }
    if (this.longitude && this.latitude) {
      this.lng = this.longitude;
      this.lat = this.latitude;
      this.center = [this.longitude, this.latitude];
      this.markers.push([this.longitude, this.latitude]);
    }
  },
  methods: {
    // 选择地址后自动定位到当前地址附近
    updateAddress(value, longitude, latitude) {
      this.searchKey = value;
      this.address = value;
      this.lng = longitude;
      this.lat = latitude;
      this.center = [longitude, latitude];
      this.markers.push([longitude, latitude]);
    },
    initSearch() {
      let vm = this;
      let map = this.amapManager.getMap();
      AMapUI.loadUI(["misc/PoiPicker"], function(PoiPicker) {
        let poiPicker = new PoiPicker({
          input: "search",
          placeSearchOptions: {
            map: map,
            pageSize: 10
          },
          suggestContainer: "searchTip",
          searchResultsContainer: "searchTip"
        });
        vm.poiPicker = poiPicker;
        // 监听poi选中信息
        poiPicker.on("poiPicked", function(poiResult) {
          let source = poiResult.source;
          let poi = poiResult.item;
          if (source !== "search") {
            poiPicker.searchByKeyword(poi.name);
          } else {
            poiPicker.clearSearchResults();
            vm.markers = [];
            let lng = poi.location.lng;
            let lat = poi.location.lat;
            let address = poi.name; // poi.cityname + poi.adname + poi.name
            vm.center = [lng, lat];
            vm.markers.push([lng, lat]);
            vm.lng = lng;
            vm.lat = lat;
            vm.address = address;
            vm.searchKey = address;
            vm.$emit("updateLocation", lng, lat, vm.searchKey);
          }
        });
      });
    },
    searchByHand() {
      if (this.searchKey !== "" && this.poiPicker) {
        this.poiPicker.searchByKeyword(this.searchKey);
      }
    }
  }
};
</script>
<style lang="stylus">
.search-box {
  margin-top: 6px;
  width: 100%;
}
.search-box input {
  padding: 0 15px;
  width: 100%;
  height: 32px;
  line-height: 32px;
  color: #606266;
  border: 1px solid #dcdfe6;
  border-radius: 4px;
}
.search-box input:focus {
  border-color: #409eff;
  outline: 0;
}
.search-box input::-webkit-input-placeholder {
  color: #c0c4cc;
}
.tip-box {
  width: 100%;
  max-height:280px;
  position: absolute;
  top: 72px;
  z-index: 10000;
  overflow-y: auto;
  background-color: #fff;
}
</style>
<style>
.amap-ui-poi-picker-sugg,
.amap_lib_placeSearch {
  border: 1px solid #eee;
  border-radius: 4px;
}
.amap-box {
  height: 200px;
}
</style>
这里样式使用了stylus,可自行转换其他样式。
(3)在组件中使用地图搜索组件,这里以弹窗为例
<template>
  <el-dialog
    :title="title"
    :visible.sync="visible"
    :before-close="handleClose"
    width="600px"
    append-to-body
    :close-on-click-modal="false"
    :close-on-press-escape="false"
  >
    <div class="form-info">
      <el-form
        :model="form"
        ref="form"
        :rules="rules"
        size="small"
        label-width="110px"
      >
        <el-form-item label="选择地址" prop="address">
          <base-map-search
            ref="mapSearch"
            :city="form.city"
            :value="form.address"
            :longitude="form.addLon"
            :latitude="form.addLat"
            :isEdit="isEdit"
            @updateLocation="updateLocation"
          />
        </el-form-item>
        <el-row>
          <el-col :span="12">
            <el-form-item prop="addLon" label="经度">
              <el-input
                v-model.number="form.addLon"
                :maxlength="15"
                placeholder="请输入经度"
              ></el-input>
            </el-form-item>
          </el-col>
          <el-col :span="12" class="right-label-form-item">
            <el-form-item prop="addLat" label="纬度">
              <el-input
                v-model.number="form.addLat"
                :maxlength="15"
                placeholder="请输入纬度"
              ></el-input>
            </el-form-item>
          </el-col>
        </el-row>
      </el-form>
    </div>
  </el-dialog>
</template>
<script>
import BaseMapSearch from "../base/mapSearch/baseMapSearch";
export default {
    props: ["visible", "isEdit", "detail"],
    components: {
      BaseMapSearch
    },
    data() {
        return {
            title: "添加地址",
            form: {
                address: "",
                addLon: "",
                addLat: ""
            },
            rules: {
                address: [
                  {
                    required: true,
                    message: "请输入地址",
                    trigger: ["blur", "change"]
                  }
                ],
                addLat: [
                  {
                    required: true,
                    message: "请输入纬度",
                    trigger: ["blur", "change"]
                  }
                ],
                addLon: [
                  {
                    required: true,
                    message: "请输入经度",
                    trigger: ["blur", "change"]
                  }
                ],
            }
        };
    },
    created() {
      if (this.isEdit) {
        this.initForm();
      }
    },
    methods: {
        // 初始化表单
        initForm() {
          this.title = "修改地址";
          if (this.detail) {
            this.form = { ...this.detail };
          }
        },
        // 地图搜索选址
        updateLocation(lng, lat, address) {
          this.form.addLon = lng;
          this.form.addLat = lat;
          this.form.address = address;
        },
        handleClose() {
          this.$emit("update:visible", false);
        }
    }
};
</script>
(4)这时,如果项目中使用了ESlint,会报AMap、AMapUI未定义的错误,我们需要在.eslintrc.js文件中定义globals属性:
module.exports = {
    // ...
    globals: {
      AMap: false,
      AMapUI: false
    }
};
这样就写好了,效果如图:
到此这篇关于vue-amap安装和使用的文章就介绍到这了,更多相关vue-amap安装和使用内容请搜索我们以前的文章或继续浏览下面的相关文章希望大家以后多多支持我们!
相关推荐
-
最全vue的vue-amap使用高德地图插件画多边形范围的示例代码
一.在vue-cli的框架下的main.js(或者main.ts)中引入高德插件,代码如下: import Vue from 'vue' import VueAMap from 'vue-amap' import ElementUI from 'element-ui' import App from './App.vue' import router from './router' import store from './store' import './registerServiceWork
-

vue 使用高德地图vue-amap组件过程解析
这篇文章主要介绍了vue 使用高德地图vue-amap组件过程解析,文中通过示例代码介绍的非常详细,对大家的学习或者工作具有一定的参考学习价值,需要的朋友可以参考下 首先 npm install -S vue-amap 然后在 main.js import VueAMap from 'vue-amap'; //注意不要和 AMap原始名称覆盖 Vue.use(VueAMap); // 初始化vue-amap VueAMap.initAMapApiLoader({ // 高德的key key: '
-
vue-amap安装和用法步骤
之前分享了异步加载高德地图api的用法,现在记录一下vue-amap的用法. vue-amap是饿了么开源的一套基于 Vue 2.0 和高德地图的地图组件. 数据状态与地图状态单向绑定,开发者无需关心地图的具体操作. 官方文档:https://elemefe.github.io/vue-amap/ 步骤如下: 1.npm 安装 npm install vue-amap --save 如果是CDN方式,目前可通过unpkg.com/vue-amap获取最新版本的资源. <script src=&quo
-
Vue extend的基本用法(实例详解)
Vue.extend 属于 Vue 的全局 API,在实际业务开发中我们很少使用,因为相比常用的 Vue.component 写法使用 extend 步骤要更加繁琐一些. 我们创建Vue实例时,都会有一个el选项,来指定实例的根节点,如果不写el选项,那组件就处于未挂载状态.Vue.extend 的作用,就是基于 Vue 构造器,创建一个' 子类 ',它的参数跟new Vue的基本一样,但data要跟组件一样,是个函数,再配合$mount,就可以渲染组件,并且挂载到任意指定的节点上,比如body
-
vue学习之Vue-Router用法实例分析
本文实例讲述了vue学习之Vue-Router用法.分享给大家供大家参考,具体如下: Vue-router就像一个路由器,将组件(components)映射到路由(routes)后,通过点击<router-link>它可以在<router-view>中将相应的组件渲染出来. 1.使用vue-router的步骤 //1.创建路由组件 const Link1={template:'#link1'}; const Link2={template:'#link2'}; const Link
-
vue导入.md文件的步骤(markdown转HTML)
前言 刚接到这个需求的时候,觉得很简单(的确很简单)但是这玩意的坑真的也让人无奈. 网上找了很多的资料,都没有写出痛点(这就很难过了).通过实践并且在我们项目中平稳运行,想分享给后面的人 我的博客上也写了100多篇文章,点击量有上万的也有个位数的,能够帮助到他人这就是写作记录的动力. 需求 vue项目中可以良好展示markdown(只是展示功能 没有编辑功能) 痛点问题 .md文件类型,直接模块加载(只有字符串,这得多难受,怎么维护呢),还是一个文件一个文件的好维护并且好修改复用 用第三方插件,
-
Vue项目引入PWA的步骤
Vue项目引入PWA很简单,操作步骤如下: 1. 安装依赖 vue add @vue/pwa 由于使用add关键字,安装成功后会在项目中创建一些文件,如果项目使用了git,可以很容易的看出文件变化: src文件夹下会生成一个registerServiceWorker.js文件,并在main.js中导入,这个文件自动生成了注册service worker的代码.registerServiceWorker.js的代码如下: import { register } from 'register-ser
-
Python开发工具Pycharm的安装以及使用步骤总结
前言 PyCharm是一种Python 的IDE工具(集成开发环境),带有一整套可以帮助用户在使用Python语言开发时提高其效率的工具,内部集成的功能如下: Project管理 智能提示 语法高亮 代码跳转 调试代码 解释代码(解释器) 框架和库 ...... 总而言之,PyCharm 是一款功能强大的 Python 编辑器,推荐以后编写Python代码,主要用的就是这款IDE. 一.Pycharm下载 先登陆Pycharm官网或者直接输入Pycharm下载地址:https://www.jet
-
node自定义安装更改npm全局模块默认安装路径的步骤
笔者将node安装到了D盘,同时也需要改变npm全局包默认安装的路径,因为不想占C盘空间 第一步当然是去node官网下载对应的版本,同时安装到D盘,先要在D盘新建一个nodejs文件夹 安装不会自己建文件夹 下载地址 选择自己的安装包,然后安装的时候选择D:\nodeJs 就行了 完成安装后,这个时候环境变量里面是没有node的,所以桌面上是找不到node和npm,打开安装的文件夹,新建2个文件夹 node_cache 和node_global global是存放,全局安装的模块的,比如 npm
-
vue使用AES.js的步骤详解
AES加密的使用 对数据传输加密.解密处理---AES.js 第一步: 在vue中安装crypto-js依赖 npm install crypto-js --save-dev 第二步: 在static目录下新建一个AES.js文件,例如: 第三步: 在AES.js中填写如下代码 import CryptoJS from "crypto-js"; // npm install crypto-js --save-dev //随机生成指定数量的32进制key export default {
-
vue中使用typescript配置步骤
目录 1.vue老项目引入TypeScripe 从零开始创建vue+typescript项目 通过前端各个框架的发展,例如vue3.0,react和angular等框架的源码都是用ts(typescript)进行编写的,因此我感觉未来的中大型项目的发展趋势也离不开ts.因此我根据一些入门教程利用vue结合ts编写了文档,适合入门配置vue+ts项目. 1.vue老项目引入TypeScripe npm install vue-class-component vue-property-decorat
-
Vue UI创建项目详细步骤
1.首先要安装最新的Vue CLI 在命令行工具里输入一下命令 npm install -g @vue/cli 或者 yarn global add @vue/cli 安装成功后,可用vue -V命令查看已安装的Vue CLI版本 2.在命令行运行 vue ui,就会出现图形化管理 在界面上可以看到第一个tab项目,点击创建这个tab ,可以来创建一个新的vue项目 3.点击了创建之后可以看到一下内容,可以项目创建一个目录或者选择一个目录,然后选择一种包管理工具:可以使npm,也可以是yarn等