
IDEA 中使用 Hudi的示例代码
目录
- 环境准备
- 核心代码
- 测试
- 参考资料
环境准备
创建 Maven 项目创建服务器远程连接
Tools------Delployment-----Browse Remote Host
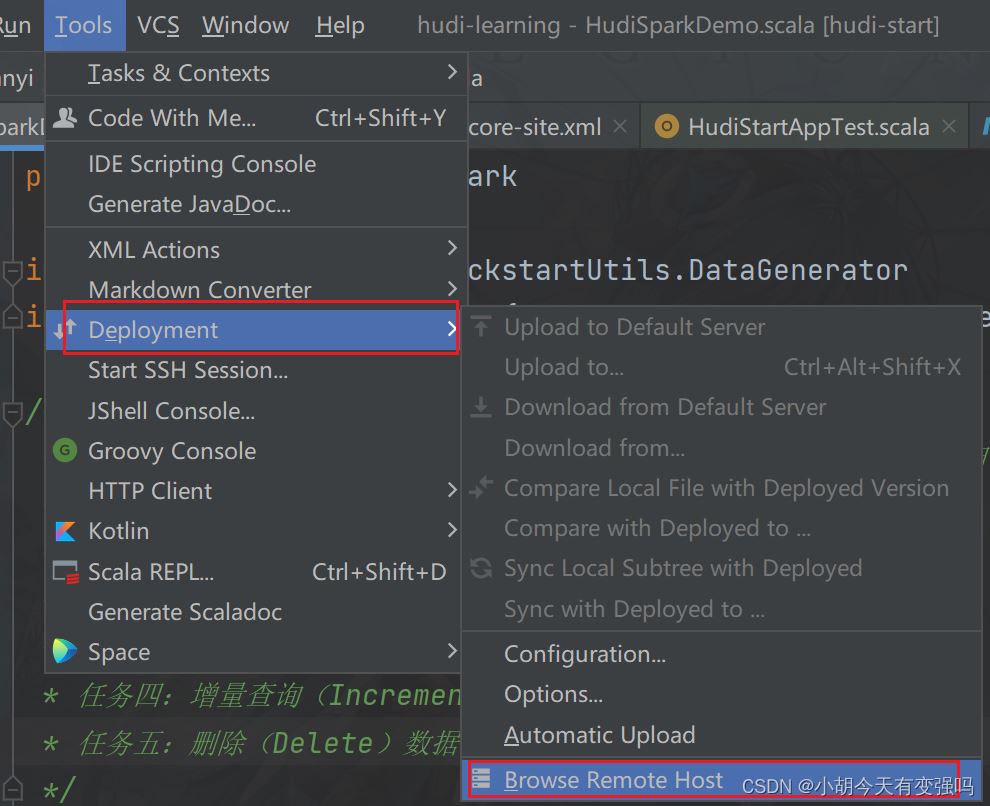
设置如下内容:
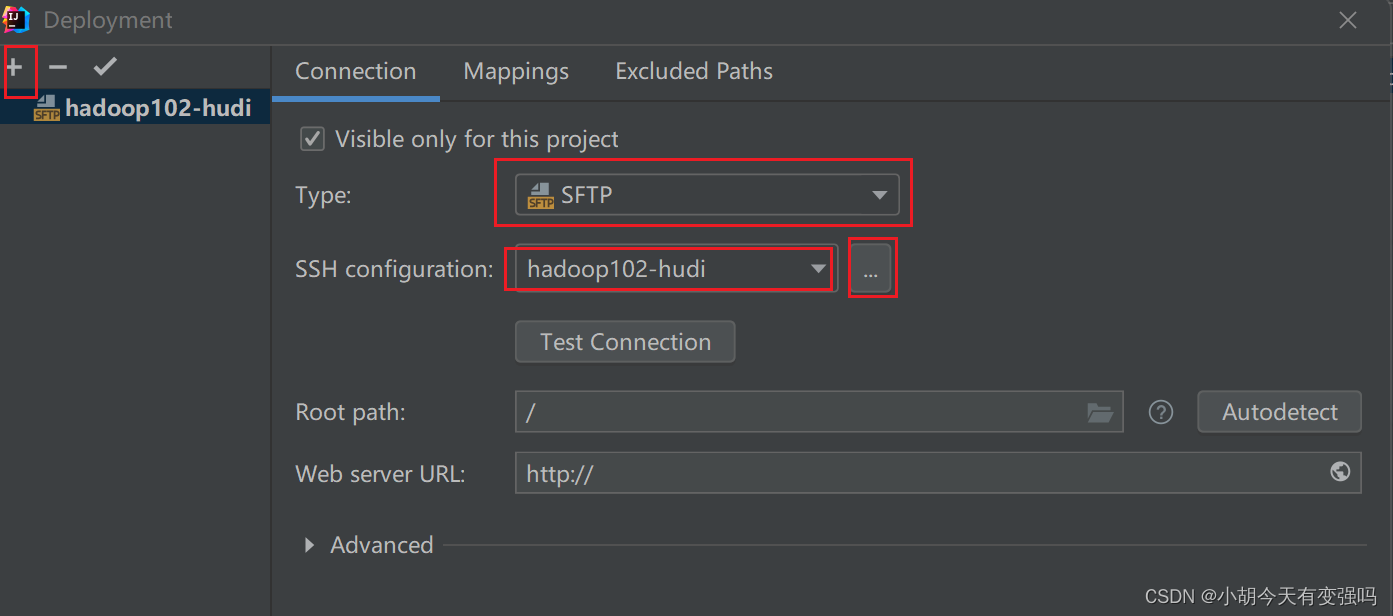
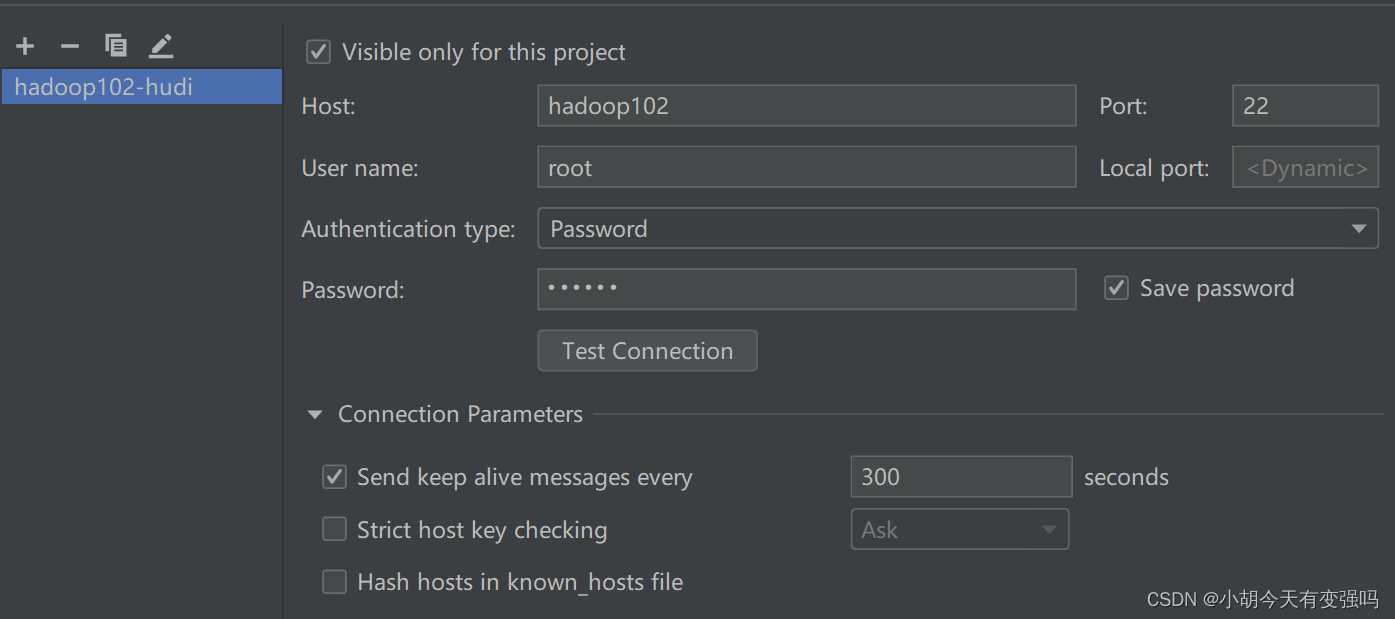
在这里输入服务器的账号和密码
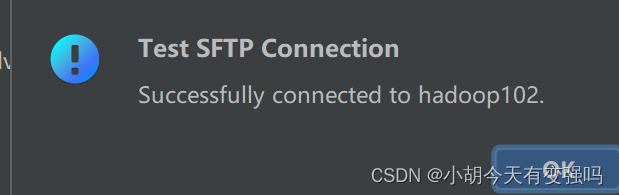
点击Test Connection,提示Successfully的话,就说明配置成功。
复制Hadoop的 core-site.xml、hdfs-site.xml 以及 log4j.properties 三个文件复制到resources文件夹下。
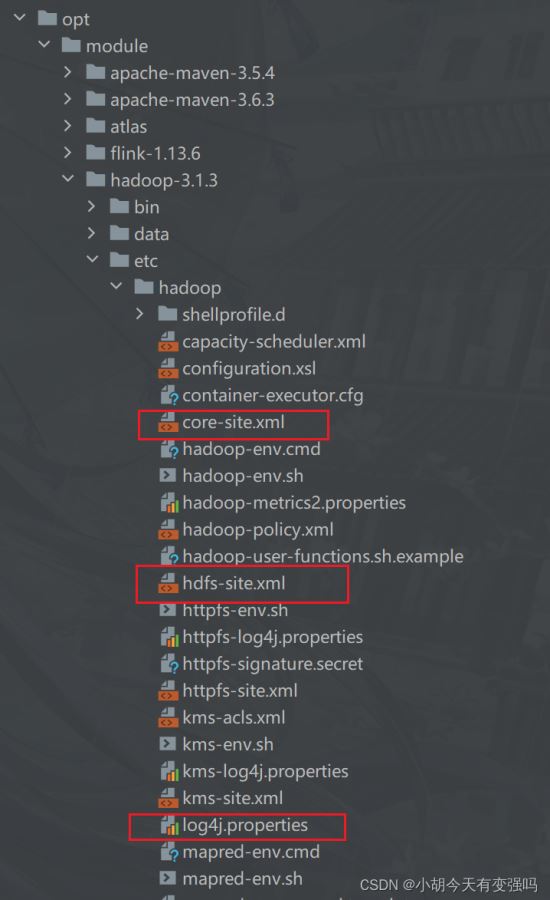
设置 log4j.properties 为打印警告异常信息:
log4j.rootCategory=WARN, console
4.添加 pom.xml 文件
<repositories>
        <repository>
            <id>aliyun</id>
            <url>http://maven.aliyun.com/nexus/content/groups/public/</url>
        </repository>
        <repository>
            <id>cloudera</id>
            <url>https://repository.cloudera.com/artifactory/cloudera-repos/</url>
        </repository>
        <repository>
            <id>jboss</id>
            <url>http://repository.jboss.com/nexus/content/groups/public</url>
        </repository>
    </repositories>

    <properties>
        <scala.version>2.12.10</scala.version>
        <scala.binary.version>2.12</scala.binary.version>
        <spark.version>3.0.0</spark.version>
        <hadoop.version>2.7.3</hadoop.version>
        <hudi.version>0.9.0</hudi.version>
    </properties>

    <dependencies>
        <!-- 依赖Scala语言 -->
        <dependency>
            <groupId>org.scala-lang</groupId>
            <artifactId>scala-library</artifactId>
            <version>${scala.version}</version>
        </dependency>
        <!-- Spark Core 依赖 -->
        <dependency>
            <groupId>org.apache.spark</groupId>
            <artifactId>spark-core_${scala.binary.version}</artifactId>
            <version>${spark.version}</version>
        </dependency>
        <!-- Spark SQL 依赖 -->
        <dependency>
            <groupId>org.apache.spark</groupId>
            <artifactId>spark-sql_${scala.binary.version}</artifactId>
            <version>${spark.version}</version>
        </dependency>

        <!-- Hadoop Client 依赖 -->
        <dependency>
            <groupId>org.apache.hadoop</groupId>
            <artifactId>hadoop-client</artifactId>
            <version>${hadoop.version}</version>
        </dependency>

        <!-- hudi-spark3 -->
        <dependency>
            <groupId>org.apache.hudi</groupId>
            <artifactId>hudi-spark3-bundle_2.12</artifactId>
            <version>${hudi.version}</version>
        </dependency>
        <dependency>
            <groupId>org.apache.spark</groupId>
            <artifactId>spark-avro_2.12</artifactId>
            <version>${spark.version}</version>
        </dependency>

    </dependencies>

    <build>
        <outputDirectory>target/classes</outputDirectory>
        <testOutputDirectory>target/test-classes</testOutputDirectory>
        <resources>
            <resource>
                <directory>${project.basedir}/src/main/resources</directory>
            </resource>
        </resources>
        <!-- Maven 编译的插件 -->
        <plugins>
            <plugin>
                <groupId>org.apache.maven.plugins</groupId>
                <artifactId>maven-compiler-plugin</artifactId>
                <version>3.0</version>
                <configuration>
                    <source>1.8</source>
                    <target>1.8</target>
                    <encoding>UTF-8</encoding>
                </configuration>
            </plugin>
            <plugin>
                <groupId>net.alchim31.maven</groupId>
                <artifactId>scala-maven-plugin</artifactId>
                <version>3.2.0</version>
                <executions>
                    <execution>
                        <goals>
                            <goal>compile</goal>
                            <goal>testCompile</goal>
                        </goals>
                    </execution>
                </executions>
            </plugin>
        </plugins>
    </build>
要注释掉创建项目时的生成的下面的代码,不然依赖一直报错:
<!-- <properties>-->
<!-- <maven.compiler.source>8</maven.compiler.source>-->
<!-- <maven.compiler.target>8</maven.compiler.target>-->
<!-- </properties>-->
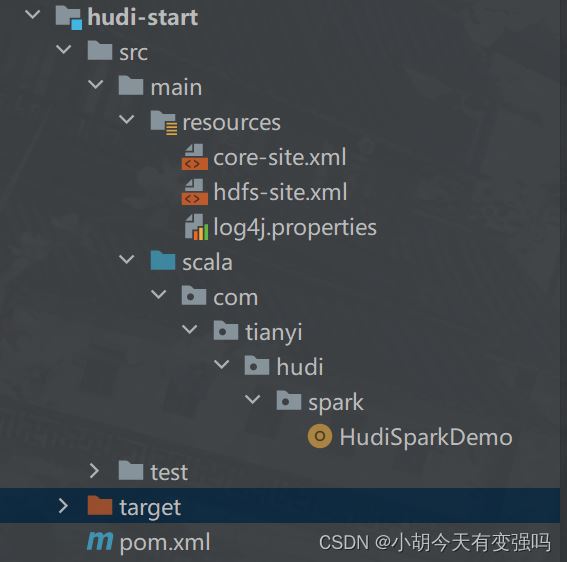
代码结构:
核心代码
import org.apache.hudi.QuickstartUtils.DataGenerator
import org.apache.spark.sql.{DataFrame, SaveMode, SparkSession}
/**
 * Hudi 数据湖的框架,基于Spark计算引擎,对数据进行CURD操作,使用官方模拟赛生成的出租车出行数据
 *
 * 任务一:模拟数据,插入Hudi表,采用COW模式
 * 任务二:快照方式查询(Snapshot Query)数据,采用DSL方式
 * 任务三:更新(Update)数据
 * 任务四:增量查询(Incremental Query)数据,采用SQL方式
 * 任务五:删除(Delete)数据
 */
object HudiSparkDemo {
  /**
   * 官方案例:模拟产生数据,插入Hudi表,表的类型为COW
   */
  def insertData(spark: SparkSession, table: String, path: String): Unit = {
    import spark.implicits._
    // 第1步、模拟乘车数据
    import org.apache.hudi.QuickstartUtils._
    val dataGen: DataGenerator = new DataGenerator()
    val inserts = convertToStringList(dataGen.generateInserts(100))
    import scala.collection.JavaConverters._
    val insertDF: DataFrame = spark.read.json(
      spark.sparkContext.parallelize(inserts.asScala, 2).toDS()
    )
//    		insertDF.printSchema()
//    		insertDF.show(10, truncate = false)
    //第二步: 插入数据到Hudi表
    import org.apache.hudi.DataSourceWriteOptions._
    import org.apache.hudi.config.HoodieWriteConfig._
    insertDF.write
      .mode(SaveMode.Append)
      .format("hudi")
      .option("hoodie.insert.shuffle.parallelism", 2)
      .option("hoodie.insert.shuffle.parallelism", 2)
      //Hudi表的属性设置
      .option(PRECOMBINE_FIELD.key(), "ts")
      .option(RECORDKEY_FIELD.key(), "uuid")
      .option(PARTITIONPATH_FIELD.key(), "partitionpath")
      .option(TBL_NAME.key(), table)
      .save(path)
  }
  /**
   *  采用Snapshot Query快照方式查询表的数据
   */
  def queryData(spark: SparkSession, path: String): Unit = {
    import spark.implicits._
    val tripsDF: DataFrame = spark.read.format("hudi").load(path)
//    tripsDF.printSchema()
//    tripsDF.show(10, truncate = false)
    //查询费用大于10,小于50的乘车数据
    tripsDF
      .filter($"fare" >= 20 && $"fare" <=50)
      .select($"driver", $"rider", $"fare", $"begin_lat", $"begin_lon", $"partitionpath", $"_hoodie_commit_time")
      .orderBy($"fare".desc, $"_hoodie_commit_time".desc)
      .show(20, truncate = false)
  }
  def queryDataByTime(spark: SparkSession, path: String):Unit = {
    import org.apache.spark.sql.functions._
    //方式一:指定字符串,按照日期时间过滤获取数据
    val df1 = spark.read
      .format("hudi")
      .option("as.of.instant", "20220610160908")
      .load(path)
      .sort(col("_hoodie_commit_time").desc)
    df1.printSchema()
    df1.show(numRows = 5, truncate = false)
    //方式二:指定字符串,按照日期时间过滤获取数据
    val df2 = spark.read
      .format("hudi")
      .option("as.of.instant", "2022-06-10 16:09:08")
      .load(path)
      .sort(col("_hoodie_commit_time").desc)
    df2.printSchema()
    df2.show(numRows = 5, truncate = false)
  }

  /**
   * 将DataGenerator作为参数传入生成数据
   */
  def insertData(spark: SparkSession, table: String, path: String, dataGen: DataGenerator): Unit = {
    import spark.implicits._
    // 第1步、模拟乘车数据
    import org.apache.hudi.QuickstartUtils._
    val inserts = convertToStringList(dataGen.generateInserts(100))
    import scala.collection.JavaConverters._
    val insertDF: DataFrame = spark.read.json(
      spark.sparkContext.parallelize(inserts.asScala, 2).toDS()
    )
    //    		insertDF.printSchema()
    //    		insertDF.show(10, truncate = false)
    //第二步: 插入数据到Hudi表
    import org.apache.hudi.DataSourceWriteOptions._
    import org.apache.hudi.config.HoodieWriteConfig._
    insertDF.write
      //更换为Overwrite模式
      .mode(SaveMode.Overwrite)
      .format("hudi")
      .option("hoodie.insert.shuffle.parallelism", 2)
      .option("hoodie.insert.shuffle.parallelism", 2)
      //Hudi表的属性设置
      .option(PRECOMBINE_FIELD.key(), "ts")
      .option(RECORDKEY_FIELD.key(), "uuid")
      .option(PARTITIONPATH_FIELD.key(), "partitionpath")
      .option(TBL_NAME.key(), table)
      .save(path)
  }
  /**
   * 模拟产生Hudi表中更新数据,将其更新到Hudi表中
   */
  def updateData(spark: SparkSession, table: String, path: String, dataGen: DataGenerator):Unit = {
    import spark.implicits._
    // 第1步、模拟乘车数据
    import org.apache.hudi.QuickstartUtils._
    //产生更新的数据
    val updates = convertToStringList(dataGen.generateUpdates(100))
    import scala.collection.JavaConverters._
    val updateDF: DataFrame = spark.read.json(
      spark.sparkContext.parallelize(updates.asScala, 2).toDS()
    )
    // TOOD: 第2步、插入数据到Hudi表
    import org.apache.hudi.DataSourceWriteOptions._
    import org.apache.hudi.config.HoodieWriteConfig._
    updateDF.write
      //追加模式
      .mode(SaveMode.Append)
      .format("hudi")
      .option("hoodie.insert.shuffle.parallelism", "2")
      .option("hoodie.upsert.shuffle.parallelism", "2")
      // Hudi 表的属性值设置
      .option(PRECOMBINE_FIELD.key(), "ts")
      .option(RECORDKEY_FIELD.key(), "uuid")
      .option(PARTITIONPATH_FIELD.key(), "partitionpath")
      .option(TBL_NAME.key(), table)
      .save(path)
  }
  /**
   *  采用Incremental Query增量方式查询数据,需要指定时间戳
   */
  def incrementalQueryData(spark: SparkSession, path: String): Unit = {
    import spark.implicits._
    // 第1步、加载Hudi表数据,获取commit time时间,作为增量查询数据阈值
    import org.apache.hudi.DataSourceReadOptions._
    spark.read
      .format("hudi")
      .load(path)
      .createOrReplaceTempView("view_temp_hudi_trips")
    val commits: Array[String] = spark
      .sql(
        """
				  |select
				  |  distinct(_hoodie_commit_time) as commitTime
				  |from
				  |  view_temp_hudi_trips
				  |order by
				  |  commitTime DESC
				  |""".stripMargin
      )
      .map(row => row.getString(0))
      .take(50)
    val beginTime = commits(commits.length - 1) // commit time we are interested in
    println(s"beginTime = ${beginTime}")
    // 第2步、设置Hudi数据CommitTime时间阈值,进行增量数据查询
    val tripsIncrementalDF = spark.read
      .format("hudi")
      // 设置查询数据模式为:incremental,增量读取
      .option(QUERY_TYPE.key(), QUERY_TYPE_INCREMENTAL_OPT_VAL)
      // 设置增量读取数据时开始时间
      .option(BEGIN_INSTANTTIME.key(), beginTime)
      .load(path)
    // 第3步、将增量查询数据注册为临时视图,查询费用大于20数据
    tripsIncrementalDF.createOrReplaceTempView("hudi_trips_incremental")
    spark
      .sql(
        """
				  |select
				  |  `_hoodie_commit_time`, fare, begin_lon, begin_lat, ts
				  |from
				  |  hudi_trips_incremental
				  |where
				  |  fare > 20.0
				  |""".stripMargin
      )
      .show(10, truncate = false)
  }
  /**
   * 删除Hudi表数据,依据主键uuid进行删除,如果是分区表,指定分区路径
   */
  def deleteData(spark: SparkSession, table: String, path: String): Unit = {
    import spark.implicits._
    // 第1步、加载Hudi表数据,获取条目数
    val tripsDF: DataFrame = spark.read.format("hudi").load(path)
    println(s"Raw Count = ${tripsDF.count()}")
    // 第2步、模拟要删除的数据,从Hudi中加载数据,获取几条数据,转换为要删除数据集合
    val dataframe = tripsDF.limit(2).select($"uuid", $"partitionpath")
    import org.apache.hudi.QuickstartUtils._
    val dataGenerator = new DataGenerator()
    val deletes = dataGenerator.generateDeletes(dataframe.collectAsList())
    import scala.collection.JavaConverters._
    val deleteDF = spark.read.json(spark.sparkContext.parallelize(deletes.asScala, 2))
    // 第3步、保存数据到Hudi表中,设置操作类型:DELETE
    import org.apache.hudi.DataSourceWriteOptions._
    import org.apache.hudi.config.HoodieWriteConfig._
    deleteDF.write
      .mode(SaveMode.Append)
      .format("hudi")
      .option("hoodie.insert.shuffle.parallelism", "2")
      .option("hoodie.upsert.shuffle.parallelism", "2")
      // 设置数据操作类型为delete,默认值为upsert
      .option(OPERATION.key(), "delete")
      .option(PRECOMBINE_FIELD.key(), "ts")
      .option(RECORDKEY_FIELD.key(), "uuid")
      .option(PARTITIONPATH_FIELD.key(), "partitionpath")
      .option(TBL_NAME.key(), table)
      .save(path)
    // 第4步、再次加载Hudi表数据,统计条目数,查看是否减少2条数据
    val hudiDF: DataFrame = spark.read.format("hudi").load(path)
    println(s"Delete After Count = ${hudiDF.count()}")
  }
  def main(args: Array[String]): Unit = {
    System.setProperty("HADOOP_USER_NAME","hty")
    //创建SparkSession示例对象,设置属性
    val spark: SparkSession = {
      SparkSession.builder()
        .appName(this.getClass.getSimpleName.stripSuffix("$"))
        .master("local[2]")
        // 设置序列化方式:Kryo
        .config("spark.serializer", "org.apache.spark.serializer.KryoSerializer")
        .getOrCreate()
    }
    //定义变量:表名称、保存路径
    val tableName: String = "tbl_trips_cow"
    val tablePath: String = "/hudi_warehouse/tbl_trips_cow"
    //构建数据生成器,模拟产生业务数据
    import org.apache.hudi.QuickstartUtils._
    //任务一:模拟数据,插入Hudi表,采用COW模式
    //insertData(spark, tableName, tablePath)
     //任务二:快照方式查询(Snapshot Query)数据,采用DSL方式
      //queryData(spark, tablePath)
    //queryDataByTime(spark, tablePath)
    // 任务三:更新(Update)数据,第1步、模拟产生数据,第2步、模拟产生数据,针对第1步数据字段值更新,
    // 第3步、将数据更新到Hudi表中
    val dataGen: DataGenerator = new DataGenerator()
    //insertData(spark, tableName, tablePath, dataGen)
    //updateData(spark, tableName, tablePath, dataGen)
    //任务四:增量查询(Incremental Query)数据,采用SQL方式
    //incrementalQueryData(spark, tablePath)
    //任务五:删除(Delete)数据
    deleteData(spark, tableName,tablePath)
    //应用结束,关闭资源
    spark.stop()
  }
}
测试
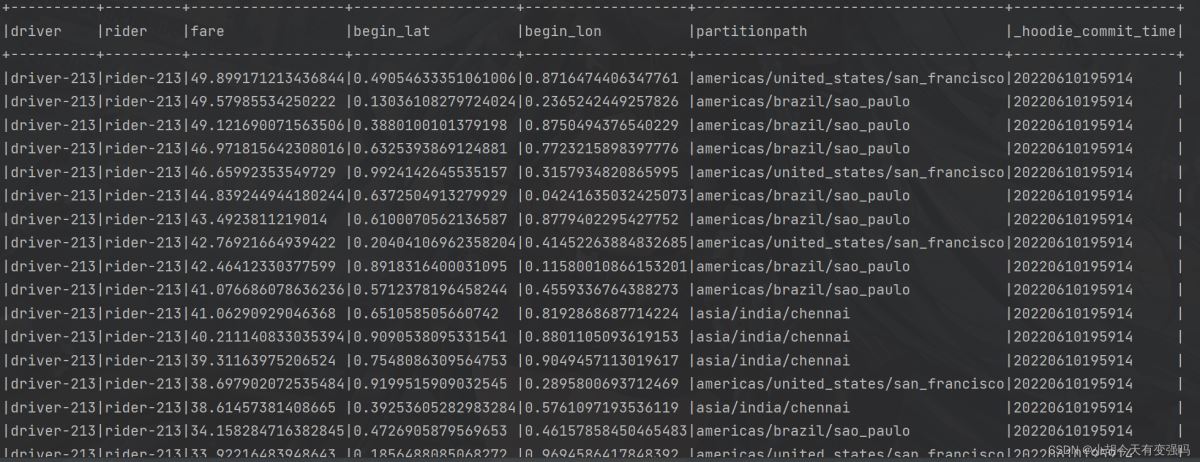
执行 insertData(spark, tableName, tablePath) 方法后对其用快照查询的方式进行查询:
queryData(spark, tablePath)
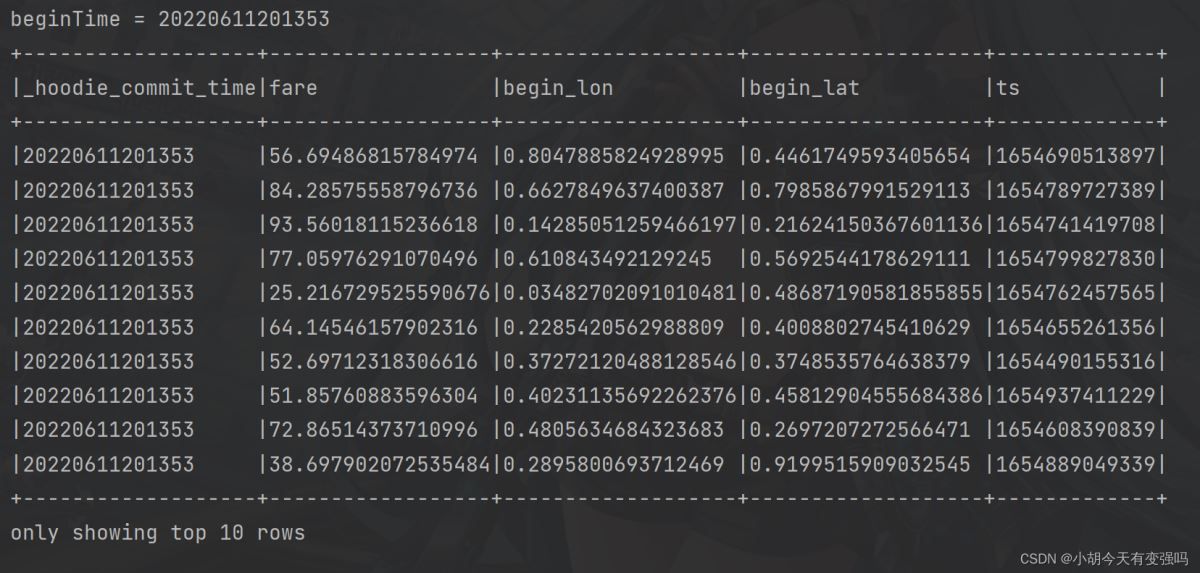
增量查询(Incremental Query)数据:
incrementalQueryData(spark, tablePath)
参考资料
https://www.bilibili.com/video/BV1sb4y1n7hK?p=21&vd_source=e21134e00867aeadc3c6b37bb38b9eee
到此这篇关于IDEA 中使用 Hudi的文章就介绍到这了,更多相关IDEA 使用 Hudi内容请搜索我们以前的文章或继续浏览下面的相关文章希望大家以后多多支持我们!
相关推荐
-

Apache Hudi集成Spark SQL操作hide表
目录 1. 摘要 2. 环境准备 2.1 启动spark-sql 2.2 设置并发度 3. Create Table 4. Insert Into 4.1 Insert 4.2 Select 5. Update 5.1 Update 5.2 Select 6. Delete 6.1 Delete 6.2 Select 7. Merge Into 7.1 Merge Into Insert 7.2 Select 7.4 Merge Into Update 7.5 Select 7.6 Merge
-
Apache教程Hudi与Hive集成手册
目录 1. Hudi表对应的Hive外部表介绍 2. Hive对Hudi的集成 3. 创建Hudi表对应的hive外部表 4. 查询Hudi表对应的Hive外部表 4.1 操作前提 4.2 COW类型Hudi表的查询 4.2.1 COW表实时视图查询 4.2.2 COW表增量查询 4.3 MOR类型Hudi表的查询 4.3.1 MOR表读优化视图 4.3.2 MOR表实时视图 4.3.3 MOR表增量查询 5. Hive侧源码修改 1. Hudi表对应的Hive外部表介绍 Hudi源表对应一份H
-
IDEA 中使用 Hudi的示例代码
目录 环境准备 核心代码 测试 参考资料 环境准备 创建 Maven 项目创建服务器远程连接Tools------Delployment-----Browse Remote Host 设置如下内容: 在这里输入服务器的账号和密码 点击Test Connection,提示Successfully的话,就说明配置成功. 复制Hadoop的 core-site.xml.hdfs-site.xml 以及 log4j.properties 三个文件复制到resources文件夹下. 设置 log4j.pr
-
JavaScript中removeChild 方法开发示例代码
1. 概述 删除后的节点虽然不在文档树中了,但其实它还在内存中,可以随时再次被添加到别的位置. 当你遍历一个父节点的子节点并进行删除操作时,要注意,children属性是一个只读属性,并且它在子节点变化时会实时更新 // 拿到待删除节点: var self = document.getElementById('to-be-removed'); // 拿到父节点: var parent = self.parentElement; // 删除: var removed = parent.remove
-
如何在vue中使用ts的示例代码
本文介绍了如何在vue中使用ts的示例代码,分享给大家,具体如下: 注意:此文并不是把vue改为全部替换为ts,而是可以在原来的项目中植入ts文件,目前只是实践阶段,向ts转化过程中的过渡. ts有什么用? 类型检查.直接编译到原生js.引入新的语法糖 为什么用ts? TypeScript的设计目的应该是解决JavaScript的"痛点":弱类型和没有命名空间,导致很难模块化,不适合开发大型程序.另外它还提供了一些语法糖来帮助大家更方便地实践面向对象的编程. typescript不仅可
-
Python中字符串与编码示例代码
在最新的Python 3版本中,字符串是以Unicode编码的,即Python的字符串支持多语言 编码和解码 字符串在内存中以Unicode表示,在操作字符串时,经常需要str和bytes互相转换 如果在网络上传输或保存到磁盘上,则从内存读到的数据就是str,要把str变为以字节为单位的bytes,称为编码 如果从网络或磁盘上读取字节流,则从网络或磁盘上读到的数据就是bytes,要把bytes变为str,称为解码 为避免乱码问题,应当始终坚持使用UTF-8编码对str和bytes进行
-
Java 添加、替换、删除PDF中的图片的示例代码
概述 本文介绍通过java程序向PDF文档添加图片,以及替换和删除PDF中已有的图片.另外,关于图片的操作还可参考设置PDF 图片背景.设置PDF图片水印.读取PDF中的图片.将PDF保存为图片等文章. 工具:Free Spire.PDF for Java (免费版) Jar获取及导入:官网下载,并解压将lib文件夹下的jar文件导入java程序,或者通过maven仓库下载并导入. jar导入效果: Java代码示例 [示例1]添加图片到PDF import com.spire.pdf.*; i
-
在Java中操作Zookeeper的示例代码详解
依赖 <dependency> <groupId>org.apache.zookeeper</groupId> <artifactId>zookeeper</artifactId> <version>3.6.0</version> </dependency> 连接到zkServer //连接字符串,zkServer的ip.port,如果是集群逗号分隔 String connectStr = "192.
-
在Vue中使用antv的示例代码
一,在vue原型中使用 1.首先安装antv/g2 yarn add @antv/g2 --save 2.在main.js中挂在到vue原型实例中 const G2 = require('@antv/g2') Vue.prototype.$G2 = G2 3.在vue文件中可以直接在mounted生命周期中直接使用 <template> <div> <div id="c1"></div> </div> </templat
-
SpringBoot中实现数据字典的示例代码
我们在日常的项目开发中,对于数据字典肯定不模糊,它帮助了我们更加方便快捷地进行开发,下面一起来看看在 SpringBoot 中如何实现数据字典功能的 一.简介 1.定义 数据字典是指对数据的数据项.数据结构.数据流.数据存储.处理逻辑等进行定义和描述,其目的是对数据流程图中的各个元素做出详细的说明,使用数据字典为简单的建模项目.简而言之,数据字典是描述数据的信息集合,是对系统中使用的所有数据元素的定义的集合. 数据字典(Data dictionary)是一种用户可以访问的记录数据库和应用程序元数
-
C++实现删除txt文件中指定内容的示例代码
默认明白C++的文件输入输出流 方法: 新建一个中间文件,逐行读取原文件(test.txt)的内容并写入到中间文件(temp.txt),遇到需要删除的内容则跳过. 再将中间文件的内容写入原文件,删除中间文件. fstream in("C:\\Users\\Administrator\\Desktop\\test.txt", ios::in);//原文件 fstream out("C:\\Users\\Administrator\\Desktop\\temp.txt"
-
如何在ASP.NET Core中使用Session的示例代码
ASP.NET Core 是一个跨平台,开源的,轻量级,高性能 并且 高度模块化的web框架,Session 可以实现用户信息存储从而可以在同一个客户端的多次请求之间实现用户追踪,在 ASP.Net Core 中可以使用 Microsoft.AspNetCore.Session 中间件来启用 Session 机制. 中间件的价值在于可以在 request -> response 的过程中做一些定制化的操作,比如说:监视数据,切换路由,修改流转过程中的消息体,通常来说:中间件是以链式的方式灌入到