Python基础教程之pytest参数化详解
目录
- 前言
- 源代码分析
- 装饰测试类
- 装饰测试函数
- 单个数据
- 一组数据
- 组合数据
- 标记用例
- 嵌套字典
- 增加测试结果可读性
- 总结
前言
上篇博文介绍过,pytest是目前比较成熟功能齐全的测试框架,使用率肯定也不断攀升。在实际
工作中,许多测试用例都是类似的重复,一个个写最后代码会显得很冗余。这里,我们来了解一下
@pytest.mark.parametrize装饰器,可以很好的解决上述问题。
源代码分析
def parametrize(self,argnames, argvalues, indirect=False, ids=None, scope=None):
  """ Add new invocations to the underlying test function using the list
    of argvalues for the given argnames.  Parametrization is performed
      during the collection phase.  If you need to setup expensive resources
    see about setting indirect to do it rather at test setup time.  # 使用给定argnames的argValue列表向基础测试函数添加新的调用,在收集阶段执行参数化。

    :arg argnames: a comma-separated string denoting one or more argument
                   names, or a list/tuple of argument strings.  # 参数名:使用逗号分隔的字符串,列表或元祖,表示一个或多个参数名

    :arg argvalues: The list of argvalues determines how often a
        test is invoked with different argument values.  If only one
        argname was specified argvalues is a list of values.  If N
        argnames were specified, argvalues must be a list of N-tuples,
        where each tuple-element specifies a value for its respective
        argname.  # 参数值:只有一个argnames,argvalues则是值列表。有N个argnames时,每个元祖对应一组argnames,所有元祖组合成一个列表

    :arg indirect: The list of argnames or boolean. A list of arguments'
        names (self,subset of argnames). If True the list contains all names from
        the argnames. Each argvalue corresponding to an argname in this list will
        be passed as request.param to its respective argname fixture
        function so that it can perform more expensive setups during the
        setup phase of a test rather than at collection time.

    :arg ids: list of string ids, or a callable.
        If strings, each is corresponding to the argvalues so that they are
        part of the test id. If None is given as id of specific test, the
        automatically generated id for that argument will be used.
        If callable, it should take one argument (self,a single argvalue) and return
        a string or return None. If None, the automatically generated id for that
        argument will be used.
        If no ids are provided they will be generated automatically from
        the argvalues.  # ids:字符串列表,可以理解成标题,与用例个数保持一致

    :arg scope: if specified it denotes the scope of the parameters.
        The scope is used for grouping tests by parameter instances.
        It will also override any fixture-function defined scope, allowing
        to set a dynamic scope using test context or configuration.
  # 如果指定,则表示参数的范围。作用域用于按参数实例对测试进行分组。
   它还将覆盖任何fixture函数定义的范围,允许使用测试上下文或配置设置动态范围。
    """
argnames
释义:参数名称
格式:字符串"arg1,arg2,arg3"
aegvalues
释义:参数值列表
格式:必须是列表,如[val1,val2,val3]
单个参数,里面是值的列表,如@pytest.mark.parametrize("name",["Jack","Locus","Bill"])
多个参数,需要用元祖来存放值,一个元祖对应一组参数的值,如@pytest.mark.parametrize("user,age",[("user1",15),("user2",24),("user3",25)])
ids
释义:可以理解为用例的id
格式:字符串列表,如["case1","case2","case3"]
indirect
释义:当indirect=True时,若传入的argnames是fixture函数名,此时fixture函数名将成为一个可执行的函数,
argvalues作为fixture的参数,执行fixture函数,最终结果再存入 request.param;当indirect=False时,fixture
函数只作为一个参数名给测试收集阶段调用。
备注:这里可以将the setup phase(测试设置阶段)理解为配置 conftest.py 阶段,将the collection phase(
测试收集阶段)理解为用例执行阶段。
装饰测试类
import pytest

data = [
    (2,2,4),
    (3,4,12)
]

def add(a,b):
    return a * b

@pytest.mark.parametrize('a,b,expect',data)
class TestParametrize(object):
    def test_parametrize_1(self,a,b,expect):
        print('\n测试函数1测试数据为\n{}-{}'.format(a,b))
        assert add(a,b) == expect

    def test_parametrize_2(self,a,b,expect):
        print('\n测试函数2测试数据为\n{}-{}'.format(a,b))
        assert add(a,b) == expect

if __name__ == "__main__":
    pytest.main(["-s","test_07.py"])
============================= test session starts =============================
platform win32 -- Python 3.8.0, pytest-6.2.5, py-1.11.0, pluggy-1.0.0
rootdir: D:\AutoCode
plugins: html-3.1.1, metadata-1.11.0
collecting ... collected 4 items

test_07.py::TestParametrize::test_parametrize_1[2-2-4]
测试函数1测试数据为
2-2
PASSED
test_07.py::TestParametrize::test_parametrize_1[3-4-12]
测试函数1测试数据为
3-4
PASSED
test_07.py::TestParametrize::test_parametrize_2[2-2-4]
测试函数2测试数据为
2-2
PASSED
test_07.py::TestParametrize::test_parametrize_2[3-4-12]
测试函数2测试数据为
3-4
PASSED

============================== 4 passed in 0.12s ==============================

Process finished with exit code 0
由以上代码可以看到,当装饰器装饰测试类时,定义的数据集合会被传递给类的所有方法。
装饰测试函数
单个数据
import pytest

data = ["Rose","white"]

@pytest.mark.parametrize("name",data)
def test_parametrize(name):
    print('\n列表中的名字为\n{}'.format(name))

if __name__ == "__main__":
    pytest.main(["-s","test_07.py"])
============================= test session starts =============================
platform win32 -- Python 3.8.0, pytest-6.2.5, py-1.11.0, pluggy-1.0.0
rootdir: D:\AutoCode
plugins: html-3.1.1, metadata-1.11.0
collected 2 items

test_07.py
列表中的名字为
Rose
.
列表中的名字为
white
.

============================== 2 passed in 0.09s ==============================

Process finished with exit code 0
当测试用例只需要一个参数时,我们存放数据的列表无序嵌套序列,@pytest.mark.parametrize("name", data)
装饰器的第一个参数也只需要一个变量接收列表中的每个元素,第二个参数传递存储数据的列表,那么测试用
例需要使用同名的字符串接收测试数据(实例中的name)且列表有多少个元素就会生成并执行多少个测试用例。
一组数据
import pytest

data = [
    [1, 2, 3],
    [4, 5, 9]
]  # 列表嵌套列表
# data_tuple = [
#     (1, 2, 3),
#     (4, 5, 9)
# ]  # 列表嵌套元组

@pytest.mark.parametrize('a, b, expect', data)
def test_parametrize_1(a, b, expect):  # 一个参数接收一个数据
    print('\n测试数据为\n{},{},{}'.format(a, b, expect))
    actual = a + b
    assert actual == expect

@pytest.mark.parametrize('value', data)
def test_parametrize_2(value):  # 一个参数接收一组数据
    print('\n测试数据为\n{}'.format(value))
    actual = value[0] + value[1]
    assert actual == value[2]

if __name__ == "__main__":
    pytest.main(["-s","test_07.py"])
============================= test session starts =============================
platform win32 -- Python 3.8.0, pytest-6.2.5, py-1.11.0, pluggy-1.0.0
rootdir: D:\AutoCode
plugins: html-3.1.1, metadata-1.11.0
collected 4 items

test_07.py
测试数据为
1,2,3
.
测试数据为
4,5,9
.
测试数据为
[1, 2, 3]
.
测试数据为
[4, 5, 9]
.

============================== 4 passed in 0.09s ==============================

Process finished with exit code 0
当测试用例需要多个数据时,我们可以使用嵌套序列(嵌套元组&嵌套列表)的列表来存放测试数据。
装饰器@pytest.mark.parametrize()可以使用单个变量接收数据,也可以使用多个变量接收,同样,测
试用例函数也需要与其保持一致。
当使用单个变量接收时,测试数据传递到测试函数内部时为列表中的每一个元素或者小列表,需
要使用索引的方式取得每个数据。
当使用多个变量接收数据时,那么每个变量分别接收小列表或元组中的每个元素列表嵌套多少个多
组小列表或元组,测生成多少条测试用例。
组合数据
import pytest

data_1 = [1,2,3]
data_2 = ['a','b']

@pytest.mark.parametrize('a',data_1)
@pytest.mark.parametrize('b',data_2)
def test_parametrize_1(a,b):
    print(f'笛卡尔积测试结果为:{a},{b}')

if __name__ == '__main__':
    pytest.main(["-vs","test_06.py"])
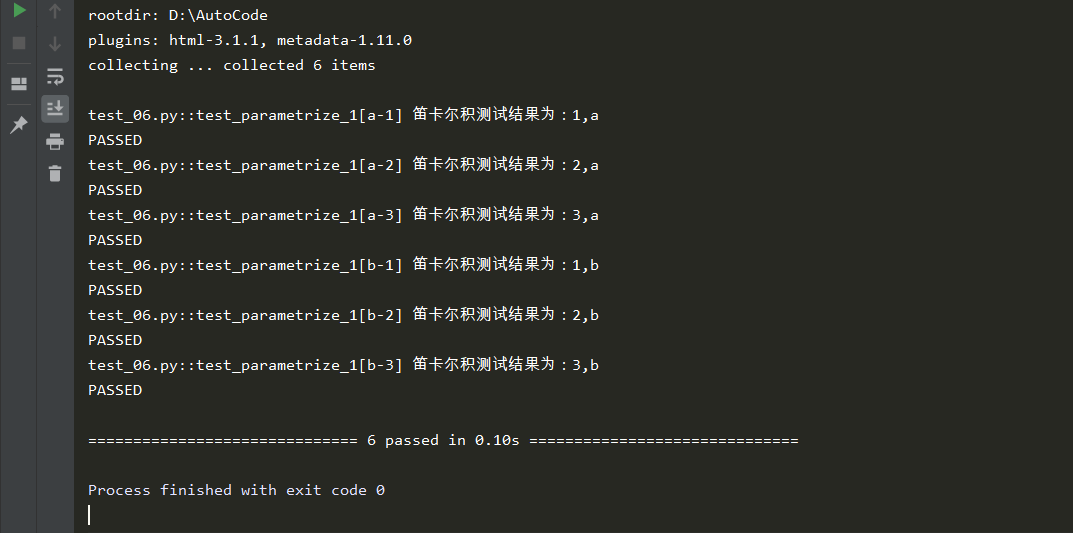
通过测试结果,我们不难分析,一个测试函数还可以同时被多个参数化装饰器装饰,那么多个
装饰器中的数据会进行交叉组合的方式传递给测试函数,进而生成n * n个测试用例。
标记用例
import pytest

@pytest.mark.parametrize("test_input,expected",[
    ("3+5",8),
    ("2+4",6),
    pytest.param("6 * 9",42,marks=pytest.mark.xfail),
    pytest.param("6 * 6",42,marks=pytest.mark.skip)
])

def test_mark(test_input,expected):
    assert eval(test_input) == expected

if __name__ == '__main__':
    pytest.main(["-vs","test_06.py"])

输出结果显示收集到4个用例,两个通过,一个被跳过,一个标记失败,当我们不想执行某组测试
数据时,我们可以标记skip或skipif;当我们预期某组数据会执行失败时,我们可以标记为xfail等。
嵌套字典
import pytest
data = (
{
'user': "name1",
'pwd': 123
},
{
'user': "name2",
'pwd': 456
}
)
@pytest.mark.parametrize('dic',data)
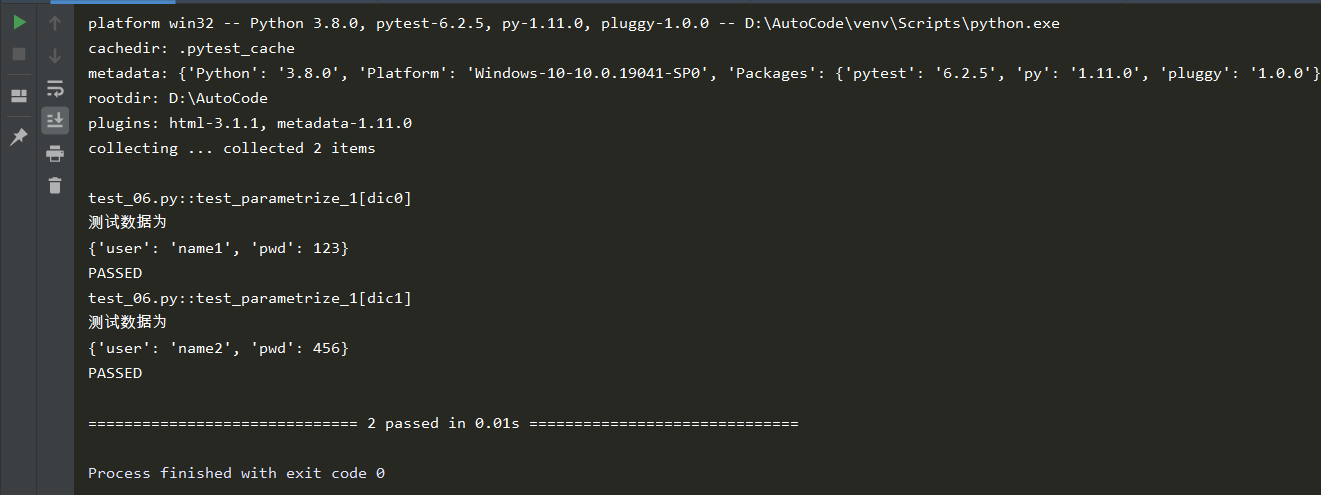
def test_parametrize(dic):
print('\n测试数据为\n{}'.format(dic))
if __name__ == '__main__':
pytest.main(["-vs","test_06.py"])
增加测试结果可读性
参数化装饰器有一个额外的参数ids,可以标识每一个测试用例,自定义测试数据结果的显示,
为了增加可读性,我们可以标记每一个测试用例使用的测试数据是什么,适当的增加一些说明。
在使用前你需要知道,ids参数应该是一个字符串列表,必须和数据对象列表的长度保持一致。
import pytest

data_1 = [
    (1, 2, 3),
    (4, 5, 9)
]

ids = ["a:{} + b:{} = expect:{}".format(a, b, expect) for a, b, expect in data_1]

def add(a, b):
    return a + b

@pytest.mark.parametrize('a, b, expect', data_1, ids=ids)
class TestParametrize(object):

    def test_parametrize_1(self, a, b, expect):
        print('\n测试函数1测试数据为\n{}-{}'.format(a, b))
        assert add(a, b) == expect

    def test_parametrize_2(self, a, b, expect):
        print('\n测试函数2数据为\n{}-{}'.format(a, b))
        assert add(a, b) == expect

if __name__ == '__main__':
    pytest.main(["-v","test_06.py"])
不加ids参数的返回结果

加ids参数的返回结果

我们可以看到带ids参数的返回结果中的用例都被一个列表明确的标记了,而且通过这种标记
可以更加直观的看出来,每个测试用例使用的数据名称及测试内容。
总结
到此这篇关于Python基础教程之pytest参数化详解的文章就介绍到这了,更多相关Python pytest参数化内容请搜索我们以前的文章或继续浏览下面的相关文章希望大家以后多多支持我们!
相关推荐
-
pytest实现测试用例参数化
背景 本文总结pytest的测试用例参数化. 说明 软件测试中,输入相应值,检查期望值,是常见测试方法. 在自动化测试中,一个测试用例对应一个测试点,通常一组测试数据无法完全覆盖测试范围,所以,需要参数化来传递多组数据. pytest的测试用例参数化使用如下装饰器即可完成. @pytest.mark.parametrize(argnames, argvalues) # 参数: # argnames:以逗号分隔的字符串 # argvaluse: 参数值列表,若有多个参数,一组参数以元组形式存在,包
-
Pytest参数化parametrize使用代码实例
这篇文章主要介绍了Pytest参数化parametrize使用代码实例,文中通过示例代码介绍的非常详细,对大家的学习或者工作具有一定的参考学习价值,需要的朋友可以参考下 在测试用例的前面加上: @pytest.mark.parametrize("参数名",列表数据) 参数名:用来接收每一项数据,并作为测试用例的参数. 列表数据:一组测试数据. 示例代码: import pytest test_datas = [ (11, 22, 33), (22, 33, 55) ] datas_di
-
Pytest单元测试框架如何实现参数化
1.传入单个参数 pytest.mark.parametrize(argnames,argvalues) argnames:参数名 argvalues:参数对应的值,类型必须为可迭代类型,一般为 list import pytest class Test01(): @pytest.mark.parametrize("school",["深圳多测师","广州多测师","上海多测师"]) def test_dcs(self,sch
-

Python基础教程之pytest参数化详解
目录 前言 源代码分析 装饰测试类 装饰测试函数 单个数据 一组数据 组合数据 标记用例 嵌套字典 增加测试结果可读性 总结 前言 上篇博文介绍过,pytest是目前比较成熟功能齐全的测试框架,使用率肯定也不断攀升.在实际 工作中,许多测试用例都是类似的重复,一个个写最后代码会显得很冗余.这里,我们来了解一下 @pytest.mark.parametrize装饰器,可以很好的解决上述问题. 源代码分析 def parametrize(self,argnames, argvalues, indir
-
MySQL基础教程之DML语句详解
目录 DML 语句 1.插入记录 2.更新记录 3.简单查询记录 4.删除记录 5.查询记录详解(DQL语句) 5.1.查询不重复的记录 5.2.条件查询 5.3.聚合查询 5.4.排序查询 5.5.limit查询 5.6.连表查询 5.7.子查询 5.8.记录联合 5.9.select语句的执行顺序 6.总结 DML 语句 DML(Data Manipulation Language)语句:数据操纵语句. 用途:用于添加.修改.删除和查询数据库记录,并检查数据完整性. 常用关键字:insert
-
Docker基础教程之Dockerfile语法详解
前言 Dockfile是一种被Docker程序解释的脚本,Dockerfile由一条一条的指令组成,每条指令对应Linux下面的一条命令.Docker程序将这些Dockerfile指令翻译真正的Linux命令.Dockerfile有自己书写格式和支持的命令,Docker程序解决这些命令间的依赖关系,类似于Makefile.Docker程序将读取Dockerfile,根据指令生成定制的image.相比image这种黑盒子,Dockerfile这种显而易见的脚本更容易被使用者接受,它明确的表明ima
-
android基础教程之context使用详解
在android中有两种context,一种是application context,一种是activity context,通常我们在各种类和方法间传递的是activity context. 区别联系: 复制代码 代码如下: public class MyActivity extends Activity { public void method() { mContext = this; // since Activity extends Context m
-
Python基础教程之if判断,while循环,循环嵌套
if判断 判断的定义 如果条件满足,就做一件事:条件不满足,就做另一件事: 判断语句又被称为分支语句,有判断,才有分支: if判断语句基本语法 if语句格式: if 判断的条件: 条件成立后做的事 ... ... 代码缩进为一个tab键,或者四个空格,官方建议使用空格:但应注意,在python开发中,tab和空格不能混用! 判断年龄示例: # 判断是否成年,成年则可以进网吧 age = 19 if age>=18: print("你满了18岁,可以进网吧") i
-
基于Android studio3.6的JNI教程之opencv实例详解
基本环境: Android studio3.6 NDK:r14b(尽量使用该版本) Opencv3.4.1 android sdk (1)新建工程OpenCVDemo,选择,一定要选择Native c++类型,最后要选c++14支持. (2)File->Project Structure->SDK Location,设置这3个路径,NDK选择r14b. (3)任意找一张图片,复制到res/drawable. (4)修改布局文件res/layout/ activity_main.xml <
-
基于Android studio3.6的JNI教程之helloworld思路详解
jdk环境变量配置: path中增加下面2个路径,也就是android studio的路径,android有自带的jdk. E:\Android\Android Studio\jre\bin E:\Android\Android Studio\bin 新建工程: 一定要选择Native c++类型,最后要选c++11支持. SDK设置: File->Settings File->Project Structure 首先确定工程的目录结构,然后尝试运行一下工程,使用模拟器,确保工程没问题, 在M
-
ES6学习教程之Promise用法详解
前言 promise用了这么多年了,一直也没有系统整理过.今天整理整理promise的相关东西,感兴趣的可以一起看一看.我尽量用更容易理解的语言来剖析一下promise 我准备分两篇文章来说明一下promise 一篇来理解和使用promise(本篇) 另一篇来从promise使用功能的角度来剖析下promise的源码(下一篇) 1.什么是Promise 我的理解是:实现让我们用同步的方式去写异步代码的一种技术.是异步解决方案的一种. 他可以将多个异步操作进行队列化,让它们可以按照我们的想法去顺序
-
Python基础知识之变量的详解
一.定义 在python中,变量名只有在第一次出现的时候,才是定义变量.当再次出现时,不是定义变量,而是直接调用之前定义的变量. 二.命名方法 2.1小驼峰命名法 第一个单词以小写字母开始,后续单词的首字母大写 firstName , lastName 2.2大驼峰命名法 每一个单词的首字母都采用大写字母 FirstName , LastName 2.3下划线命名法 每个单词之间用下划线连接起来 first_name , last_name 三.命名规则 3.1标识符 开发人员自定义的一些符号和
-
Python多线程编程之threading模块详解
一.介绍 线程是什么?线程有啥用?线程和进程的区别是什么? 线程是操作系统能够进行运算调度的最小单位.被包含在进程中,是进程中的实际运作单位.一条线程指的是进程中一个单一顺序的控制流,一个进程中可以并发多个线程,每条线程并行执行不同的任务. 二.Python如何创建线程 2.1 方法一: 创建Thread对象 步骤: 1.目标函数 2.实例化Thread对象 3.调用start()方法 import threading # 目标函数1 def fun1(num): for i in range(